If you love a little spooky with your sparkle, then The Nightmare Before Christmas is the perfect holiday inspiration. I’m Richa, and in this post, we’re diving into Nightmare Before Christmas Decorations Ideas that bring the magic of Halloween and Christmas together—just like Jack Skellington’s unforgettable journey from Halloween Town to Christmas Town.
This cult classic has become more than just a movie—it’s a full-blown decorating aesthetic! With its blend of eerie charm and festive cheer, The Nightmare Before Christmas gives you the freedom to mix skeletons with snowflakes, pumpkins with presents, and spooky vibes with merry magic. Whether you’re decorating for Halloween, Christmas, or both, these ideas will help you capture the whimsy, wonder, and slightly ghoulish glow of this beloved film.
Let’s explore some enchanting ways to bring Jack, Sally, Zero, and the rest of Halloween Town into your home this holiday season!

Amazing Nightmare Before Christmas Decorations Ideas
1. Jack Skellington Wreath
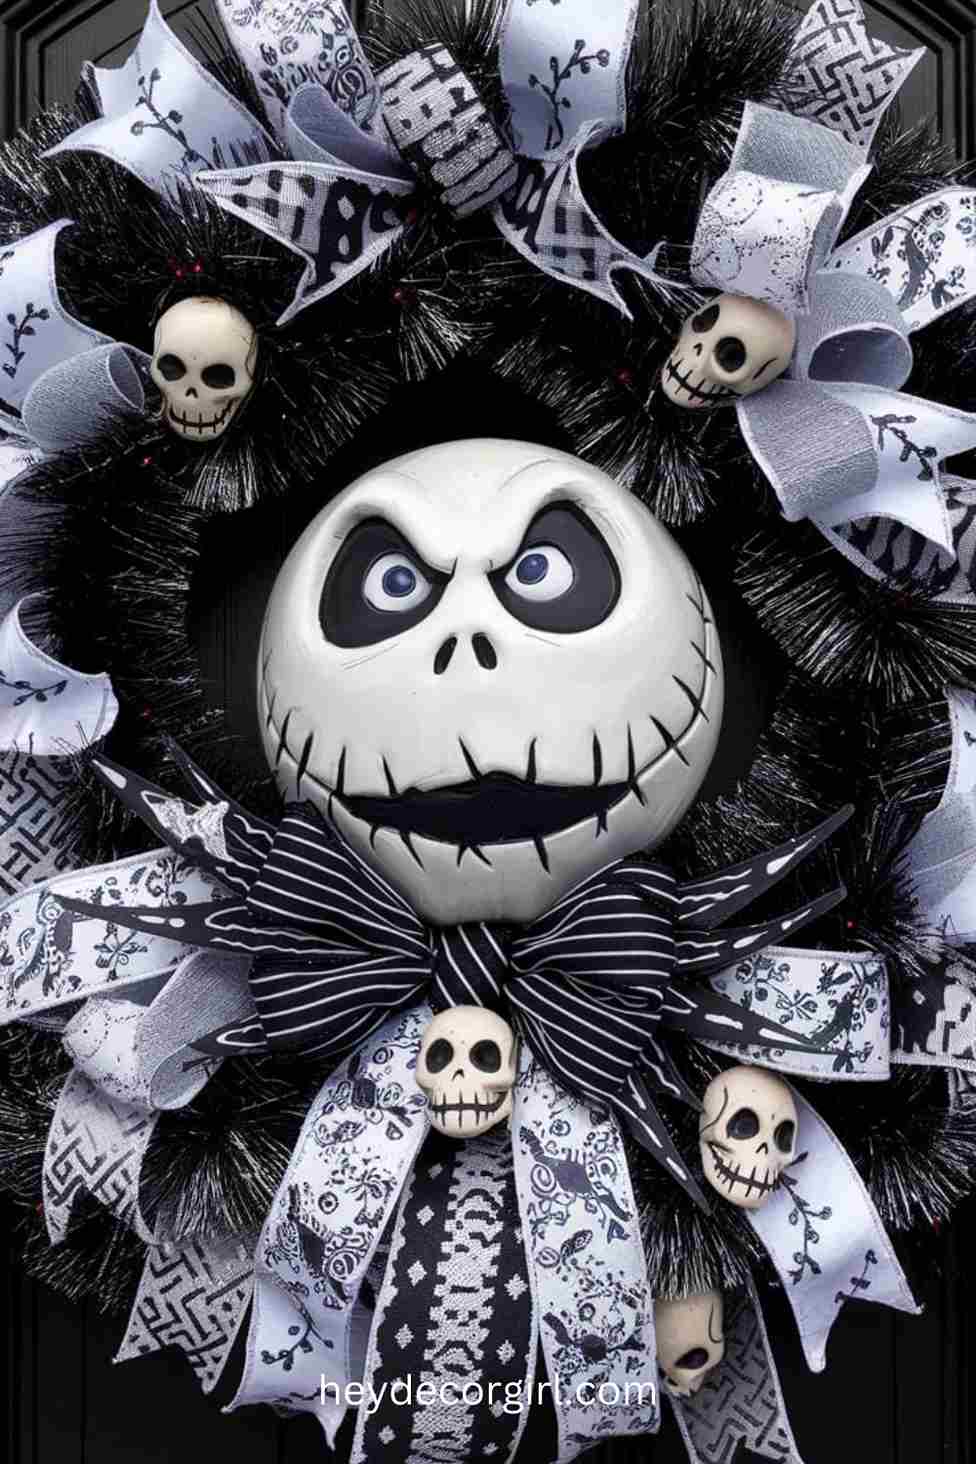
Create a hauntingly festive wreath featuring Jack Skellington, the iconic face of The Nightmare Before Christmas, as the centerpiece. This wreath combines a Halloween look with Christmas cheer, making it versatile enough to display all season long.
Materials Needed:
- Black and white ribbons (in various patterns like stripes and polka dots)
- Black tinsel garland
- Mini plastic skulls or other small Halloween-themed ornaments
- A foam or wire wreath form
- A printable or foam cut-out of Jack Skellington’s face
- Hot glue gun and glue sticks
- Optional: small LED lights for an eerie glow
Instructions:
- Begin by wrapping the wreath form with black tinsel garland, securing the ends with hot glue.
- Cut the black and white ribbons into strips and tie them around the wreath in various spots for added texture and contrast.
- Attach Jack Skellington’s face to the center of the wreath. You can print an image and laminate it or use foam to create a sturdier piece.
- Hot glue the mini skulls around the wreath in a balanced, scattered pattern.
- If desired, weave small LED lights through the wreath for a glowing effect.
Hang this Jack Skellington wreath on your front door or inside your home to greet guests with a spooky, festive vibe that fans of the movie will instantly recognize!
2. Halloween-Christmas Tree

Bring holiday magic to life with a whimsical Halloween-Christmas tree inspired by The Nightmare Before Christmas. Blend classic Christmas elements with spooky Halloween charm using themed ornaments like Jack Skellington foam balls, Zero the ghost dog made of white felt, and Oogie Boogie’s dice crafted from green foam cubes. Add Sandy Claws using a mini Santa-suited Jack and jack-o’-lantern ornaments for a fun Pumpkin King twist.
To complete the look, string black and white lights for a spooky glow, and drape black tinsel garland for added flair. Mix in spider, bat, and classic red-and-gold ornaments to balance eerie with festive. The result? A one-of-a-kind tree that’s equal parts spooky and cheerful—perfect for fans who love celebrating both holidays in imaginative style.
3. Zero’s Light-Up Doghouse
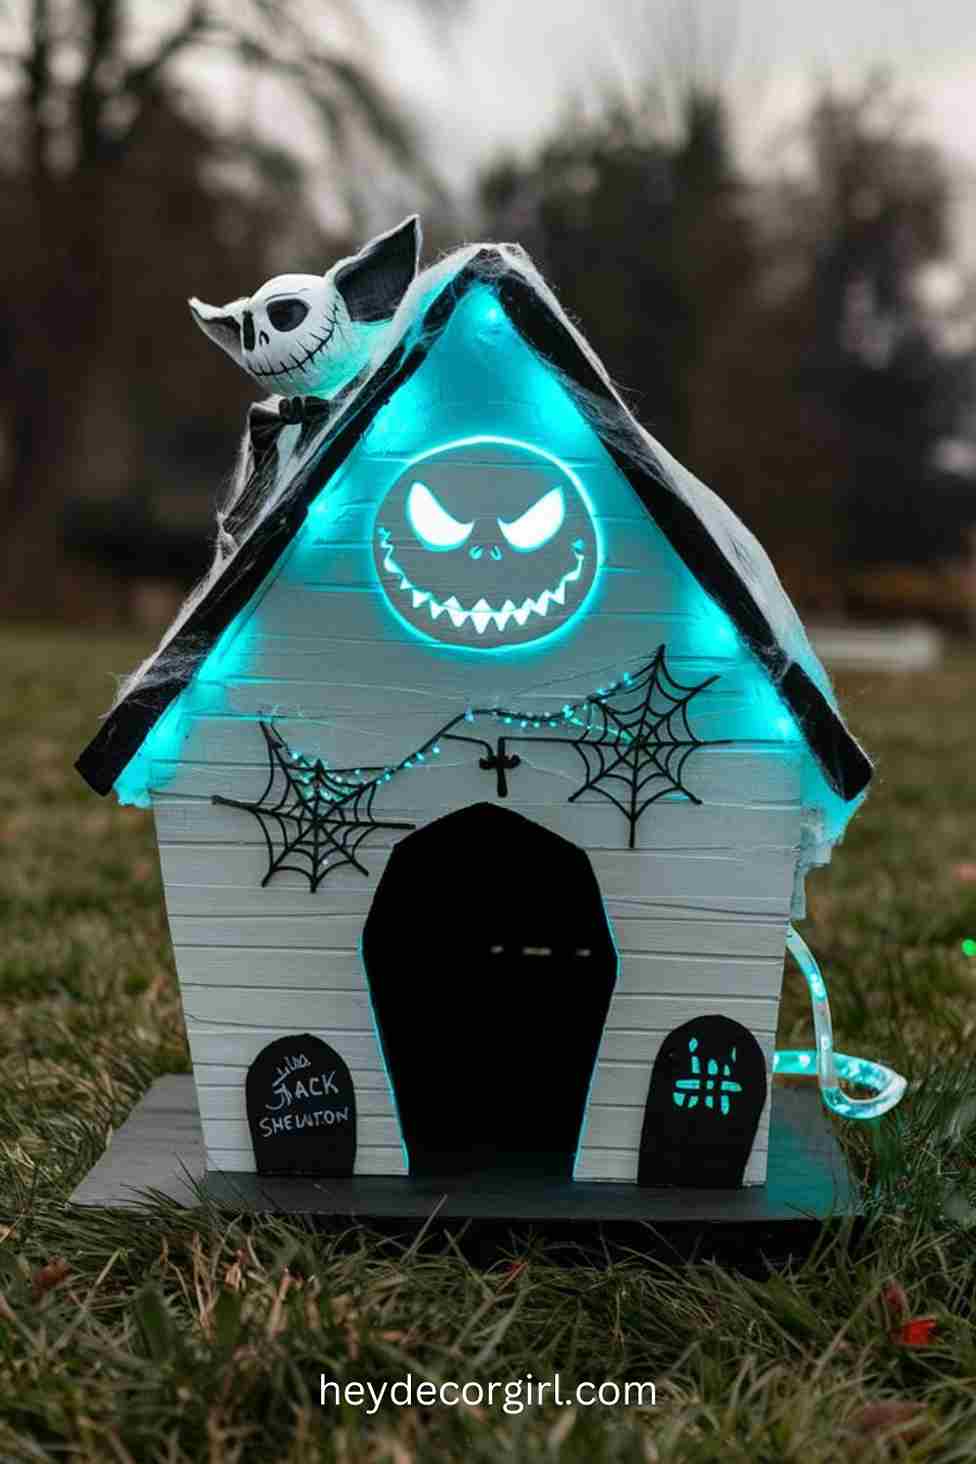
Bring The Nightmare Before Christmas to life with a DIY Zero’s glowing doghouse—a spooky yet heartwarming piece perfect for Halloween or Christmas displays. Use a small wooden or cardboard box as the base, paint it white, and add black accents for the doorway and bone details. For the roof, attach transparent plastic or thin white fabric to diffuse the glow. Inside, string soft LED lights to create an eerie but inviting ambiance.
To complete the look, add Halloween-themed touches like faux bones or a handmade Zero figure beside the house. Choose flickering or colored LEDs (like purple or green) for a more haunting effect. This simple yet magical project is sure to enchant guests and fans alike with its ghostly glow and festive charm.
4. Oogie Boogie Garland
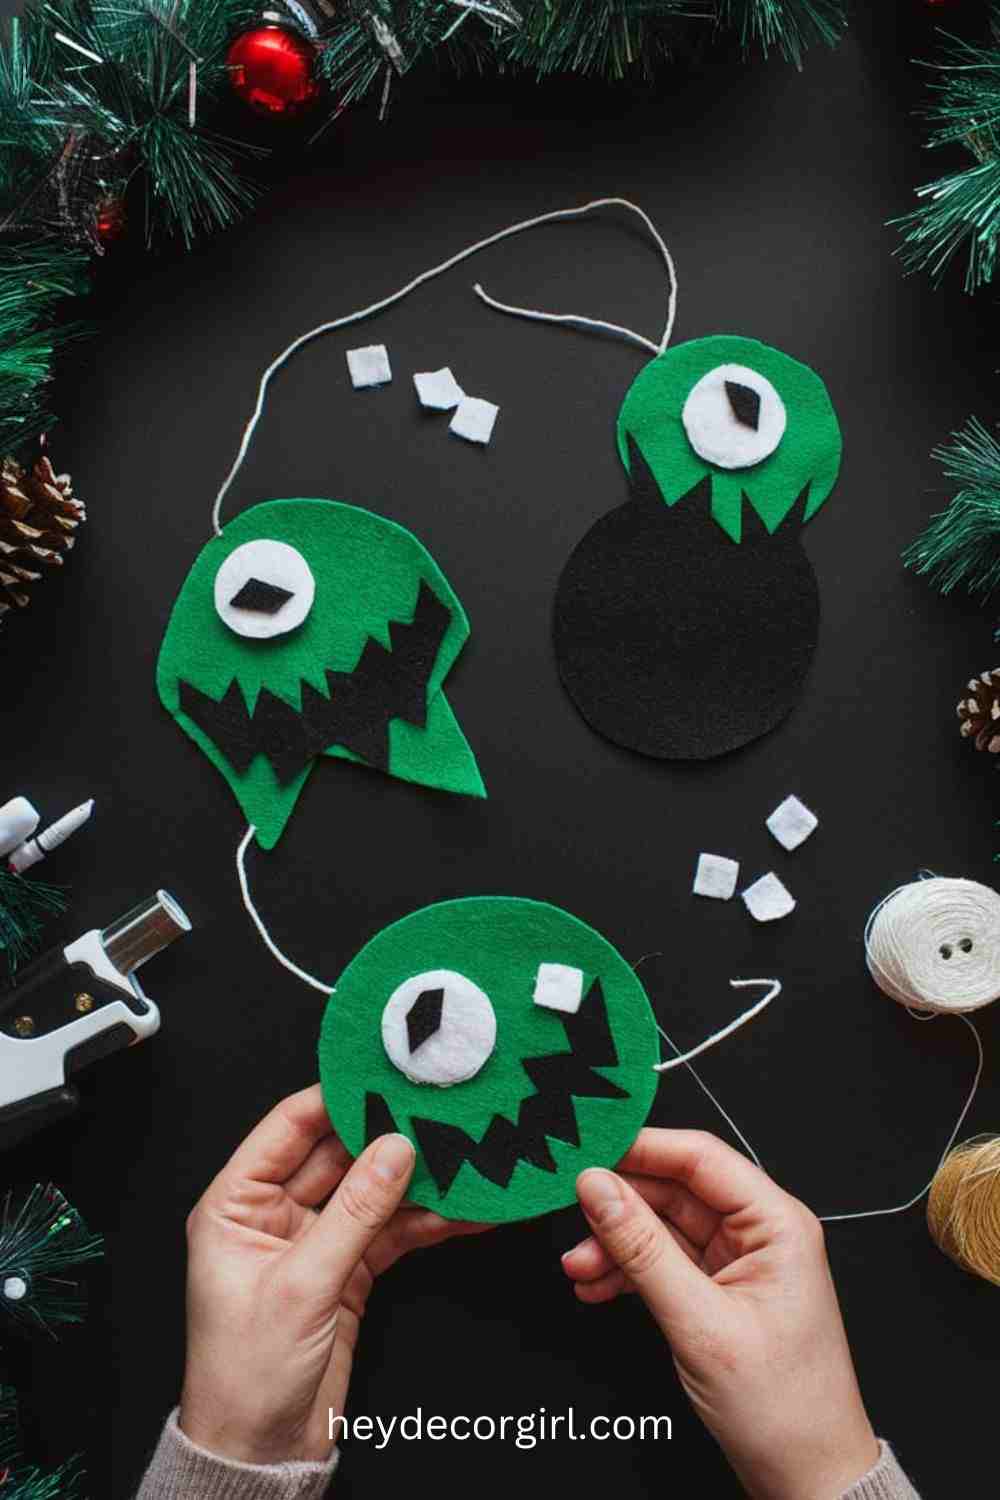
Celebrate The Nightmare Before Christmas with a playful Oogie Boogie garland that adds spooky charm to your Halloween or Christmas decor. Craft green felt cutouts of Oogie Boogie alongside black dice made from felt, complete with white dots. Use string or twine as the garland base and attach the characters and dice using hot glue or thread, spacing them evenly for a balanced look.
For added flair, embellish with glitter, beads, or mini green lights to mimic Oogie’s eerie glow. Drape the garland along a mantel, staircase, or doorway, or wrap it around your tree for a whimsical touch. It’s a fun, creative way to show love for this iconic character—and a festive hit for fans of all ages!
5. Sally’s Potion Bottles
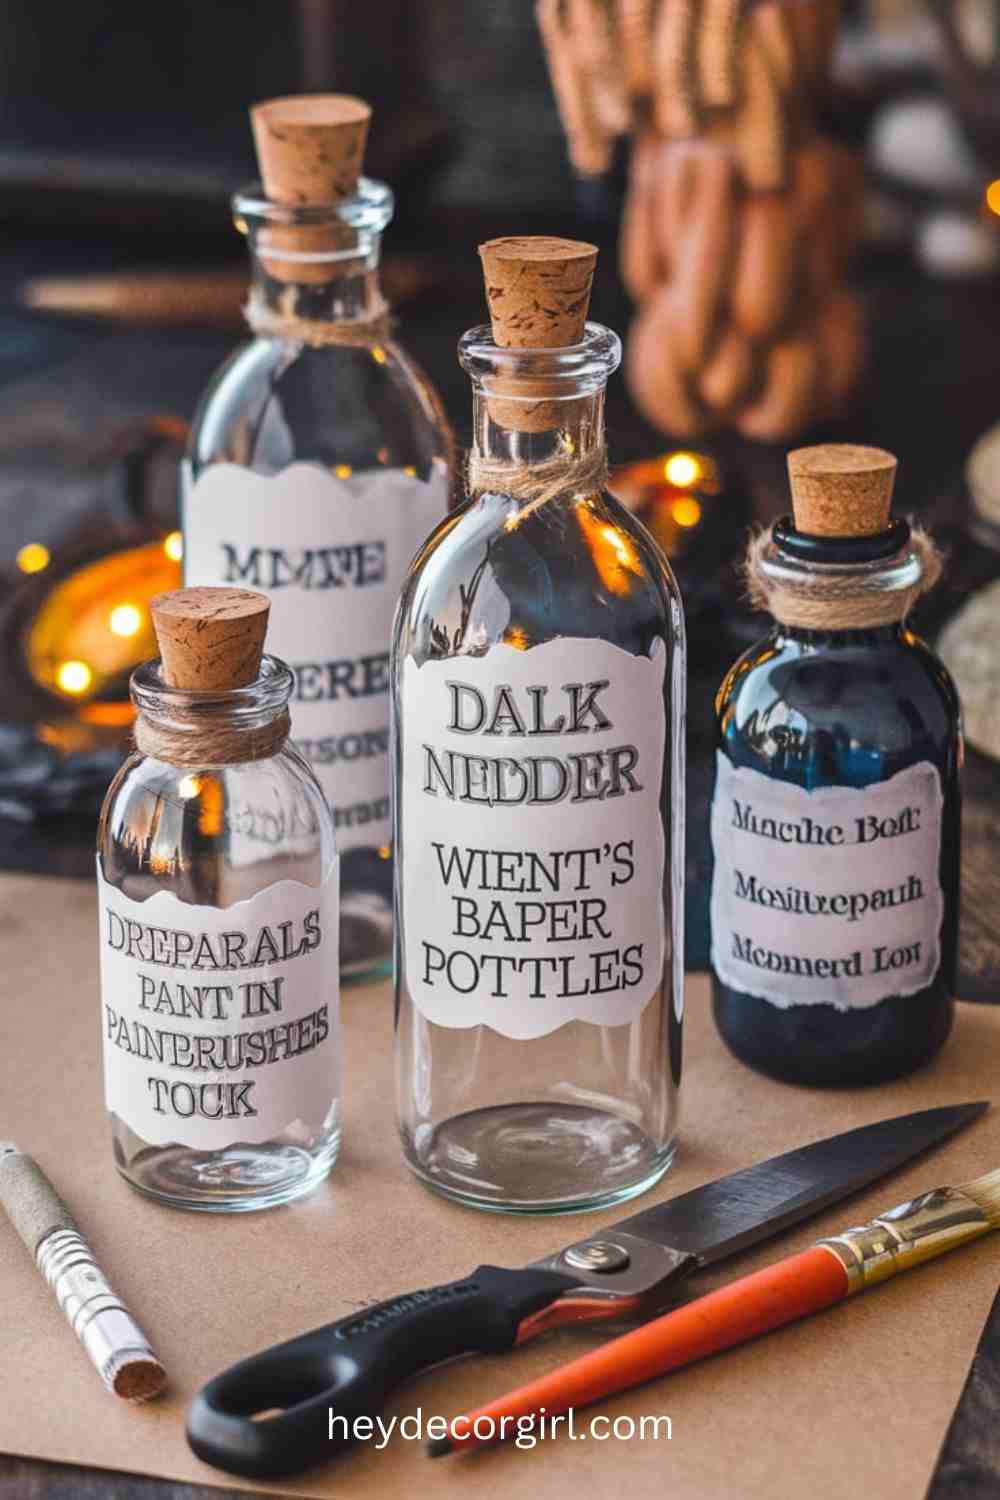
Bring a touch of Halloween magic into your home with a DIY project inspired by Sally’s potion collection from The Nightmare Before Christmas. These whimsical potion bottles are perfect for decorating your space, and they can serve as eye-catching accents for your Halloween or Christmas displays.
Materials Needed:
- Various glass or plastic bottles (old jars, vases, or craft bottles work well)
- Acrylic paint in vibrant colors (greens, purples, blues, and reds)
- Paintbrushes and sponges for application
- Labels or parchment paper for potion names
- Black marker or calligraphy pen for writing
- Glitter, ribbon, or twine for embellishments
- Optional: fake spider webs or small decorative items for extra flair
Instructions:
- Choose Your Bottles: Gather a variety of bottles in different shapes and sizes to create an eclectic potion collection. Consider using old glass jars, small vases, or even plastic craft bottles.
- Paint the Bottles: Use acrylic paint to create a colorful base for each potion bottle. You can use a sponge to create a textured effect or a brush for more precise lines. Let the first coat dry before applying additional layers for a more vibrant finish.
- Create Potion Labels: Cut out labels from parchment paper or use pre-made labels. Some suggested potion names include “Deadly Nightshade,” “Witches’ Brew,” “Elixir of Life,” and “Zombie Zest.” Write the names using a black marker or calligraphy pen for an authentic look.
- Attach Labels: Once the bottles are painted and dry, attach the labels using glue or double-sided tape. Position them prominently on the front of each bottle for easy visibility.
- Add Embellishments: For a more magical touch, decorate the bottles with glitter, twine, or ribbons around the necks. You can also place fake spider webs, faux crystals, or small decorative items like plastic insects on top of the bottles.
- Display Your Potion Bottles: Arrange the finished potion bottles on a shelf, mantle, or table as a centerpiece. You can also incorporate them into a larger Halloween or Christmas display, adding to the eerie and whimsical atmosphere of the season.
These Sally-inspired potion bottles not only capture the essence of the film but also add a fun and creative element to your seasonal decorations. With a little imagination, you can create a potion collection that would make Sally proud!
6. Jack and Sally Yard Signs
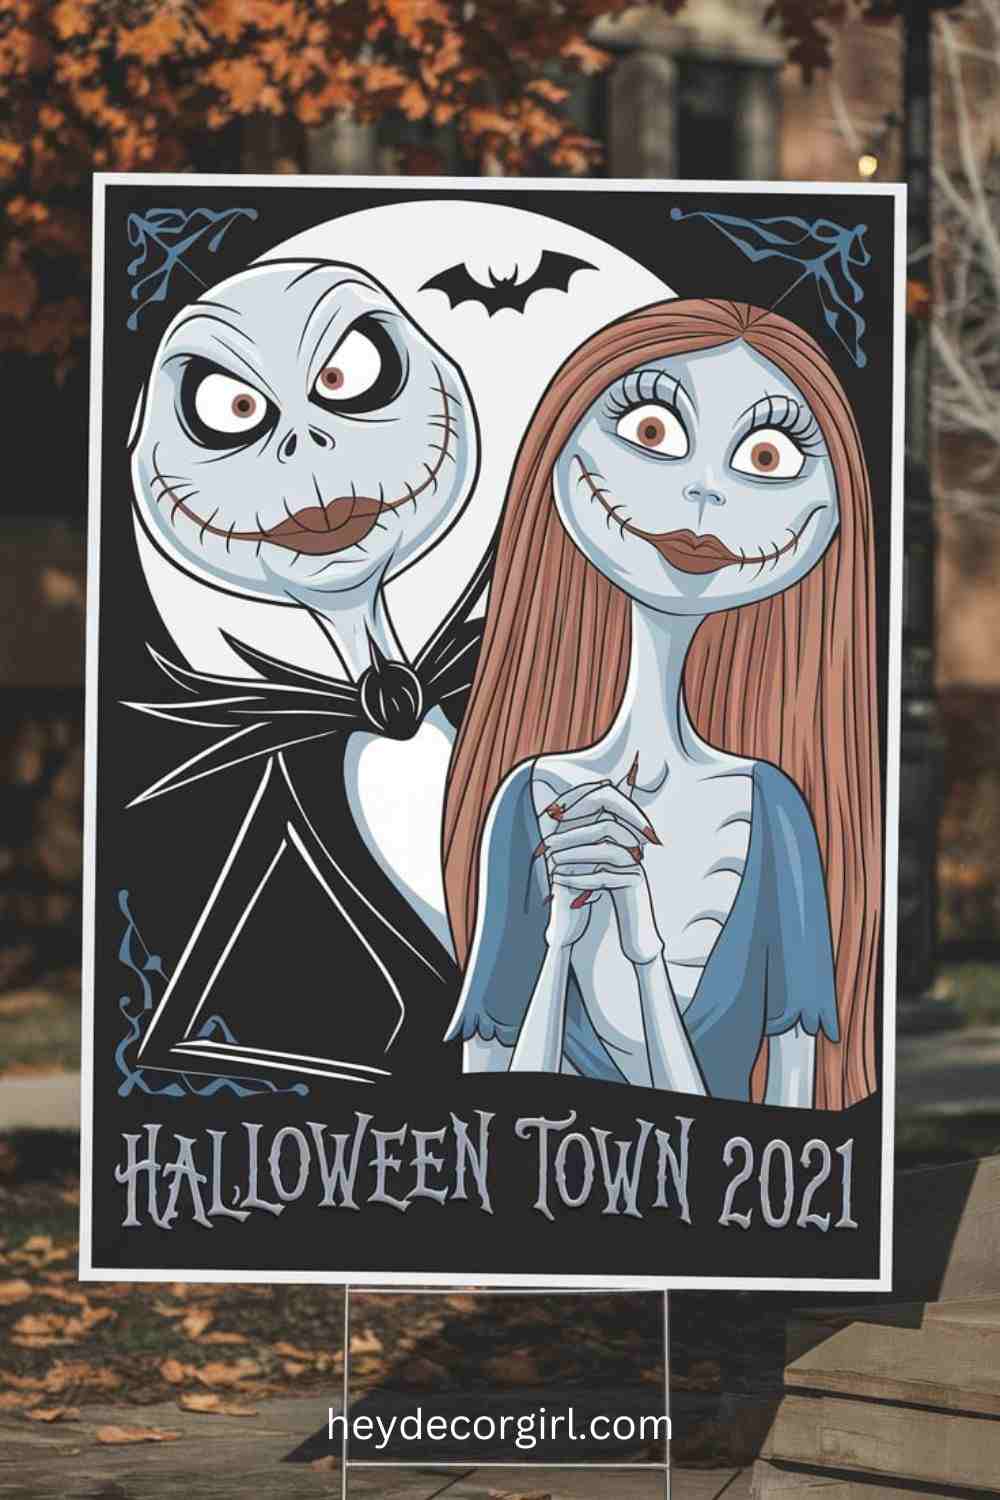
Add a whimsical touch to your outdoor decorations with Jack and Sally yard signs from The Nightmare Before Christmas. Whether you choose to create your own or purchase pre-made signs, these charming decorations will surely delight passersby and enhance your holiday spirit.
Making Your Own Yard Signs:
Materials Needed:
- Weatherproof materials such as PVC foam board or exterior plywood
- Outdoor acrylic paint in vibrant colors (black, white, and any colors for Jack and Sally’s outfits)
- Paintbrushes and sponges for application
- Clear weatherproof sealant (to protect the paint)
- Wooden stakes or metal sign holders for displaying
- Optional: a jigsaw or utility knife for cutting shapes
Instructions:
- Design Your Signs: Sketch the designs for Jack and Sally on paper, deciding on their poses and expressions. You can create individual signs for each character or combine them onto one larger sign.
- Cut the Shapes: If you’re using PVC foam board or plywood, carefully cut out the shapes using a jigsaw or utility knife. Make sure the edges are smooth to avoid any splinters.
- Paint the Signs: Once the shapes are cut, paint them with outdoor acrylic paint. Use black and white for Jack and flesh tones with colorful accents for Sally. Allow the paint to dry completely.
- Seal the Signs: After the paint has dried, apply a clear weatherproof sealant to protect the signs from the elements. This step is crucial to ensure they withstand rain, wind, and sun.
- Add Stakes: Attach wooden stakes or metal sign holders to the bottom of each sign for easy placement in your yard. You can paint the stakes black to match the design for a cohesive look.
Purchasing Yard Signs: If DIY isn’t your style, there are plenty of options for purchasing Jack and Sally yard signs. Look for weatherproof signs made from durable materials like corrugated plastic or metal. Many online retailers and local craft stores offer pre-made options that capture the essence of the characters beautifully.
Display Suggestions:
- Place the signs prominently in your yard or garden, perhaps near your front door or along the walkway to welcome guests.
- For added effect, surround the signs with Halloween or Christmas decorations, like faux pumpkins or twinkling lights, to create an enchanting atmosphere.
These Jack and Sally yard signs will add a playful and festive flair to your outdoor decorations, making them a perfect addition for fans of The Nightmare Before Christmas during the holiday season!
7. Haunted Spiral Hill Centerpiece
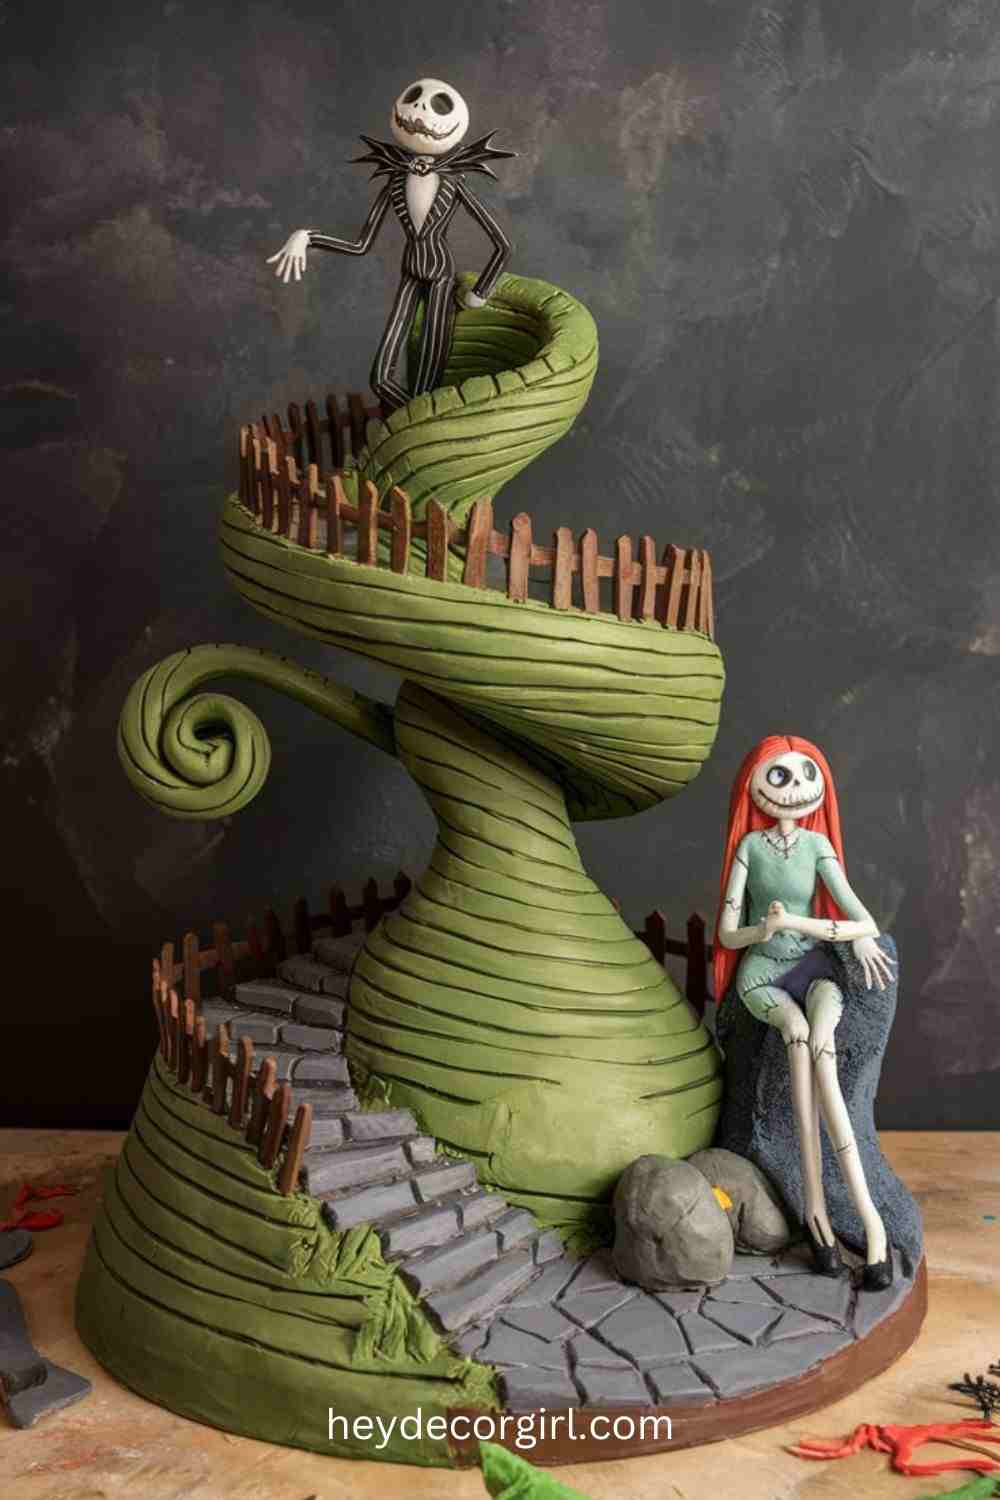
Bring the enchanting yet spooky vibe of The Nightmare Before Christmas into your home with a centerpiece inspired by the iconic Spiral Hill, featuring Jack Skellington and Sally. This DIY project will not only serve as a stunning focal point for your Halloween or Christmas table settings but also showcase your creativity.
Materials Needed:
- Air-dry clay or paper mache (for sculpting)
- Cardboard or a sturdy base for stability
- Acrylic paint in various colors (black, white, and other shades for detailing)
- Paintbrushes and sculpting tools
- Small LED lights (optional, for an ethereal glow)
- Decorative elements like faux grass or miniature pumpkins (optional)
- Clear sealant (if using paint for durability)
Instructions:
- Create the Spiral Hill Base: Start by sculpting the hill shape using air-dry clay or paper mache. If using cardboard, create a hill-like structure by layering and bending it into a spiral form. Ensure the base is sturdy enough to support the added figures of Jack and Sally.
- Shape Jack and Sally: Using clay or paper mache, sculpt small figures of Jack Skellington and Sally to sit atop the hill. Focus on capturing their iconic features—Jack’s elongated head and skeletal structure, and Sally’s patchwork dress and long hair.
- Paint the Sculptures: Once the clay or paper mache has dried completely, paint the hill and characters with acrylic paint. Use black for the hill and white for Jack’s body, adding details like his eyes and mouth. For Sally, use vibrant colors to highlight her dress and features.
- Assemble the Centerpiece: Once all painted pieces are dry, place Jack and Sally atop the spiral hill. Ensure they are securely positioned. If desired, you can use additional elements like faux grass or miniature pumpkins around the base to enhance the scene.
- Add Lighting (Optional): For a magical touch, incorporate small LED lights around the base of the hill or inside the figures (if hollow) to create a gentle glow, simulating the enchanting ambiance of Halloween Town.
- Seal Your Centerpiece: If using paint, finish the centerpiece with a clear sealant to protect it from dust and ensure its durability for future seasons.
Display Suggestions:
- Place the centerpiece on your dining table, mantel, or any prominent location to draw attention.
- Enhance the display with surrounding decor, such as autumn leaves or Halloween-themed tableware, to create a cohesive seasonal look.
This Haunted Spiral Hill centerpiece will capture the essence of The Nightmare Before Christmas, making it a delightful addition to your holiday decorations that showcases your artistic flair!
8. Character-Themed Stockings
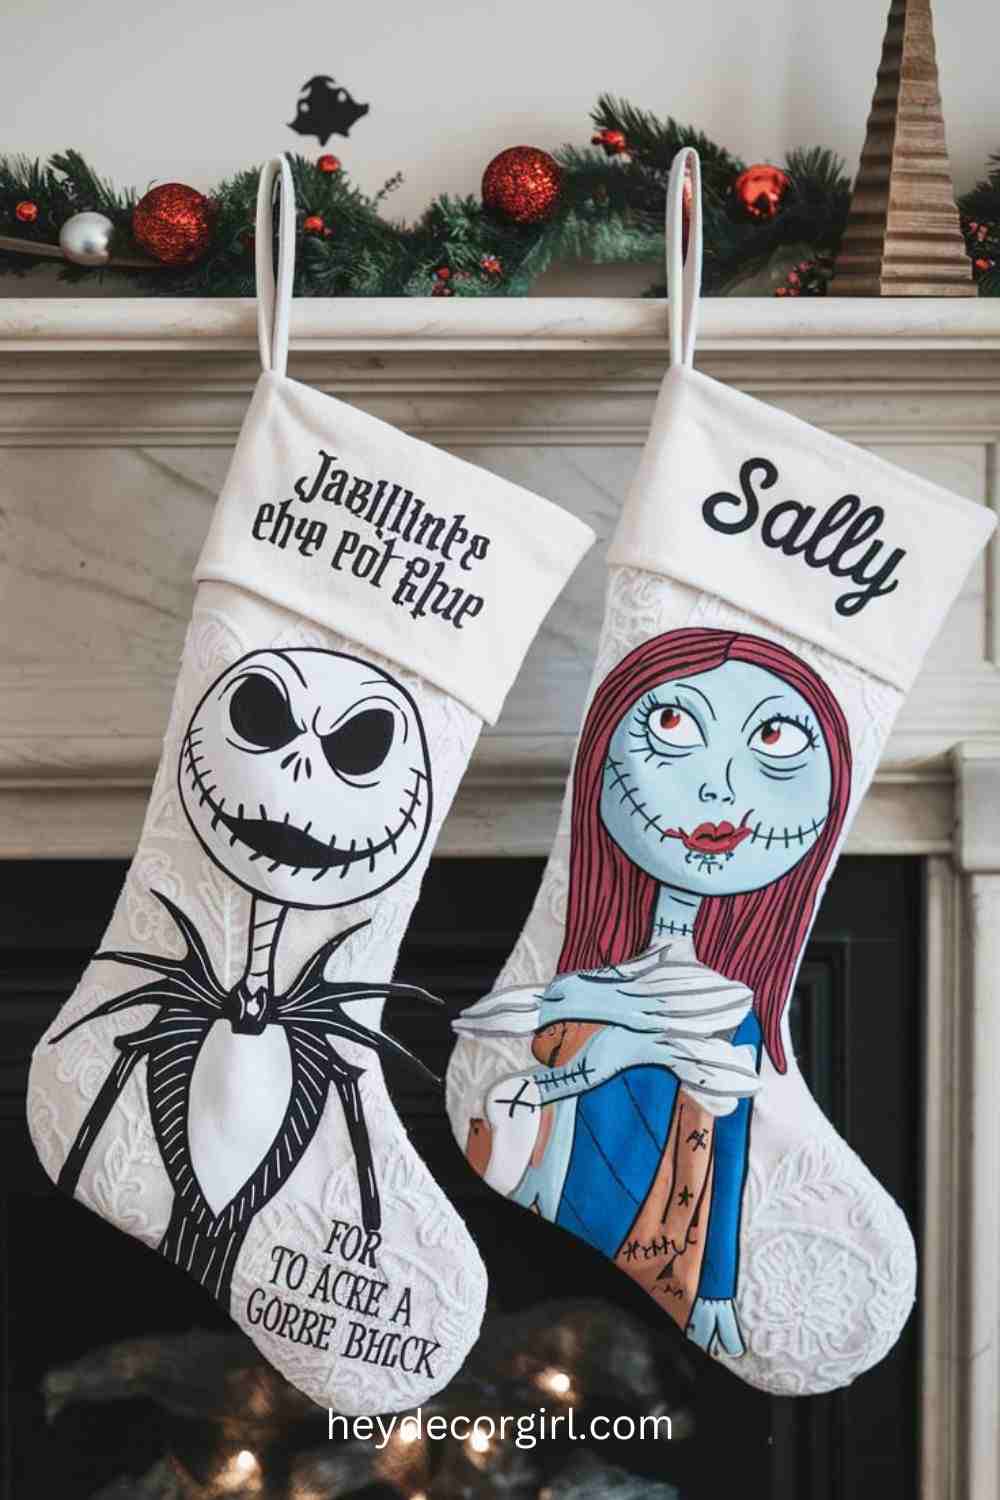
Add a spooky-fun twist to your holiday setup with The Nightmare Before Christmas-inspired stockings featuring beloved characters like Jack Skellington, Sally, and Oogie Boogie. Start with plain stockings in festive colors—black for Jack or green for Oogie—and decorate them using fabric paints or cut-out felt appliqués. Sketch your design first, then paint or glue on each character’s features, from Jack’s skeleton grin to Sally’s patchwork dress.
For extra flair, embellish with sequins, glitter, or buttons, and personalize each stocking with a name for a family-friendly touch. Once dry, hang your custom creations along the mantel or staircase. These themed stockings are a creative and playful way to celebrate the season—and will definitely steal the spotlight in your holiday decor!
9. Themed Door Decor
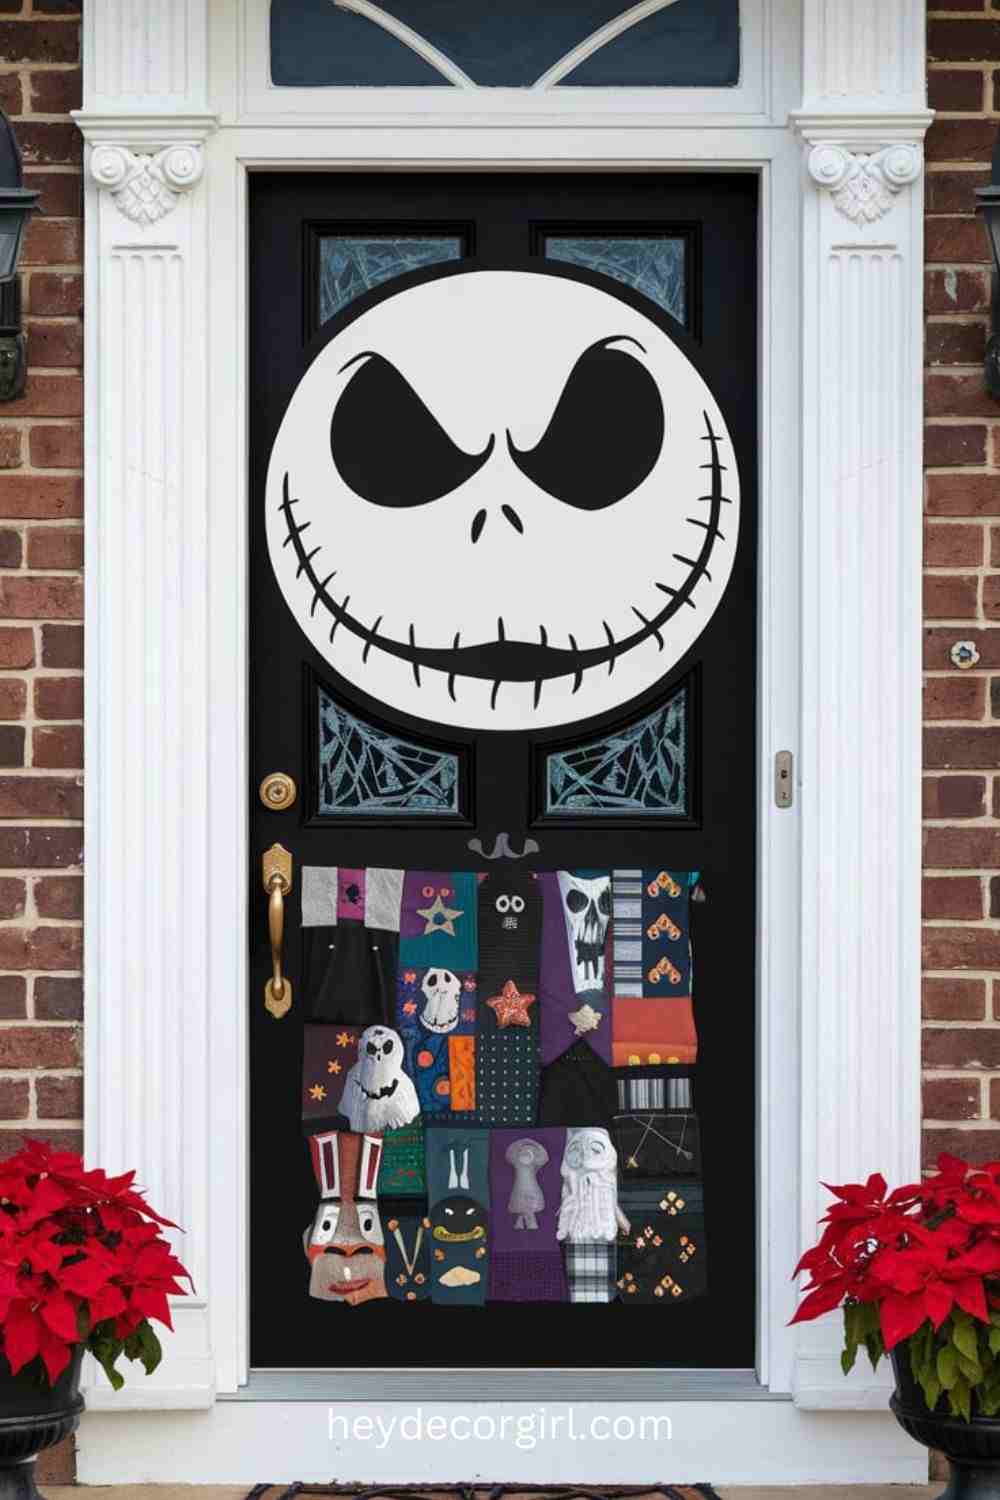
Make a bold seasonal statement by turning your front door into a Nightmare Before Christmas tribute. For a Jack Skellington-inspired look, cover the door in black fabric or vinyl and add his iconic features using white vinyl cutouts or paint—big eyes, stitched mouth, and eerie grin. Want extra flair? Accentuate with purple or orange accents and outline details for dimension. It’s a quick way to bring Halloween Town to your doorstep.
Prefer Sally’s style? Mimic her patchwork dress using colorful fabrics in floral, striped, or dotted patterns. Cut and arrange the pieces into a quilt-like design and attach them with temporary adhesive or fabric glue. Add stitch details with paint or vinyl for a handmade effect. Complete either look with a themed doormat, string lights, or a “Welcome to Halloween Town” sign for a charming and spooky welcome guests won’t forget.
10. Nightmare Before Christmas Table Settings
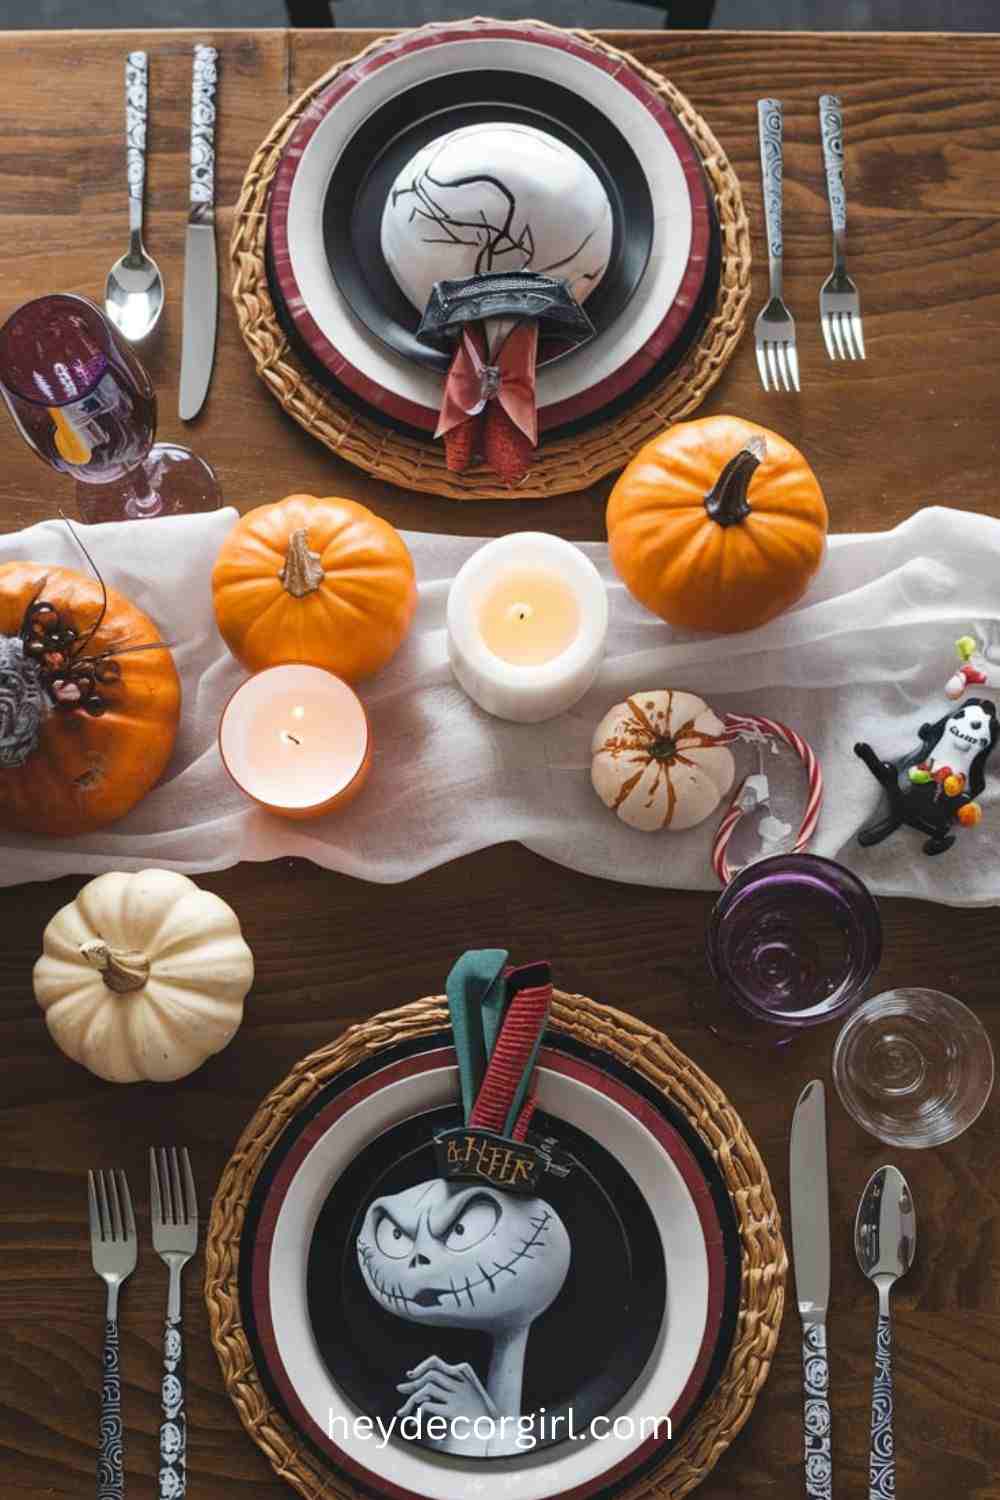
Transform your holiday table into a Nightmare Before Christmas wonderland with a themed setting that blends Halloween mischief and Christmas charm. Choose a bold color palette—think black, white, purple, and orange—and layer it with character-themed plates, napkins, and a black tablecloth for a dramatic base. Add a coordinating table runner and sprinkle in custom place cards with quotes or images of Jack, Sally, or Oogie Boogie for a personalized touch.
Create an eye-catching centerpiece using mini painted pumpkins, LED candles, and whimsical props like potion bottles or a DIY Spiral Hill display. Finish the look with string lights or Halloween figurines to enhance the atmosphere. Bonus: send guests home with themed treats or mini ornaments as favors. This creative setup not only celebrates the film’s iconic characters but also delivers a festive dining experience your guests won’t forget.
FAQ
Q1: What materials are commonly used for Nightmare Before Christmas decorations?
A1: Common materials include fabric, paper mache, clay, paint, felt, and various craft supplies. You may also find themed items such as decals, ornaments, and LED lights that can enhance your decor. For a festive touch, consider incorporating Nightmare Before Christmas Decorations Ideas, which can add a whimsical and spooky charm to your holiday displays.
Q2: Can I create Nightmare Before Christmas Decorations Ideas on a budget?
A2: Absolutely! Many DIY projects use inexpensive materials like cardboard, fabric scraps, and paint. You can also repurpose items you already have at home to create unique decorations without breaking the bank. For example, consider Nightmare Before Christmas Decorations Ideas such as crafting Jack Skellington ornaments or creating a spooky wreath inspired by the film, which can add a festive touch to your home while keeping costs low.
Q3: Are there specific colors I should focus on for Nightmare Before Christmas decor?
A3: Yes, the primary colors associated with the film Nightmare Before Christmas Decorations Ideas are black, white, purple, orange, and green. Incorporating these colors into your decor will help capture the movie’s whimsical and spooky essence. Consider using these shades in your Nightmare Before Christmas Decorations Ideas such as tablecloths, banners, and themed ornaments, to create an enchanting atmosphere.
Q4: What are some easy DIY decoration ideas for beginners?
A4: Some beginner-friendly Nightmare Before Christmas Decorations Ideas include creating Jack Skellington wreaths, character-themed stockings, and simple table centerpieces. These projects typically require minimal materials and can be completed in a short amount of time.
Q5: How can I incorporate Nightmare Before Christmas decorations into both Halloween and Christmas themes?
A5: The film’s unique blend of spooky and festive elements makes it perfect for both holidays. Nightmare Before Christmas Decorations Ideas include creating a Halloween-Christmas tree, using character-themed stockings, or displaying a haunted Spiral Hill centerpiece that fits both themes seamlessly.
Q6: Where can I find templates or patterns for crafting decorations?
A6: Many online resources offer free templates, including Pinterest, craft blogs, and fan websites dedicated to Nightmare Before Christmas Decorations Ideas . You can also find craft books that include patterns and instructions.
Q7: How can I ensure my outdoor decorations withstand the weather?
A7: When decorating outdoors, use weatherproof materials such as PVC foam board or exterior paint. Additionally, seal your painted decorations with a clear weatherproof sealant to protect them from rain and sun. Consider incorporating Nightmare Before Christmas Decorations Ideas for a unique touch, like Jack Skellington figures, spooky wreaths, or themed lights that capture the whimsical yet eerie essence of the film.
Q8: Are there store-bought decorations available for Nightmare Before Christmas?
A8: Yes, many retailers offer a variety of Nightmare Before Christmas Decorations Ideas including ornaments, tableware, and yard signs. Check stores around the Halloween and Christmas seasons for the best selection.
Q9: Can I involve kids in creating Nightmare Before Christmas decorations?
A9:Definitely! Many of the decoration ideas, including Nightmare Before Christmas Decorations Ideas can be adapted for kids, such as painting pumpkins, creating simple crafts, or decorating stockings. This can be a fun family activity that sparks creativity.
Q10: How can I display my decorations effectively?
A10: Consider creating themed vignettes around your home with Nightmare Before Christmas Decorations Ideas. Use shelves, tables, and mantels to showcase different decorations, ensuring a cohesive look. Don’t forget to add lighting elements like string lights to enhance the atmosphere!