When it comes to celebrating spooky season, there’s nothing quite as fun—or rewarding—as making your own Diy Halloween Decorations, and I, Richa, absolutely love crafting every creepy detail by hand. Whether you’re decorating a cozy corner of your bedroom or transforming your front porch into a haunted scene, DIY projects let you add personality, creativity, and charm without spending a fortune. From ghost garlands and floating candles to bloody candles, spiderweb lanterns, and haunted mirrors, the options are endless and completely customizable. The best part? You don’t need fancy tools—just a little imagination, some basic materials, and a love for all things Halloween. With Diy Halloween Decorations, you’re not just decorating—you’re building a spooky vibe that feels homemade, personal, and perfectly eerie. Whether you’re aiming for cute and cozy or spine-chilling and dramatic, your space will feel totally transformed—and uniquely yours.
Diy Halloween Decorations
-
Save
-
Save
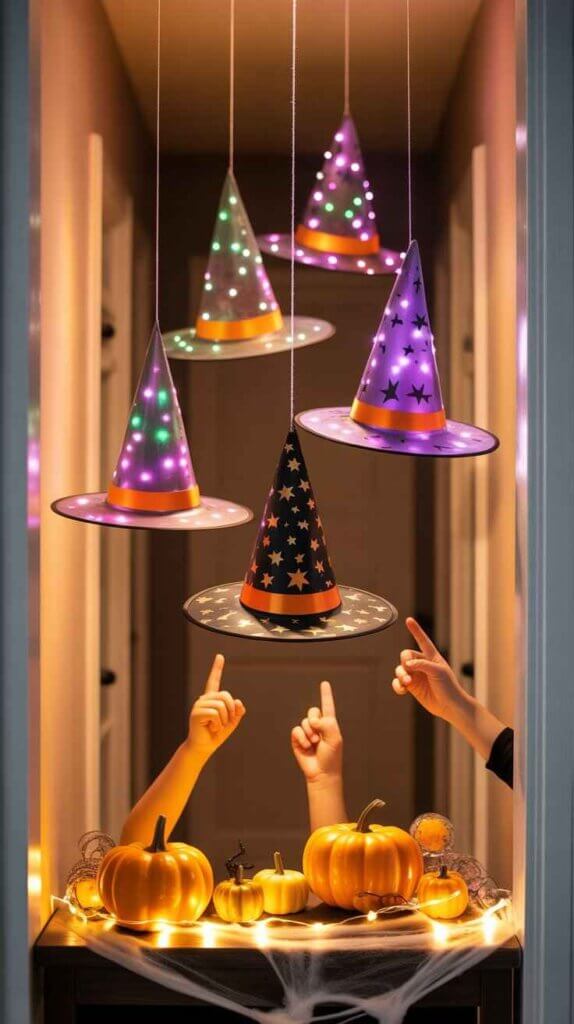
Hanging Witch Hat Lanterns
-
Save
Get Your Personalized Home Décor Ideas Kit
Create magical ceiling decor by hanging witch hats filled with LED tea lights. Start with lightweight hats, then use fishing line to hang them at different heights from the ceiling. Insert battery-powered lights inside for a floating, glowing effect. This DIY adds instant charm to bedrooms, hallways, or party rooms. Mix in tiny bats, glittery spiders, or dangling stars for a layered look. When the lights are dimmed, the hats glow softly like they’re floating mid-air. It’s a fun way to enchant your space and bring a witchy vibe to your Halloween setup.
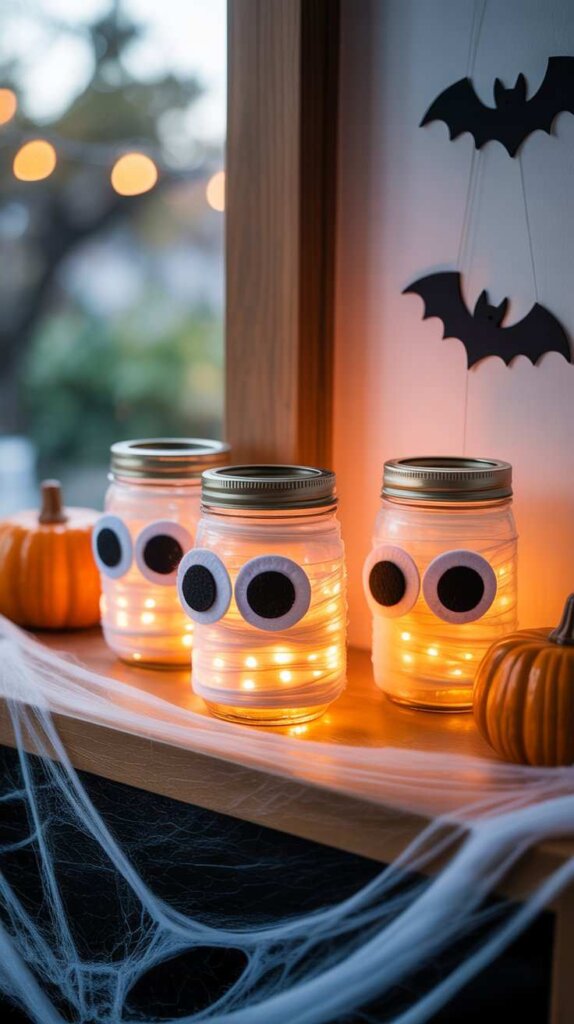
Glowing Ghost Jars
-
Save
Get Your Personalized Home Décor Ideas Kit
Use mason jars, gauze, and LED lights to craft glowing ghost jars. Wrap jars in gauze or cheesecloth, leaving room for large black felt eyes. Add a warm or color-changing LED light inside, and these jars come alive with personality. You can display them on shelves, windowsills, or even line them along your walkway. These little ghost friends are easy to make, super lightweight, and work great for kid-friendly spooky decor. Plus, you can reuse them every year just by replacing the batteries. They’re a mix of cute and eerie with just the right Halloween flair.
Spooky Silhouette Lanterns
Get Your Personalized Home Décor Ideas Kit
Transform empty glass jars into Halloween lanterns with spooky silhouettes. Paint the inside of each jar with orange or purple, then cut black paper shapes—witches, cats, or haunted houses—and glue them to the outside. Insert LED candles to light them up. The silhouettes glow beautifully and cast shadows that dance on the walls. Line them up on your porch, mantel, or table centerpiece for an atmospheric touch. This DIY lets you be creative with designs and adds cozy Halloween light to any dark corner. The result is charming, handmade, and just spooky enough.
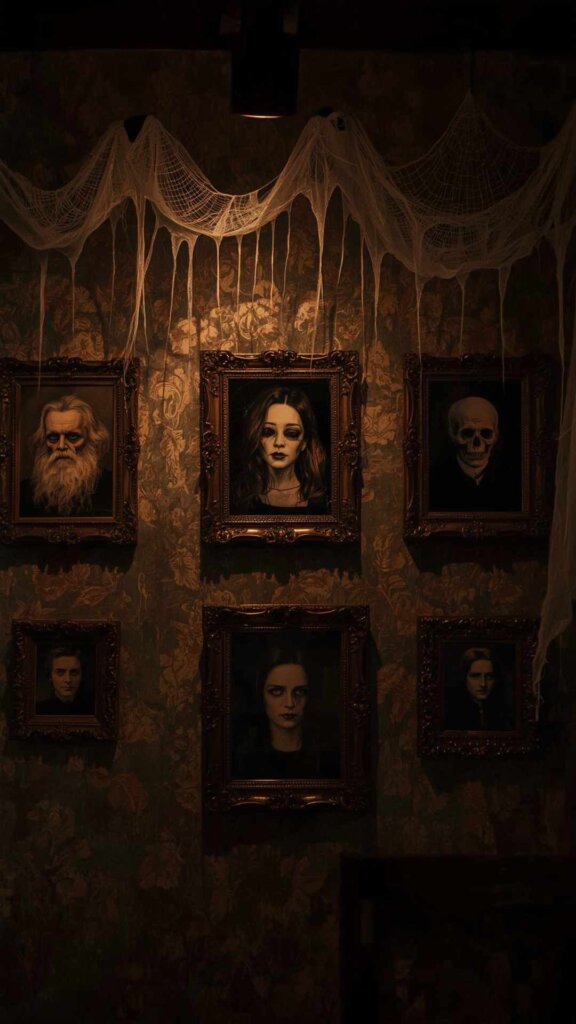
Haunted Picture Frames
-
Save
-
Save
Create your own haunted gallery wall using thrifted picture frames and eerie prints. Find spooky artwork or old black-and-white portraits, then glue on googly eyes or paint red tears and shadowy figures in the background. You can also use lenticular images that change when viewed from different angles. Add faux cobwebs and dark florals around the frame edges for drama. This setup works great in hallways, bedrooms, or above your mantel. The overall look feels vintage and unsettling, like you’ve stumbled into a haunted mansion. It’s fun, artistic, and just the right level of creepy.
Get Your Personalized Home Décor Ideas Kit
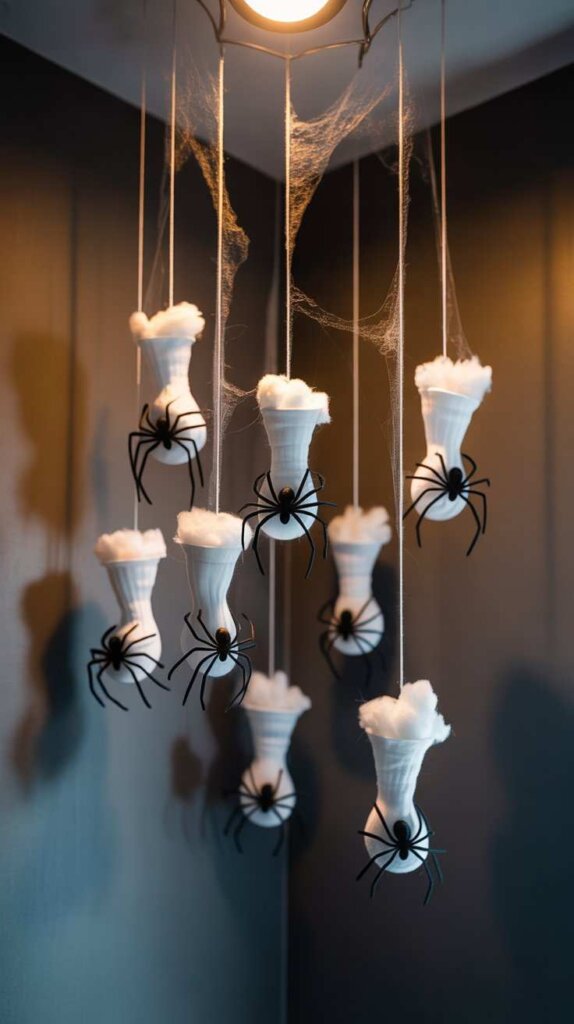
DIY Spider Egg Sacs
-
Save
Creep out your guests with realistic spider egg sacs made from white pantyhose and cotton stuffing. Shape the filling into round bundles, tie the ends, and glue small plastic spiders crawling out of the “eggs.” Hang them in corners or from ceilings with webs around them for extra scare factor. These DIY sacs are especially effective in dim lighting or stairwells. They’re quick to make and super lightweight. For extra effect, add some glitter or glow-in-the-dark paint. Whether for a party or a home scare zone, these look disgustingly cool and make people squirm—in a good way.
Get Your Personalized Home Décor Ideas Kit
Skeleton in the Closet
Turn any small closet or wardrobe into a creepy surprise by placing a plastic skeleton inside and decorating it like it just came to life. Drape the skeleton in tattered clothes, add a sign like “I’ve been waiting…” and position it to lean out. Use LED lights or even motion sensors to add suspense. This decoration is hilarious and spooky at the same time. It’s especially fun for guests who happen to open the wrong door. Best of all, you can close it up when not in use and still keep the Halloween spirit tucked away.
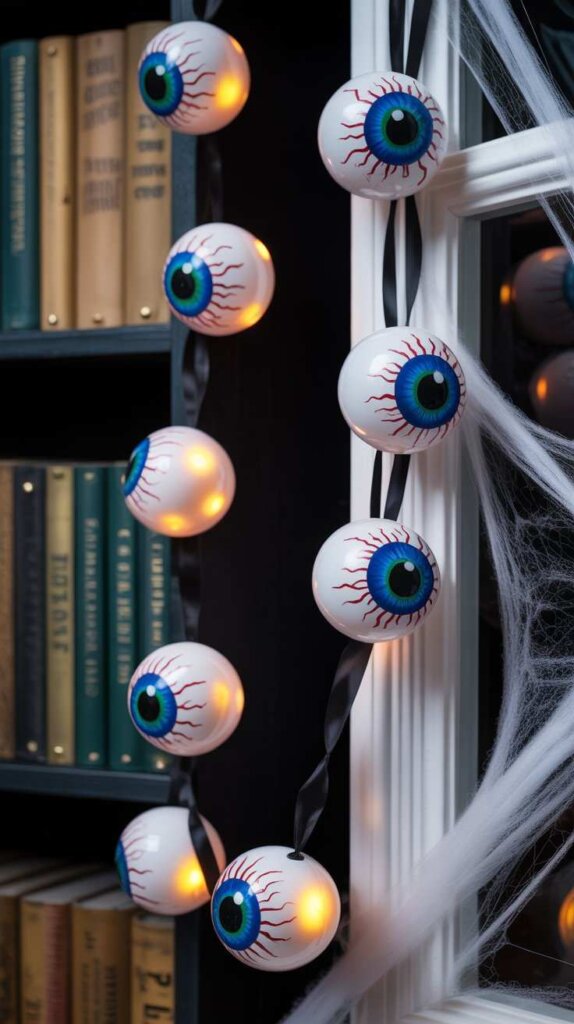
Eerie Eyeball Garland
-
Save
Get Your Personalized Home Décor Ideas Kit
Make a string of staring eyeballs by painting ping pong balls with colorful irises and pupils. Use red markers to draw tiny veins and hot glue them to a ribbon or string. Add small LED lights inside or behind for a glowing effect. Hang the garland along your window, bookshelf, or above your bed. It’s weird, playful, and just creepy enough without being gory. This is a perfect craft to do with kids or friends. When the lights are dim, the glowing eyeballs really pop and give off a haunted house vibe.
Ghostly Mirror Messages
Add haunted charm to your mirrors by writing creepy messages with red lipstick, foggy glass markers, or fake blood. Phrases like “I see you,” “Don’t turn around,” or “Behind you” give your room an instant horror vibe. For added drama, frame the mirror in cobwebs, flickering candles, or skeletal hands. This works especially well in bedrooms or bathrooms where reflections already feel a little eerie. The effect is subtle during the day but super chilling at night when dim lighting and shadows play off the message. It’s the easiest way to make everyday decor spooky.
Get Your Personalized Home Décor Ideas Kit
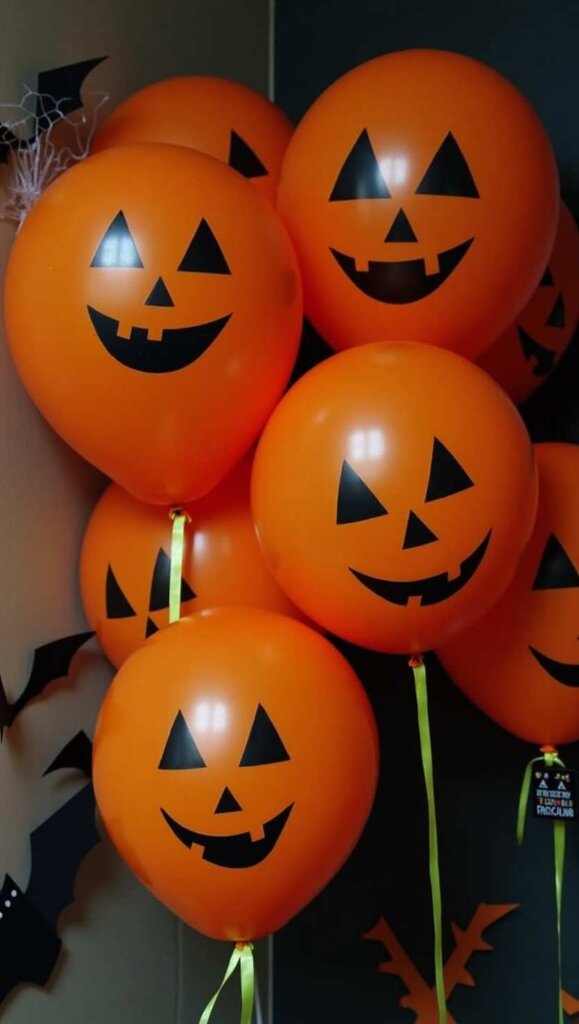
Pumpkin Balloon Creatures
-
Save
Swap messy carving for fun balloon pumpkins with spooky faces. Inflate orange balloons, draw jack-o’-lantern expressions with black marker, and tie on green ribbon for stems. You can tape them to walls or float them with helium. These balloon creatures are perfect for last-minute decorating or kids’ parties. Add pipe cleaner arms or bat wings for personality. Lightweight and cheap, they fill a room fast and create an instant Halloween vibe. Plus, cleanup is a breeze—just pop and toss when the party’s done. They’re festive, fun, and super low-maintenance.
Get Your Personalized Home Décor Ideas Kit
Witch Broom Parking
Make a fun display outside your door or in a corner of your home by setting up a “Witch Parking Only” sign next to a cluster of handmade broomsticks. Use twigs, long branches, and twine to create rustic brooms. Place them in a bucket or lean against a wall. Add a chalkboard sign with a funny warning like “Violators will be toad.” This setup adds a charming witchy touch to any Halloween display. It’s quirky, super easy to make, and looks great when paired with hats, black cats, or spellbooks.
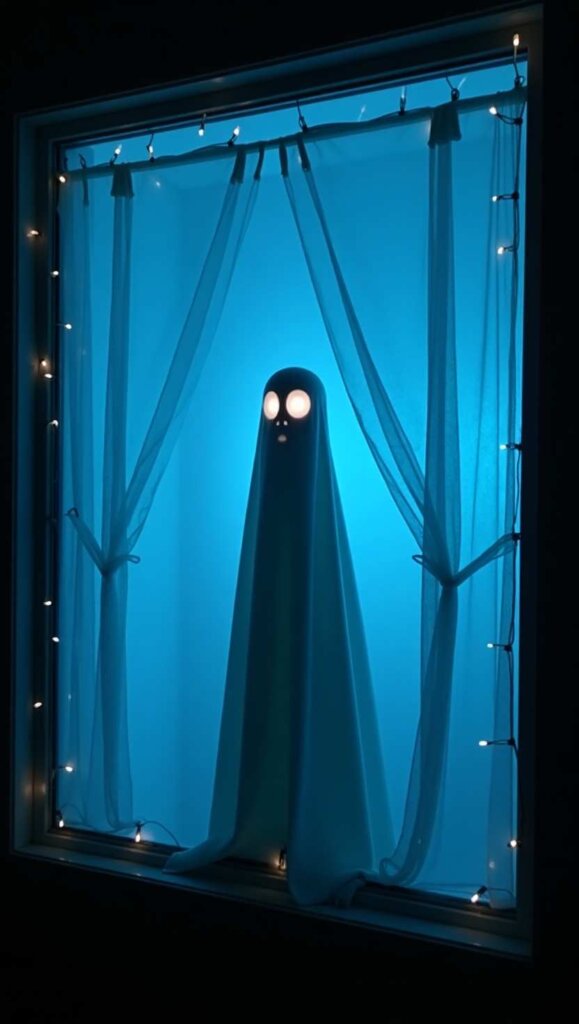
Ghoul in the Window
-
Save
Get Your Personalized Home Décor Ideas Kit
Create a peek-a-boo effect by placing a ghost figure behind sheer curtains or blinds. Use a foam head, pillow, or mannequin wrapped in white fabric to make the shape. Backlight the setup with soft white or blue light to create a glowing figure. It’s an easy illusion that looks amazing from outside and makes passersby do a double take. Add glowing eyes or string lights around the window frame for extra attention. This decoration is low effort but delivers big reactions, especially on dark fall evenings.
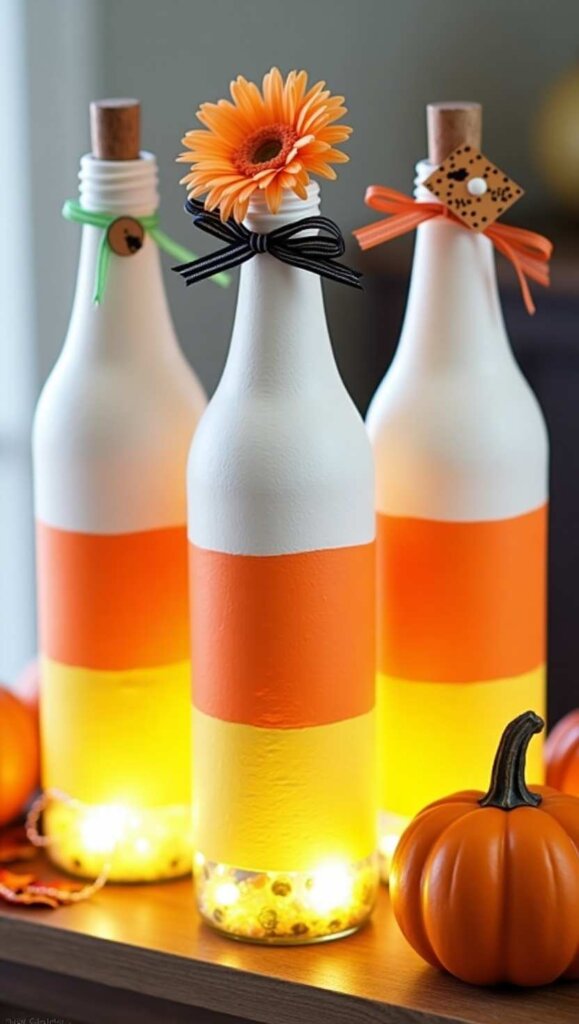
Candy Corn Bottles
-
Save
Get Your Personalized Home Décor Ideas Kit
Decorate glass bottles or jars in candy corn colors—yellow, orange, and white—for a festive centerpiece or shelf display. Spray paint or hand paint in layers, let dry, and fill with faux flowers, candy, or LED string lights. These look great grouped in threes and pair well with rustic Halloween themes. Add ribbon, tags, or mini signs to finish the look. They’re quick to make and offer a soft, nostalgic pop of color without being scary. Perfect for kitchens, entry tables, or anywhere you want Halloween without the horror.
Webbed Picture Frames
Turn your regular photo frames into haunted works of art. Stretch fake spider webs over the frame, securing with small dots of glue or tape. Add tiny spiders, skulls, or black feathers for drama. If you want to go further, replace the photo inside with a spooky print or black-and-white portrait. Display them on a mantel, shelf, or even as part of a gallery wall. This DIY is great because you can undo it after Halloween without damage. It’s a fast, flexible way to creepify everyday decor.
Get Your Personalized Home Décor Ideas Kit
Monster Door decor
Get Your Personalized Home Décor Ideas Kit
Transform any door into a silly or scary monster with paper cutouts or painted cardboard shapes. Use big eyes, fangs, horns, or claws to give it personality. Attach everything with painter’s tape so it comes off easily. This idea works great for kids’ rooms, classrooms, or closets. You can go colorful and goofy or dark and spooky. It’s a low-cost way to add Halloween energy to places you might forget to decorate. Plus, it brings instant smiles and works indoors or outdoors.
Poison Apple Display
Get Your Personalized Home Décor Ideas Kit
Craft a tray of poison apples using red fake apples and black dripped paint or melted wax. Add tags like “Eat Me” or “Witch’s Treat” and place them on a decorative plate or cauldron. Add dry ice or fog spray around the display for extra drama. These look stunning on food tables, fireplace mantels, or as party centerpieces. They blend fairy tale with horror in such a dramatic way. You can also use glitter for a magical finish. They’re bold, photogenic, and totally unexpected—perfect for those who love a theatrical Halloween touch.
FAQ
What are some budget-friendly DIY Halloween decorations?
You can create amazing Halloween vibes without spending much at all. Use materials like cardboard, paper, mason jars, old clothes, and leftover craft supplies. Try making paper bats for walls, ghost garlands from tissues, or bloody candles using crayons. Even household items like pantyhose, glass bottles, or toilet paper can become spooky when styled right. The key is creativity, not cost!
Get Your Personalized Home Décor Ideas Kit
How early should I start decorating for Halloween?
Many people start decorating in late September or the first week of October. It gives you time to enjoy the spooky atmosphere and build up excitement. Starting early also means you won’t feel rushed when crafting your DIY pieces. If you love Halloween, there’s no harm in starting even earlier—especially if you’re doing lots of hands-on projects.
How do I safely light up my DIY Halloween decorations?
Always choose battery-operated LED lights or flameless candles for indoor decorations. They’re safe, reusable, and give off a great glow. Avoid real flames near paper, fabric, or fake webs. For outdoor setups, make sure cords and lights are rated for exterior use, and keep wires protected from moisture or pets.
Get Your Personalized Home Décor Ideas Kit
Can kids help with DIY Halloween decorations?
Absolutely! Halloween is a great time for kids to get creative with you. Let them cut out paper pumpkins, paint mini ghosts, or glue googly eyes onto crafts. Just make sure any tools—like hot glue guns or sharp scissors—are used with supervision. DIY projects make wonderful memories when the whole family joins in.
How do I store DIY Halloween decorations for next year?
Let everything dry fully before packing. Use labeled containers to keep items organized—especially fragile or handmade ones. Wrap delicate crafts like jars or painted objects in tissue or bubble wrap. Store in a cool, dry place away from sunlight to prevent fading. With proper storage, your spooky creations will be ready for next Halloween.
Get Your Personalized Home Décor Ideas Kit

-
Save
Hi, I’m Richa, the creative mind and passionate soul behind Hey Decor Girl. With a bachelor’s degree in Inter-space Design and a deep love for transforming spaces, I’ve dedicated my career to bringing style, comfort, and personality into homes. As an interior designer and architect, I’ve had the pleasure of crafting unique living environments that reflect the individuality of those who live in them.
At Hey Decor Girl, I share my expertise in all things home decor—from cozy living room makeovers to rustic farmhouse designs and everything in between. My mission is to inspire you to create spaces that not only look stunning but also feel like home. Whether you’re looking for the latest trends or timeless classics, I’m here to guide you every step of the way. Let’s make your dream home a reality, one stylish detail at a time.
Diy Halloween Decorations Halloween Decorations
Last modified: July 5, 2025