Cheap Christmas Decorations Ideas: Christmas is not just a time of celebration, but also the decoration and preparation for that day are also to be done. But decking out your apartment or home for the holidays doesn’t have to be an expensive affair. Christmas Decorations on a Budget gives you the means to get into the season without spending too much. Whatever your reason for holding off on festive decorations, there are plenty of inventive ways to make your home feel magical this Christmas without spending a fortune. Whether it’s DIY crafts or giving new life to old decorations, you can charm and cheer up this holiday season without breaking the bank.

Best Cheap Christmas Decorations Ideas
1. DIY Paper Snowflakes
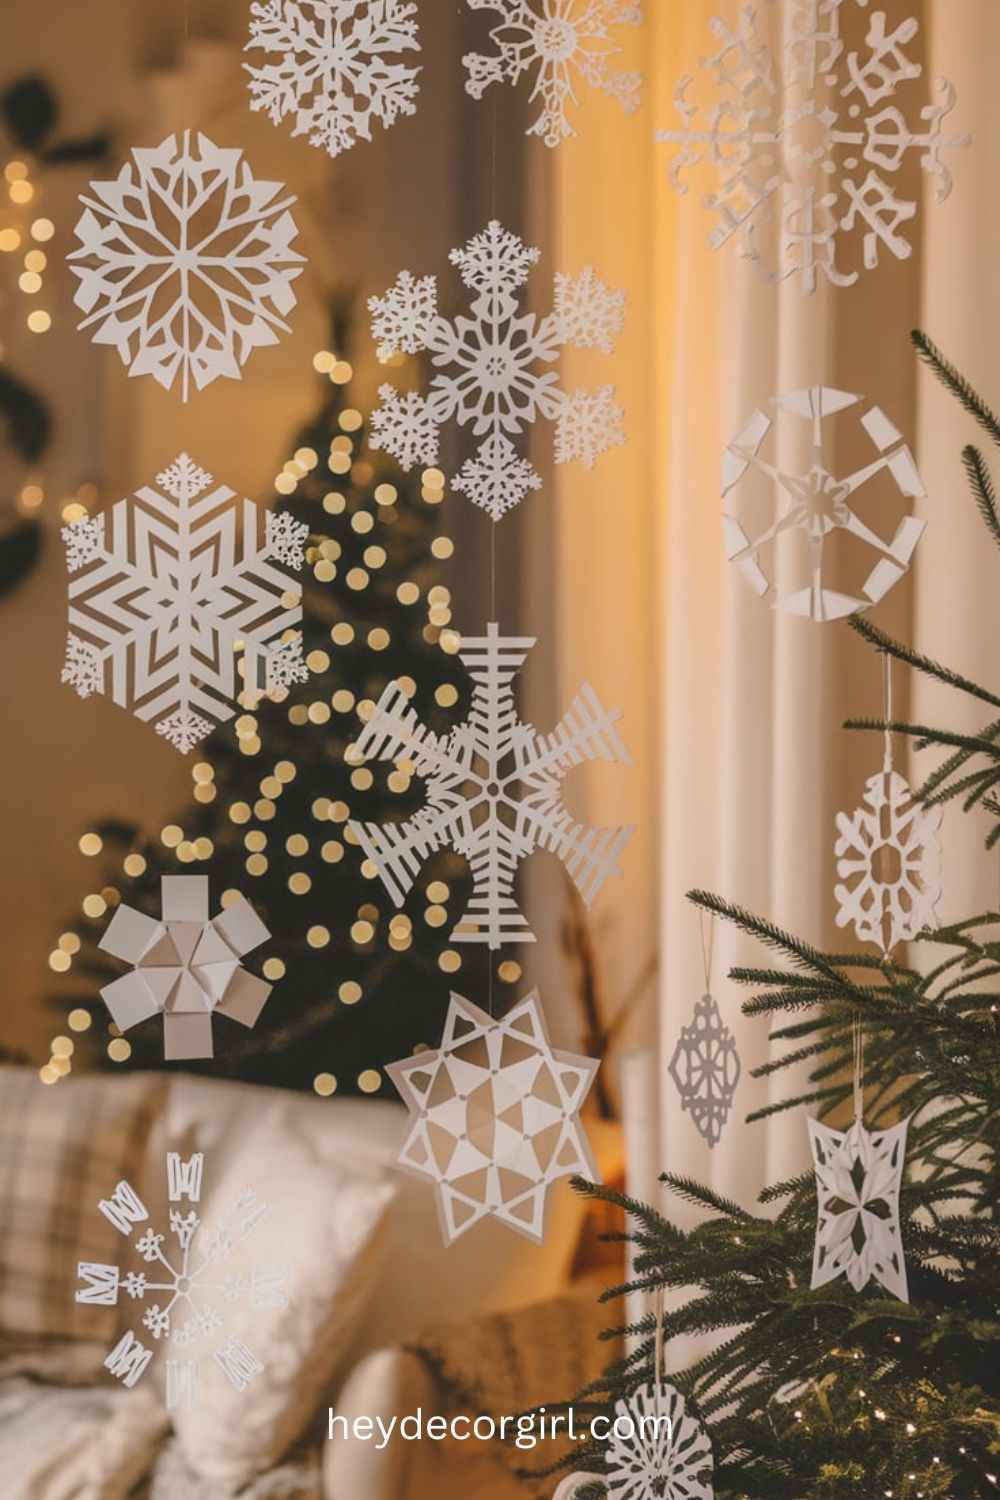
It is a cheap, easy, and enjoyable way to decorate your home by making your own paper snowflakes. Paper snowflakes can be made in any size and shape to fit any space,ce whether you are decorating your windows, walls, or tree. The following are instructions on how to make your beautiful snowflakes:
Materials Needed:
White paper (decent size, but a square piece of paper is perfect).
Scissors
Pencil (not very necessary to draw patterns)
String or tape (for hanging)
Step-by-Step Instructions:
- Preparation of Paper: Take a square piece of paper. When you have rectangular paper, all you have to do is fold one end over to make a triangle, and cut the extra part. You’ll now have a square.
- Fold the Paper: Fold the square cornerwise to make a triangle. Then half the triangle, and then half the triangle once again. The greater the number of folds, the more complicated your snowflake design will appear.
- Cut the Design: Cut small shapes using scissors all over the edges of the folded paper. Be creative! The small rectangles, triangles, or cut of curved cuts are all good. Do not chop it through, leaving a middle part to it.
- Unfold the Paper: This is the unfolding of a paper to uncover the snowflake pattern. The number of folds you create, the more detailed and complicated the snowflake will be.
- Design Customization: You may have additional cuts, or you can cut edges to make your snowflake perfect. Colored paper may be us, ed too, or you can glitter it.
Different Designs and Sizes:
- Simple Snowflake: The simplest way to make a snowflake is to begin with some cuts around the edges to make a simple, but ideal snowflake to hang in the window or even to decorate your own tree.
- Complex Snowflake: Add more folds and cut smaller shapes to make a more detailed and delicate snowflake, which is best placed as an itat on the center of your table, or as a large wall display.
- Mini Snowflakes: Smaller pieces of paper are to be used when it comes to tiny snowflakes that can be spread all over the house or be utilized on cards and gifts.
Tips for Hanging Creatively:
- Window Display: With the help of the tape or sticky tack, place your snowflakes on the windows, which will make both interiors and exteriors look like a winter wonderland.
- Hanging off the Ceiling: Tie pieces of snowflakes to strings of fishing wire, and hang at various lengths on the ceiling to create the effect of floating snow.
- Decorations on the Trees: Punch a tiny hole on the top of each snowflake and loop a ribbon through, and then hang on your Christmas tree.
- Snowflake garland: To make a garland of snowflakes, use several snowflakes and tape them together using string or twine, and then hang them around mantels or up staircases.
You can make a gorgeous collection of snowflakes with only a couple of pieces of paper and make your house look even cozier and warmer, not spending much money, of course.
2. Mason Jar Christmas Lanterns
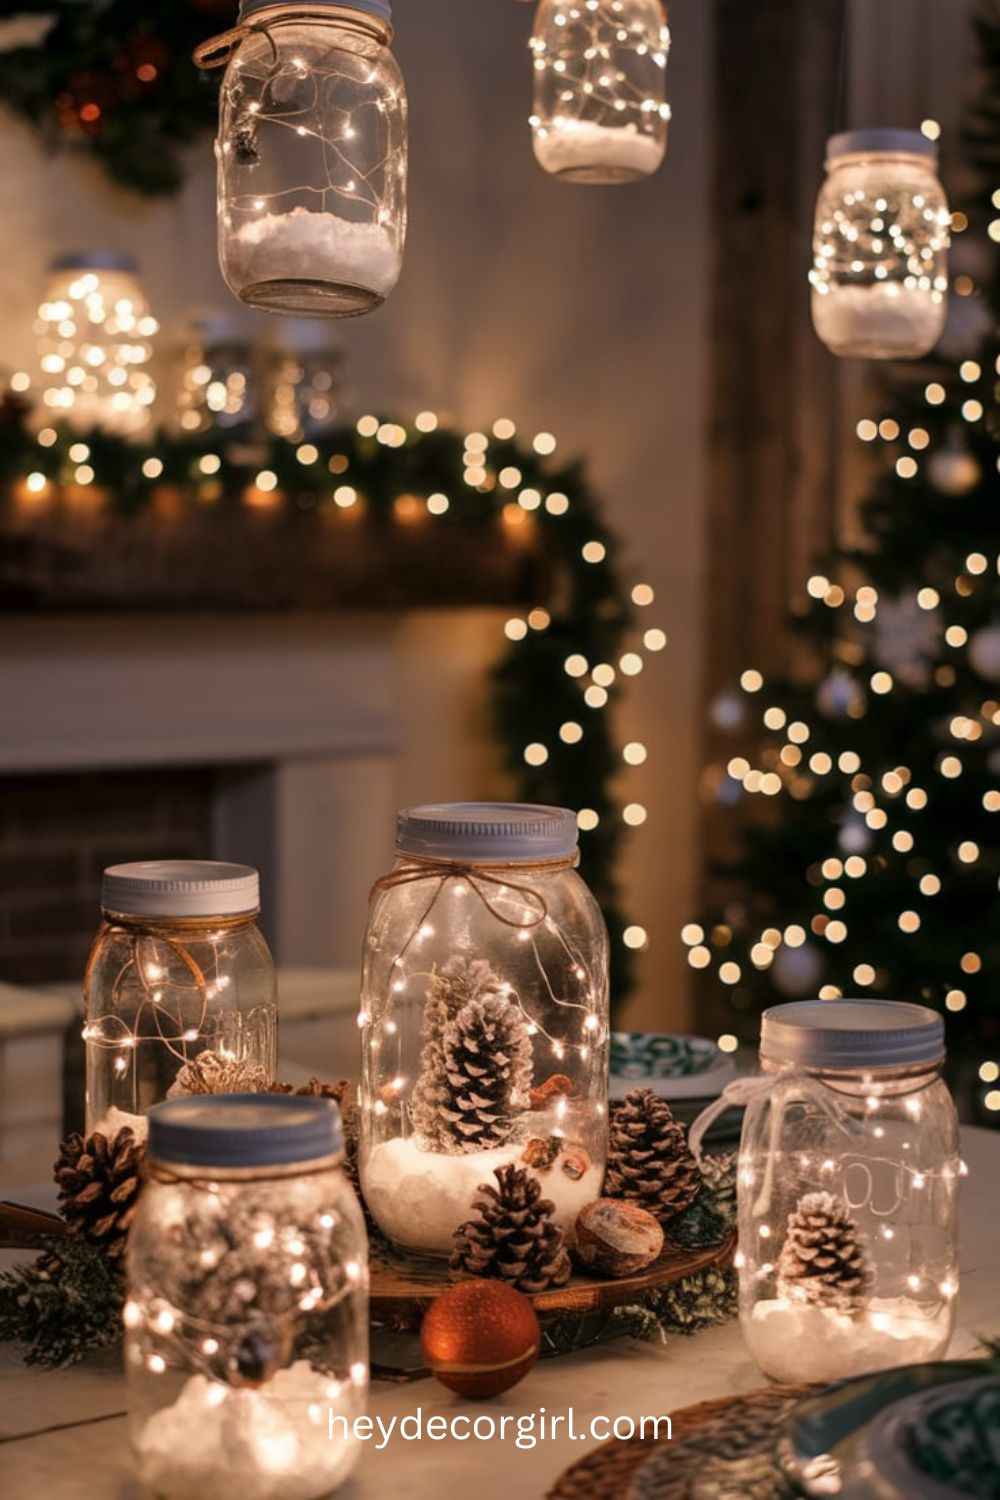
Mason jar Christmas lanterns are an inexpensive and pretty way to provide some warm holiday atmosphere to your house. These lanterns are simple to put together and can be personalized to accommodate any size, be it set on a mantel, a centerpiece, or displayed down your entryway. The following are steps on how to make your own festive mason jar lanterns:
Materials Needed:
- Mason jars (any size)
- String lights (LED lights, which operate with batteries, are best)
- Fake snow or cotton batting
- pinecones, little ornaments, or glitter (not necessary)
- Ribbons or twine (can be used to decorate it)
Scissors
- Hot glue gun (to hold ornaments) (not necessary)
Step-by-Step Instructions:
- Wash and dry Mason Jar: Clean and wipe your mason jars dry so as to eliminate any labels or residue. Should you wish to make them look frosty, it is possible that you can spray the outside of the jars with frosted glass spray paint, making it look rather wintry.
- The Fake Snow: It is best to add a layer of fake snow or cotton batting at the bottom of the mason jar. This gives it a snowy wintery look and assists in upholding the string lights indoors.
- Add the String Lights: Add a strip of battery-operated LED lights and wrap it around the mason jar. Keep the battery pack out of the jar and pick the lights and place them evenly around the inside. The lights can be held in place with a little bit of hot glue, should you have to, though you must be careful not to cover the light.
- Add Pinecones or Small Ornaments: To make it even more beautiful, you can put some small pinecones, miniature ornaments, or even figures (e.,g. a reindeer or a snowman) into the jar. This adds a more party-like, personalized look to your lantern. Make them look good in circles around the lights.
- Decorate Jar: To add the holiday theme, place around the rim of the jar a ribbon, twine, or a piece of burlap. A small tag can also be attached or decorated with an ornament.
- Light It Up: Turn on the string lights, and allow the warm, cozy light to establish a comfortable and warm atmosphere. The artificial snow will be able to reflect the light, and this will be a magical winter.
Additional Ideas:
- Form a Lantern Cluster: Prepare small mason jar lanterns of different dimensions and arrange them around the place around the home in diverse locations like atop your mantel, or as the centerpiece in your dining table.
- Hanging Lanterns: Hang your lanterns: You like to hang your lanterns, do you? You will just do it; just tie a bit of twine around the rim of the jar, and then you can suspend them by hooks or with a branch of solid wood, and the lanterns are pretty and twinkling.
- Employ Natural Materials: You may use other natural pieces of inland tools, such as small sticks or the berries of holy, ly to achieve a more rustic appearance.
Add Glitter: To add some sparkle, sprinkle glitter over the fake snow or the outside of the jar before making your lantern.
Not only easy to make, but these mason jar lanterns add a soft and cozy light to any room during the holiday season, and make it a welcoming and cozy experience. You can fit one or a bunch of them, but it is a definite success, and they will be hanging in your Christmas collection.
3. Homemade Pinecone Ornaments
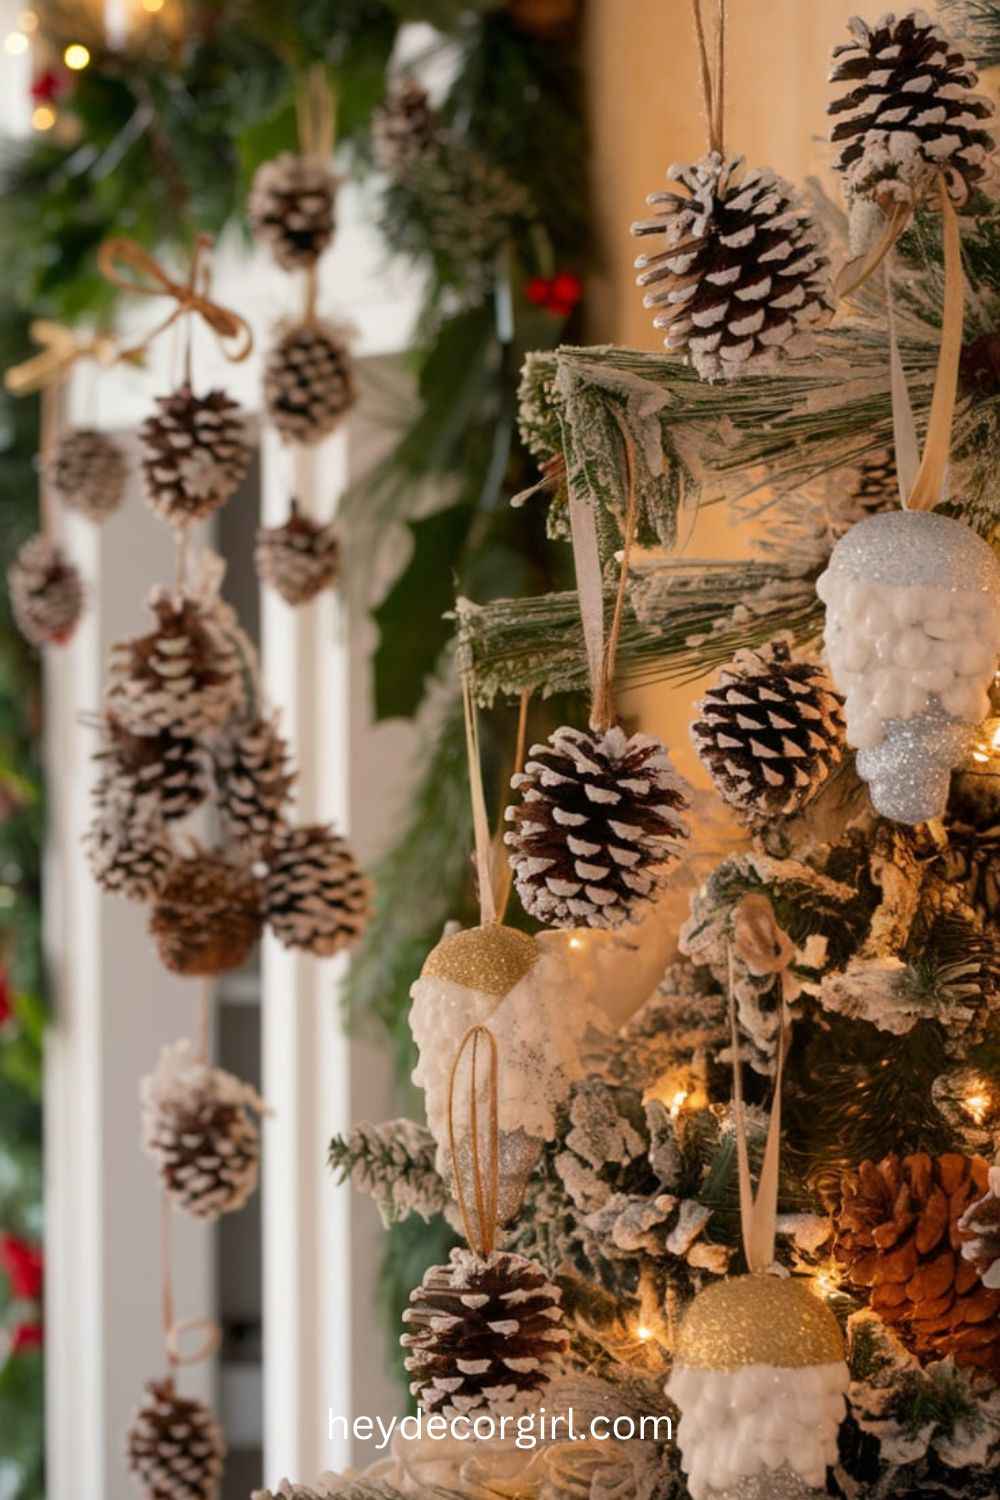
Pinecones are a simple, cost-effective Christmas ornament and are easy to make. When picking the pinecones outdoors and converting them into Christmas decorations, it brings some naturalness to your holiday decorations. To make those pinecones pretty homemade decorations, here is how to do it:
Materials Needed:
- Pinecones (also freshly gathered outside or bought)
- Glitter, paint, or spray paint (option)
- Ribbon or twine (for hanging)
- Hot glue gun (necessary to add additional decorations)
- Small ornaments, beads, or sequins (can be adorned with them).
- A paintbrush (if using paint)
Step-by-Step Instructions:
- Pick Pinecones: Go outside and pick some pinecones in your yard or the nearest park. Make sure that you select clean and sound pinecones, not contaminated with dirt or insects. In case of need, put the pinecones in the oven at200°FF where they are baked to open and dry.
- Clean and Prepare the Pinecones: Clean the pinecones by removing all the debris or excessive dirt using a soft brush or cloth. You can spray them, though, with a little water, and sprinkle them with glitter a little, when slightly wet, to give them a more natural and less sparkly effect.
Decorate the Pinecones:
- Glitter: To add a glittery finish to your pinecones, brush them with glue and sprinkle glitter all over them. Wipe off any glitter and allow them to dry.
- Paint: You can paint the ends of the pinecone tips with white paint to look like snow, or you can paint them with metallic gold or silver to look festive and elegant. A paintbrush is needed to provide a nice finish, and the paint should dry.
- Spray Paint: To speed up the process, light sprayed pinecones with metallic spray paint in gold, silver, or white color options in order to create a fancy snowy effect.
- Add Decals (Optional): In case you would like to add more of your own decoration, pin any small bead, sequin, ns, or other small ornaments to the pinecones. They may be used on the bottom or the fringes of the scales.
- Stick on Ribbon or Twine: After the pinecones have been painted and dried, use a hot glue gun or tie around the top with a piece of ribbon or twine to make a loop to hang. Make sure that the loop is large enough to keep the pinecone.
- Hang Your Ornaments: These are homemade pinecone ornaments, which can be hung in any number of places:
- Christmas Tree: Use the pinecones on your Christmas Tree to make it look natural and rustic. Combine with other ornaments to make them matted.
- Mantels and Garlands: Cut the pinecones and tie them to a string to make a pinecone garland to hang on the fireplace or a staircase.
- Around the House: Pine cones may be used to decorate the house, like hanging ornaments or door handles, or in decorative bowls to create a wintery and cozy atmosphere.
Additional Ideas:
- Scented Pinecones: Embellish the pinecones with a touch of holiday by spraying them with cinnamon or pine-scented spray.
- Painted Designs: You may also incorporate some basic designs, including polka dots, stripes, or even miniature holiday sceneries in the pinecone scales to make it seem more personalized.
- Rustic Wreaths: Use a bunch of pinecones and other natural items, such as twigs and holly berries, to make a beautiful handcrafted wreath.
Such homemade pinecone ornaments are a great option to make the outdoors indoors and also to add a rustic, homemade feature to their Christmas decor with minimal cost.
4. Repurposed Old Ornaments
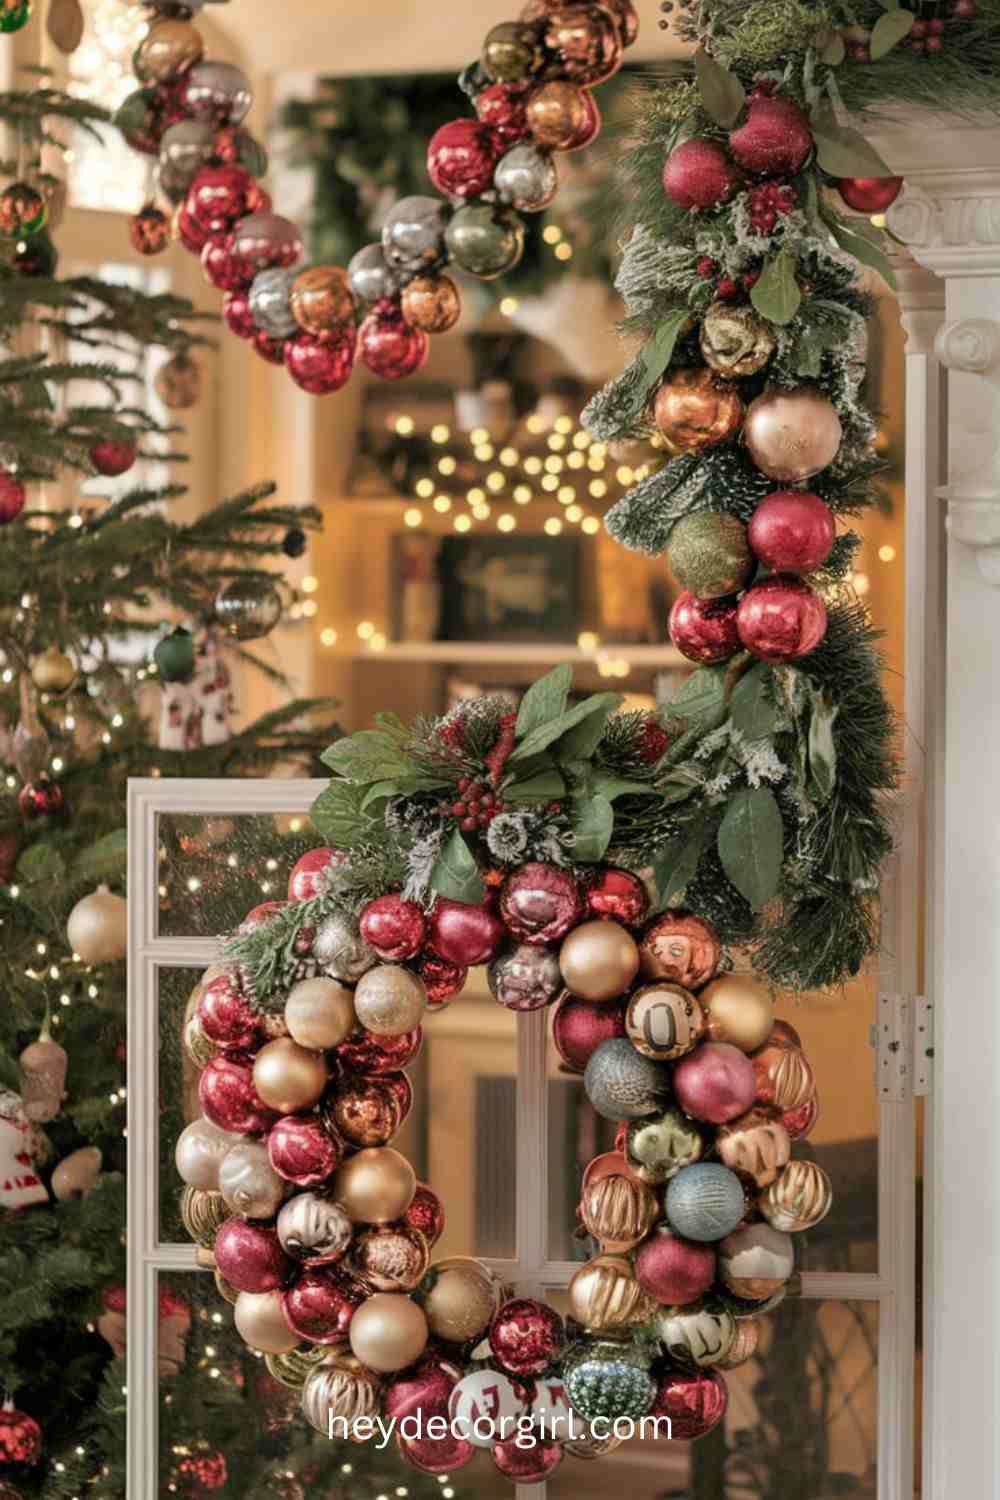
The recreation of old Christmas ornaments is a solution that costs little money and helps reduce waste in the most cost-effective manner. Not only do you have ornaments that have lost their luster, but if you are just looking to decrease your stash, you can make them feel new by repurposing them with some paint, ribbon, or doing a little bit of a DIY project. Here are some ways in which you can repurpose your old ornaments and use them to decorate your holiday:
Materials Needed:
- Obsolete Christmas ornaments (plastic, glass, or wooden)
- Acrylic paint or spray paint (infestivel color)
- Paintbrushes or sponges
- New ribbons or twine
- Hot glue gun (optional)
- Glitter or sequins, or beads (can be used to decorate)
- Craft wire (not a necessity when making garlands or wreaths)
- Floral wire (not mandatory in the case of wreaths)
To refresh ornaments, follow the following steps:
Clean the Ornaments: The first thing is to clean the old ornaments to get rid of any dust or dirt. Wipe them with a soft cloth so that they are all dry before use.
Paint the Ornaments:
Base Coat: When the ornament is faded or chipped up, then you may apply a new base coat of acrylic or spray paint in any color of your preference. The traditional holiday colors are red, gold, silver, or whit, but you can be creative with metallics or even light colors as a new twist.
Decoration Patterns: You can use a contrasting color of paint to decorate the base when it is dry with either a polka dot, a stripe, a pe, or a snowflake pattern. Glitter can also be added to achieve a sparkly finish, or the details can be hand-painted to make it more subjective.
Add New Ribbons or Twine: Take the ribbons that were on the ornaments off and put new festive ribbon or twine on them. You may either tie a simple bow or make a loop to hang or wrap the ribbon around the ornament in a design. Select ribbons that suit your theme of the occasion, such as red, green, gold, or silver.
Decorate the Ornaments (Optional):
- Use some small details like sequins, beads, or glitter to provide the ornaments with an additional glimmer. A hot glue gun can be used to fix these decorative elements on the ornament to make it eye-catching and festive.
- To make them look more natural or rustic, you can attach small pinecones, twigs, or dried flowers to the ornaments with the help of glue.
Suggestions as to how to use the old ornaments in new garlands or wreaths:
- Ornament Garland: Take several of the old ornaments and tie them together in a rainbow-colored garland.
Insert the ornaments through the use of craft wire or strong string and tie knots in order to hold them in place.
Decorate your tree, mantel, or stair rail with the garland. - Ornament Wreath: Use your old ornaments to create an exquisite wreath for your front door or as the centerpiece.
Prepare your recycled ornaments in a circle, fasten them with floral wire or a hot glue gun.
Any gaps should be filled with smaller ornaments, pinecones, or greenery to provide some texture and color.
Hang a ribbon or piece of twine at the top. - Ornament Centerpiece: Find a monstrous bowl or tray and place a bunch of used ornaments in the middle of your dinner or coffee table. You may put candles, plants, or even fake snow in the display.
Additional Ideas:
- Reuse Old Decorative tops: The broken ornaments can also be used as decorations. The DIY projects that can be made by using the tops of old glass or plastic ornaments are to create a new garland or attach the ornaments to wreaths.
- Recycle Old Decorations: You can use old ornaments that are not in perfect condition by breaking them off or into new shapes (such as a star or a snowflake), which can be used in other decorations.
Re-using old ornaments will help you to not only save some money, but also enable you to be creative and make yourself special to your holiday decorations special. Through paint, new ribbons, and a bit of imagination, you can turn old-fashioned or forgotten pieces of art into beautiful and unique decorations for your home.
5. Recycled Sweater Stockings
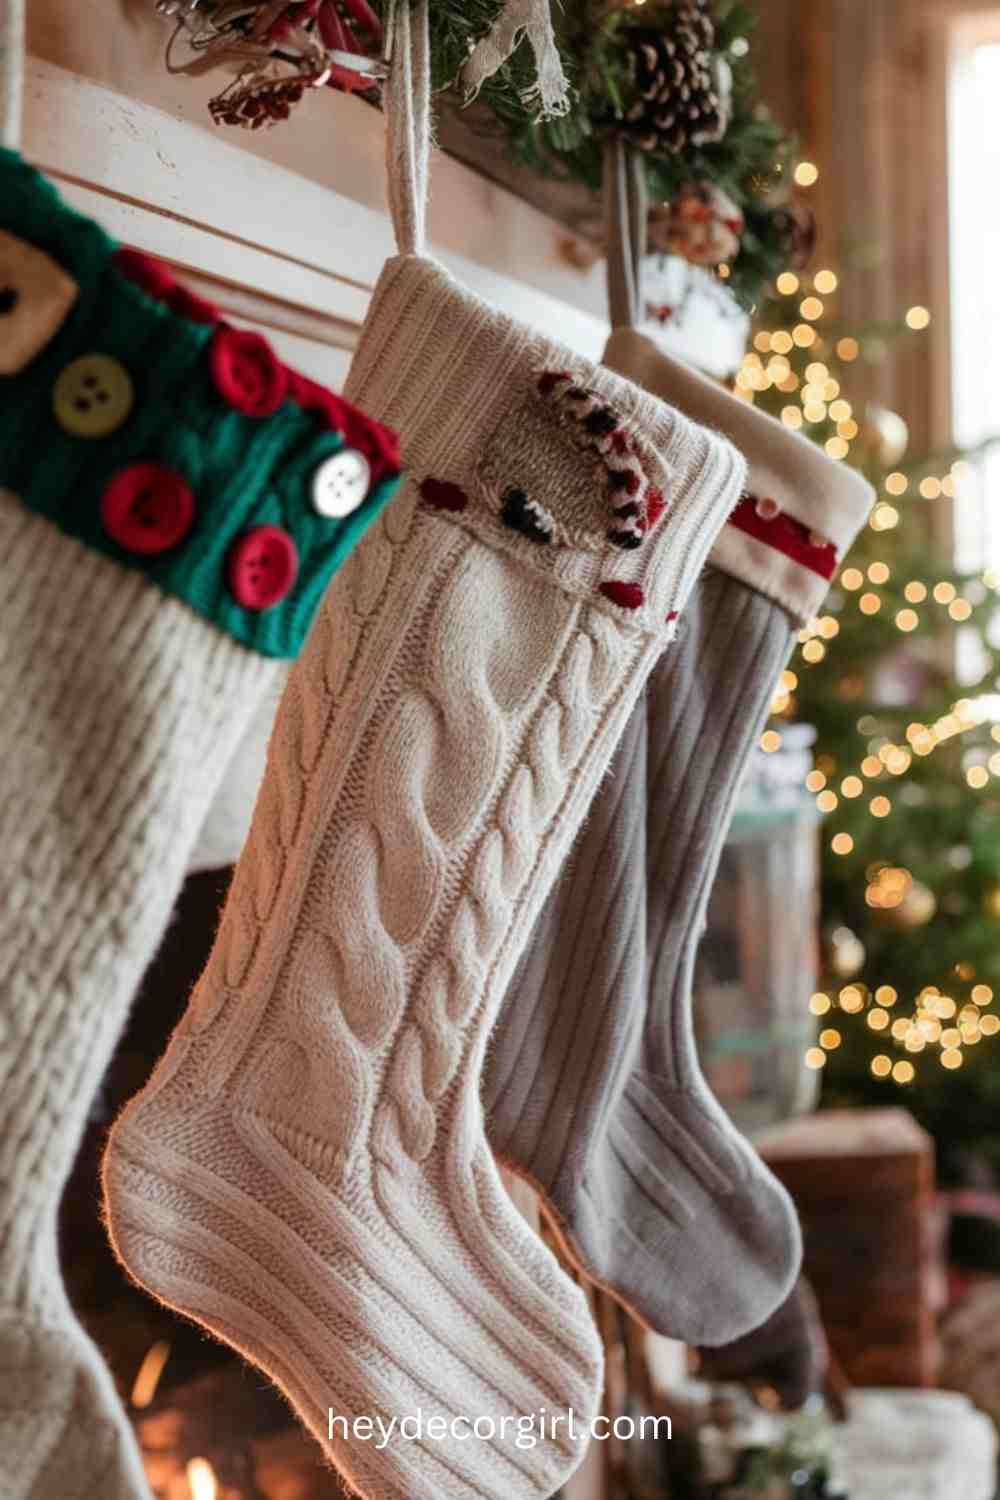
One more creative, sustainable, and affordable method of making customized holiday decorations is to use old sweaters as Christmas stockings. Do you still have old sweaters that you do not wear anymore? Well, you can use it a second time and transform it into easy, warm, cozy stockings. Not only does this DIY project help to cut down on the amount of waste produced, but it also enables you to make some of the most unique and charismatic stockings that can fit your theme during the holidays. This is the method of creating your own recycled sweater stockings:
Materials Needed:
- Old sweaters (thick, knitted sweaters are the best)
- Scissors
- Little pieces of cloth (to decorate them)
- Antique buttons or ornaments (optional)
- Needling or sewing machine (to sew)
- Hanging loops, Ribb, on or twine.
- Felt or other cloth (not compulsory to line or add any details)
Step-by-Step Instructions:
- Select the Sweater: Begin with a sweater of your choice in terms of pattern or texture. You can also consider a rather thick sweater, which serves as a more resistant stocking. Sweaters in Christmas colors such as red, green, or white can also be chosen to make the event festive.
- Prepare the Sweater: Place the sweater on a flat surface and cut it into two pieces with the front and back ofsweatercking. The size is subject to change as the stocking can be as small or as big as you would wish it to be. Another solution is to draw the shape of a traditional stocking a paper and trace it.
- Sewing the Stocking: Lay the two pieces of sweater fabric together and the right sides at the same side. Sew the edges with a sewing machine or by hand to form the shape of the stocking. Keep the top open to fill and ensure that the seams are fastened.
- Add a cuff: You can put a cuff on the top of your stocking, should you want it, and you can cut a piece of sweater or material and stitch it to the top ofcuffe top. It is an excellent way to spend some fabric scraps and make your stockings look great and layered.
Decorate the Stocking:
- Fabric Scraps: These are little bits of fabric that can be used to form applique patterns, including stars, hearts, or even initials of family members. Stitch them on the front of the stocking to make it stick out.
- Old Buttons: Use as decoration by sewing along the cuff, making a button tree, or using them to act as closure to the stocking instead of using a more traditional bow.
- Ribbons / Twine: To make it look rustic, apply ribbons or twine to create an opening that can then be used to hang the stocking, or create a bow on top.
- Optional Lining: You may also line the inside of the stocking with a soft material such as felt or cotton. This is also useful in providing the stocking with structure.
- Fill with Holiday Cheer: After you have finished your stocking, fasten it to the fireplace, on the wall, or on the staircase. Stuff it with tiny gifts, candy, or treats so that it has a personal touch of the holiday.
Additional Ideas:
- Mixed Sweater Styles: To have a patchwork appearance, you may cut the parts of various sweaters to make patchwork stockings. Patterns of mixtures, colors, and textures to have a one-of-a-kind design.
- Matching Family Stockings: When you have several old sweaters, you can think of making stockings that match each of the family members. Coordinated SEOU can use names or initials to personalize them.
- Embroidery or Appliqué: Embroider or appliqué holiday designs, such as snowflakes, reindeer, or Christmas trees, on the stockings.
One of the creative methods to add customized and upcycled decoration to your Christmas festivities is to recycle old sweaters into a Christmas stocking. It is not only an environmentally-friendly option, but you can also make all the decorations full of memories and unique to your home.
6. Paper Chain Garland
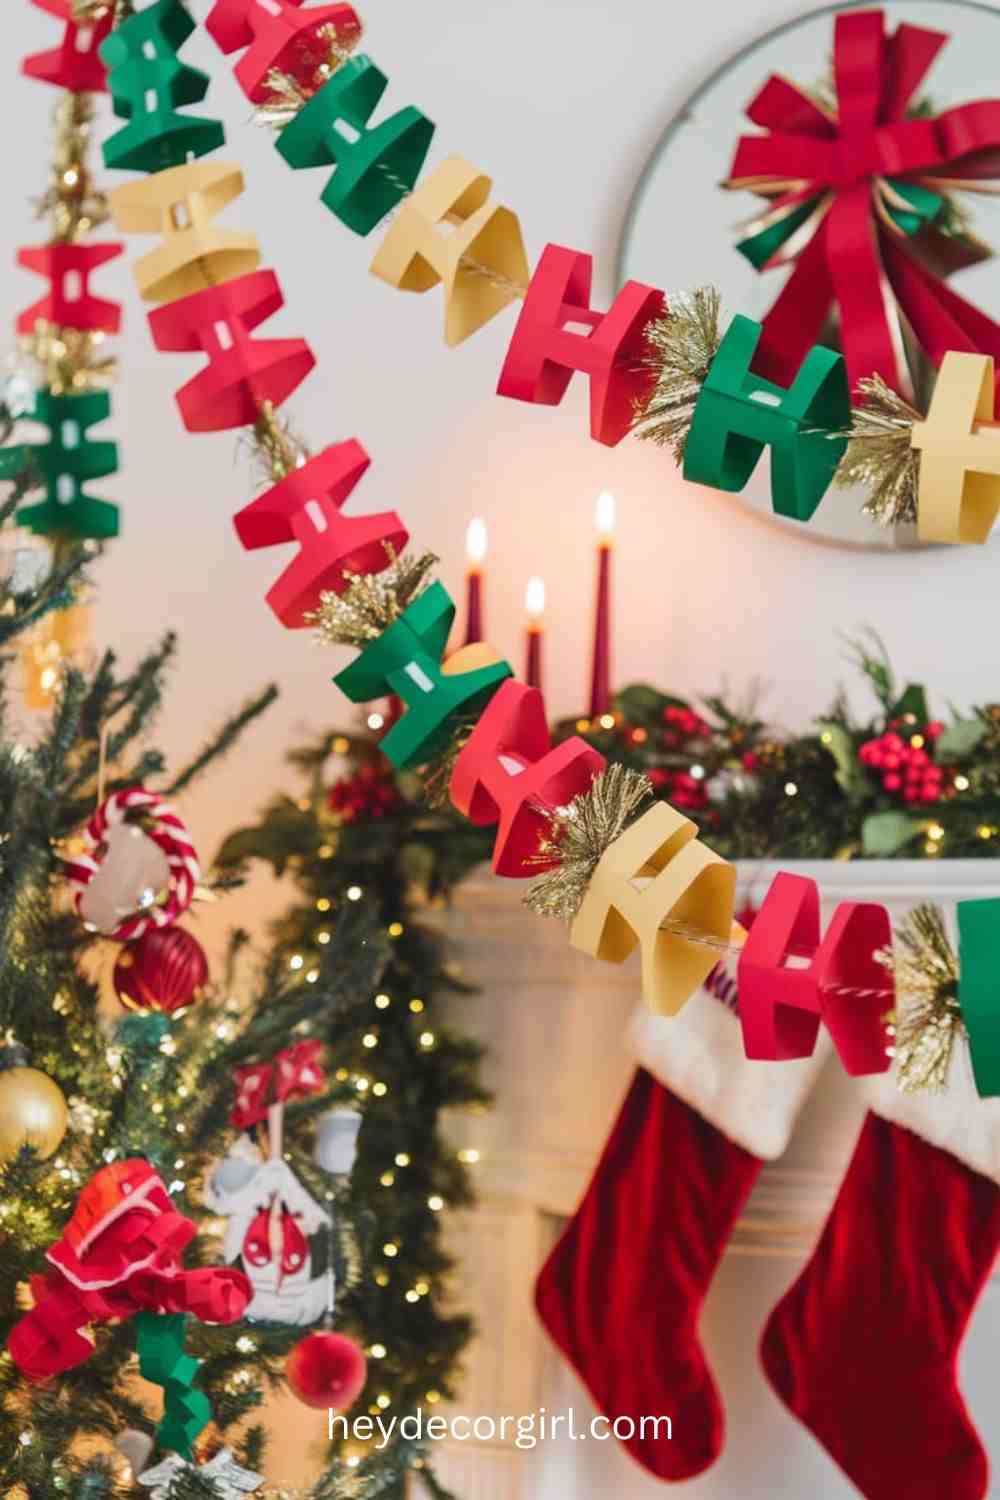
A paper chain garland is a cheap and cute craft that can be used to bring the merry and mischief to your home during the holidays. It is among the easiest of the DIY projects, thus ideal for any age. You can hang it on your Christmas tree, or drape it on the mantel, or use it as a garland around the staircase, but you do it, the paper chain garlands are quite versatile and can be easily customized to suit a particular holiday theme. Here’s how to make your own:
Materials Needed:
- Scrap paper or colored construction paper (in one or several holiday colors such as red, green, gold, or silver).
- Scissors
- Glue stick, tape, or a stapler
- Ruler (not required, when measuring even strips)
- Stickers or decorations related to the holiday (not mandatory).
Step-by-Step Instructions:
- Preparing the Paper Strips: The first step is to cut the construction paper into long strips. The strips can be any size and length; in this case, 1 inch wide and 6 inches long, but you may make the links of the paper chain any size that you want.
- Create the First Link: With the first strip of paper, make a loop by taking the ends of the strip and crossing them. Staple or glue or use tape to make a ring around the ends. This will be the first chain in your chain.
- Add Next Link: Add some more paper and pass it through the first loop, a nd then create another loop and tighten it like the first one. Keep adding links as long as you desire your garland to be.
- Change Paper Colors: It is possible to alternate between the various colors of paper to make a garland in different colors. Instead, choose one palette, one that is in line with your theme during the holidays. Traditional colours are red and green, though metallics, pastels, or even white are possible to make it more modern and wintry.
- Add Decorations (Optional): To add a festive narrative, one can adorn the paper links with stickers, glitter, or little stamps. It is also possible to include a few holiday decorations, such as snowflakes, holly, or stars, as you want to make your garland special.
- Hang the Garland: When you have finished your paper chain, the next thing to do is to hang it anywhere you want to add some colour and cheer. You can use it on your Christmas tree or on the mantel, on the staircase railing, or on n window or doorway, to give it a happy holiday look.
Additional Ideas:
- Mix and Match Paper: To have a more entertaining appearance, one can also mix various patterns of paper, such as stripes, polka dots, or festive print (gingerbread men, snowflakes, etc.).
- Recycle Paper: You can use old magazines, newspapers, or even scraps of used holiday wrapping paper to use as a more sustainable garland.
- Mini Paper Chains: To appear smaller and more delicate, thicker pieces of paper should be used to make mini paper chains, which should be used to decorate a small tree or to decorate table settings.
The easiest and cheapest way of giving your holiday decorations a light-hearted, homemade touch is with a paper chain garland. It is something the entire family can enjoy, and this can easily be adjusted to any Christmas theme or color palette!
7. DIY Cinnamon Stick Ornaments
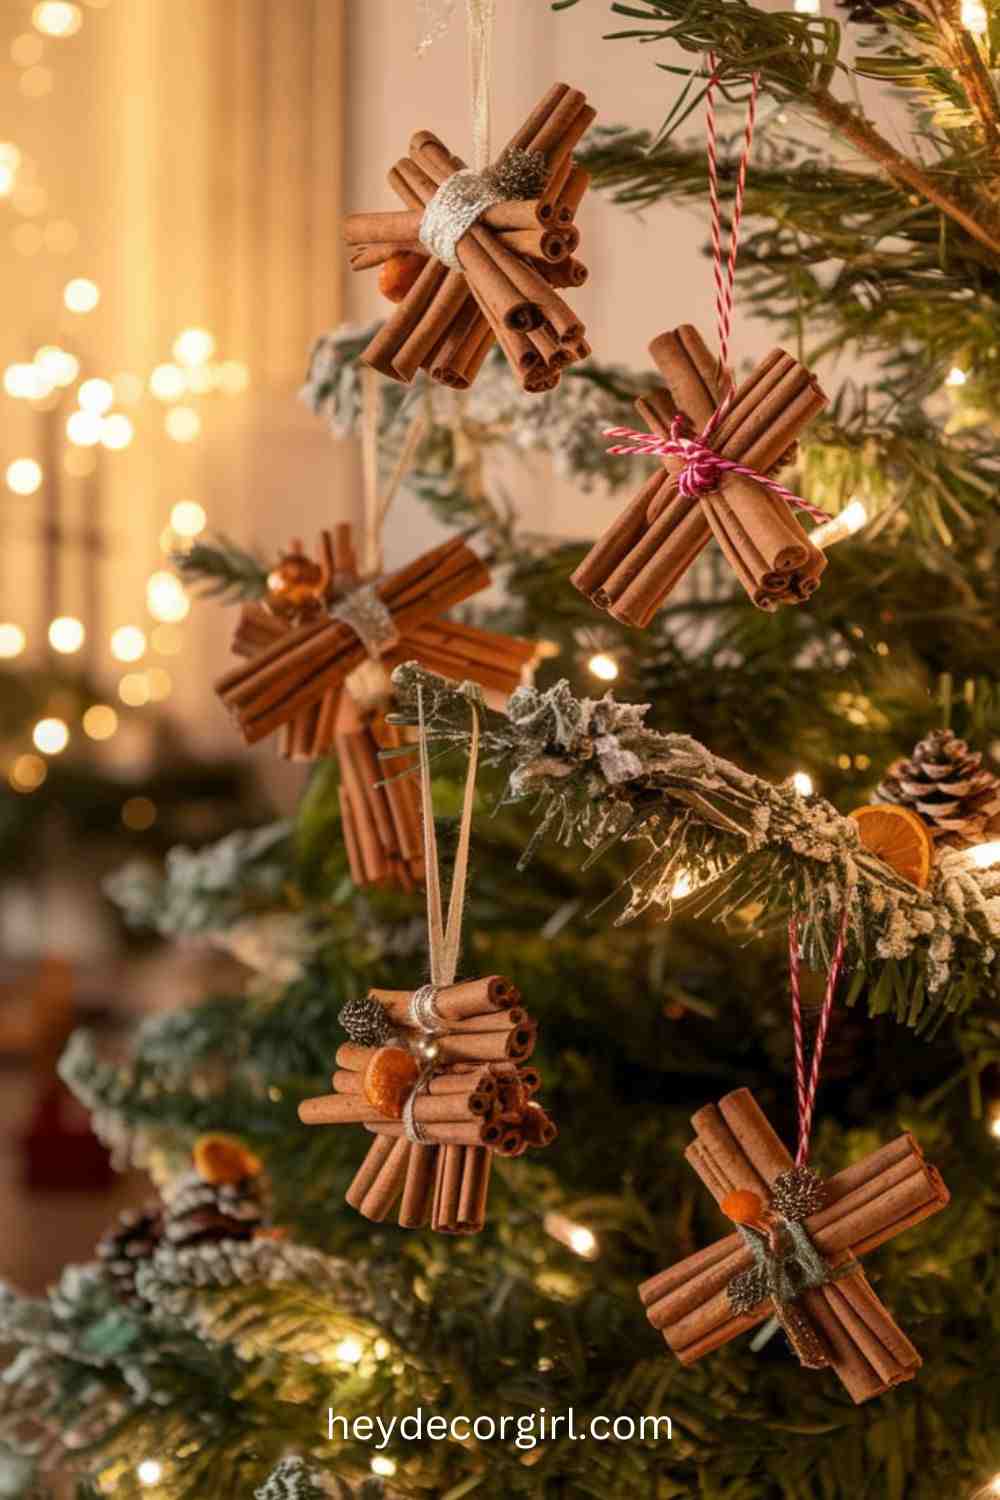 The cinnamon stick ornament not only creates a rustic look in your Christmas decoration, but it also works miraculously in filling your house with a luscious holiday smell. These are basic DIY ornaments that can be constructed easily, cheaply, yet they will be the best addition to your tree, garlands, or wreaths. The following is an example of how you can make your own cinnamon stick ornaments:
Materials Needed:
- Sticks of cinnamon (whole, approximately 3-4 inches long)
- Ribbon or twine (for hanging)
- Hot glue gun (or craft glue)
- Ornamentation (not compulsory, such as dried orange slices, pinecones, beads, or little pine branches)
- Perfumed oils (additional smell)
- Scissors
Step-by-Step Instructions:
- Prepare the Cinnamon Sticks: This begins with the collection of cinnamon sticks. You may use fresh cinnamon sticks, though they may not be as fragrant. Can add more scent later with the drop of cinnamon or clove essential oil. When working with several sticks on one ornament, use a bunch of 3 to 5 sticks, or more, depending upon how large you wish your ornament to be.
- Prepare the Sticks: Prepare the cinnamon sticks in a form of your choice. The most common shapes are:
A set of sticks that were bound and make a small structure as an ornament.
Two cinnamon sticks formed in the shape of a cross or an X.
Triangle or star-shaped when the sticks are placed at angles. Hot glue can also be applied in order to stick the sticks together, should you require it, particularly when coming up with a more complex design. - Add Ribbon or Twine: These are optional, but add a ribbon or twine long enough to form a loop through which your ornament is going to be hung. Apply the ribbon on top of the ornament with the help of hot glue, and the loop must be secured so that it can be hung. At the top, you can tie a bow as a decoration.
Decorate (Optional):
- You may also stick on little dried pieces of oranges, little pine cones, or a sprig of pine or holly to the cinnamon stick bundle, which we found to be the prettiest.
Little beads or little bells can also be glued so that the ornament twinkles.
Add some sprinkling of fake snow or glitter, if you like, to make it frosty and wintery. - Make it Smell Good: To make the ornaments smell very good during the season, drop a few drops of cinnamon, clove, or even vanilla essential oils into the cinnamon sticks. The sticks of cinnamon could be rolled in ground cinnamon to give a more powerful smell as well. Make sure that the oil is fully dried before you hang them on your tree.
- Hang and Enjoy: After you have finished your DIY cinnamon stick ornaments, you can then hang them on your Christmas tree, mantel, or your wreaths and garlands. The cinnamon will gradually give out its scent, and your home will smell like the holidays.
Additional Ideas:
Scented Sachets: The cinnamon stick ornaments may be used as homemade scented sachets. A small bunch in a piece of fabric can be kept as an air freshener in the house and can be used as a natural freshener.
8. Thrift Store Finds
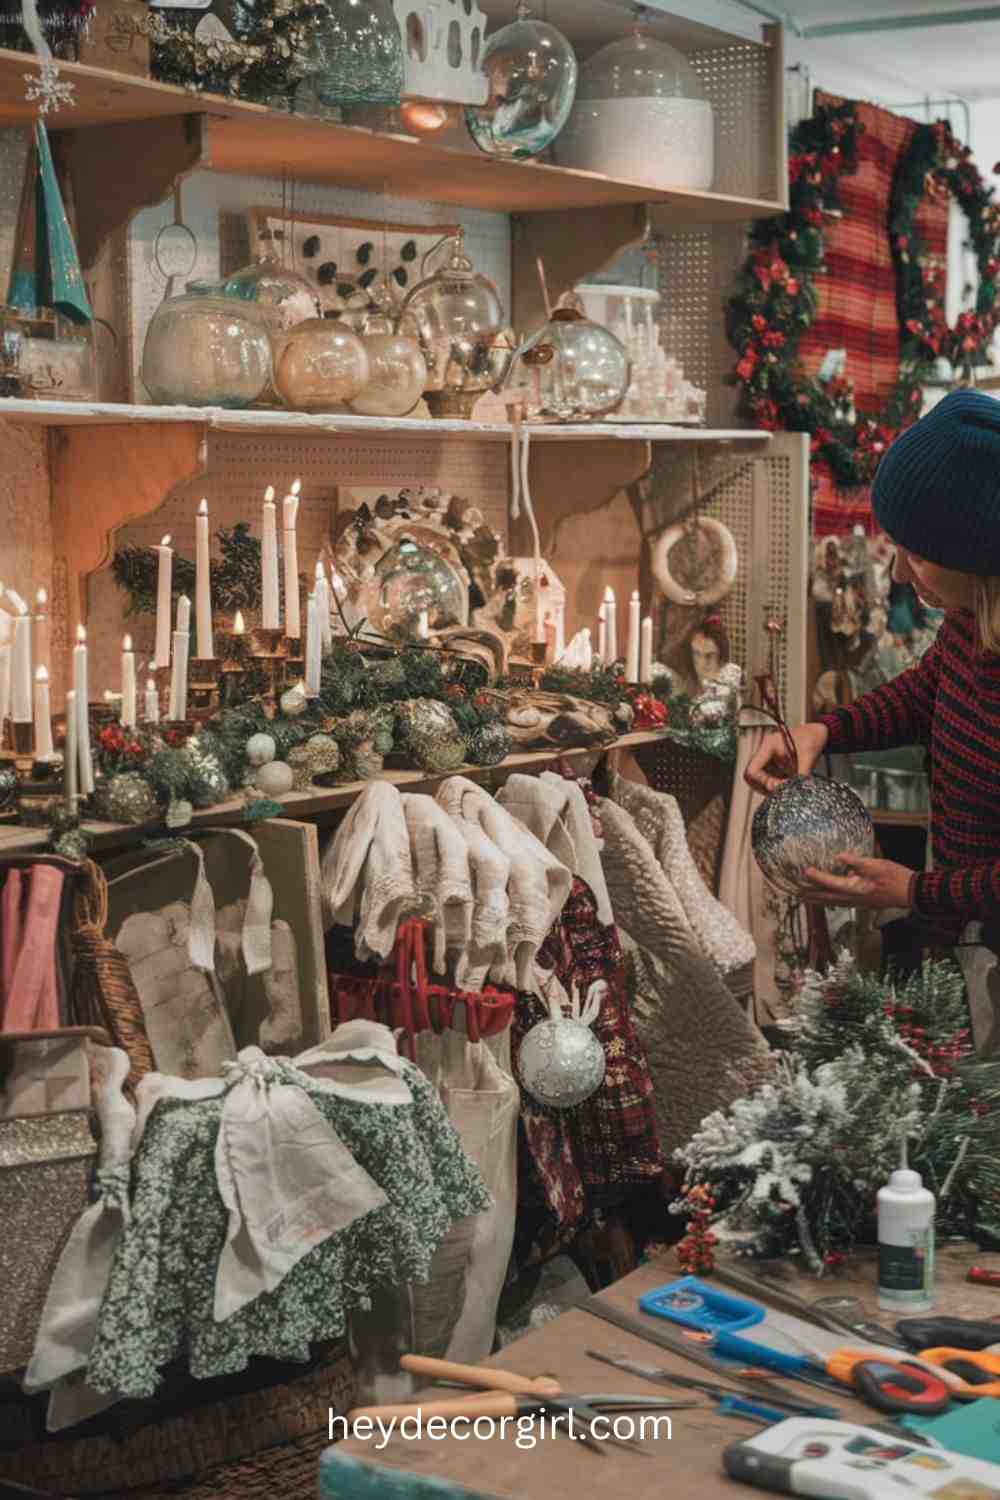
Local thrift shops are an underground treasure trove of low-cost Christmas decorations that are not only cheap but also well-loved and charming. The second-hand shopping experience will allow you to find a unique piece that can be made into beautiful holiday decor with a bit of creativity. Thrift stores have unlimited possibilities, whether you need old ornaments, outdated decorations, or something out of the box to repurpose. Here is the way of locating and repackaging used decorations in Christmas to make it really special:
Christmas Decoration Tips: Findings of Second-Hand Christmas Decorations:
- Check Seasonal Sections: Check cashing stores often stock seasonal sections of things that are available at a particular time, particularly during the holidays. This is the place where you are likely to find old Christmas decorations in the form of ornaments, wreaths, garlands, and even fabric such as old tablecloths or linens, which can be used again.
- Find Totally Unique or Vintage: Thrift stores sometimes stock old-time holiday decorations, which could be out of production or out of style. Search for h products such as old glass decorations, vintage tinsel, or old figurines that will give your decorations a distinctive feel for your holiday.
- See Unusual Finds: Not everything that is on holiday will be screaming Christmas. Consider the reuse of such items as old picture frames, candle holders, glass jars, or even toys and figurines, which may be repurposed into festive items through creative thought.
- Don’t ignore Fabric: Thrift Stores.T is a good place to get fabric to make projects. Find holiday materials and old sweaters (they are ideal for making stockings) or even tablecloths that can be cut into pieces to be used as holiday decorations, such as wreaths or tree skirts.
- Shop Off-Season: Try to shop during off-peak seasons in the form of Christmas decorations. You will have more of the second-hand stuff because people empty their homes and give them away after the holiday, and the prices are generally lower.
Concepts of Refurbishing Second-hand Goods:
- Vintage Ornaments: Old glass ornaments can be renewed using some paint or a slitter. You may also take away any old hook, more or less worn out, and add new ribbon or twine to make it look more rustic or more modern.
- Upcycle Old Wreaths: Thrifted wreaths usually require a minor touch-up, just add some greenery, some ornaments, some ribbons, or even paint them, and then they can feel new. Adding seasonal flowers, pine cones, or fake berries can make them look like a new holiday.
- Redo Picture Frames: Old wooden picture frames can be re-done into nice holiday decorations. Take out the glass and have the frame serve as a base to a wreath or stick festive decorations such as small ornaments, ribbons, bows, and even faux snow. It is also possible to make a picture frame into a chalkboard and write messages concerning the holiday.
- Rework Old Linens: Holiday: Tablecloths, napkins, and fabric. Old clothes from the thrift store can be reused into Christmas tree skirts, decorative pillow covers, or even fabric wreaths. Cut the cloth to make easy napkin rings or design your own handmade stockings to suit your theme of a holiday.
- Reuse Glass Jars or Bottles: Glass jars with age may be stuffed with faux snow, mini ornaments, or candles to make holiday centerpieces. They can also be sprayed with colors of the season or put on burlap and ribbons to have a more homestead appearance.
- Redo Old Candle Holders: Old candle holders, particularly the old vintage ones, can be turned into a festive one with a bit of creativity. Surround them with fake snow, tiny decor,ation, and twinkle lights. You can also have them painted in celebratory colors so that they can be in line with your theme.
- Use Toys or Figurines as Decorations: Old toys, figurines, or unwanted knick-knacks can be used to create unique ornaments or centrepieces. Just pop in some paint, glitter, or ribbon, and they are Christmas-themed.
- Make a DIY Tree out of Thrifted Materials: In case you need a Christmas tree, find an inventive alternative in a second-hand store. Branches can be used to create a rustic tree, or big pieces of cloth can be bundled together to create an eccentric tree.
Additional Tips:
- Get Crafty: In case of something not looking nice, do not hesitate to get crafty! A slight glue, paint, or fabric can have a far-reaching effect in making something that fits your style.
- Focus on Color: When you see great things in the incorrect colors, you need not worry because you can transform the looks of your things with the help of paint, ribbon, or cloth.
- Store Shop: Thrift stores usually have chairs, bins, baskets, or boxes that can be utilized to store or display your decorations. Several strategically placed storage pieces can also assist in maintaining order in your decorations, as well as contribute to their beauty.
Christmas shopping at thrift stores is an excellent method of saving money as well as getting unique decorations that could be tailored to suit your house. Beauty may be found in the second-hand, and some DIY additions can transform them even more into something special for your holiday season.
9. Salt Dough Ornaments
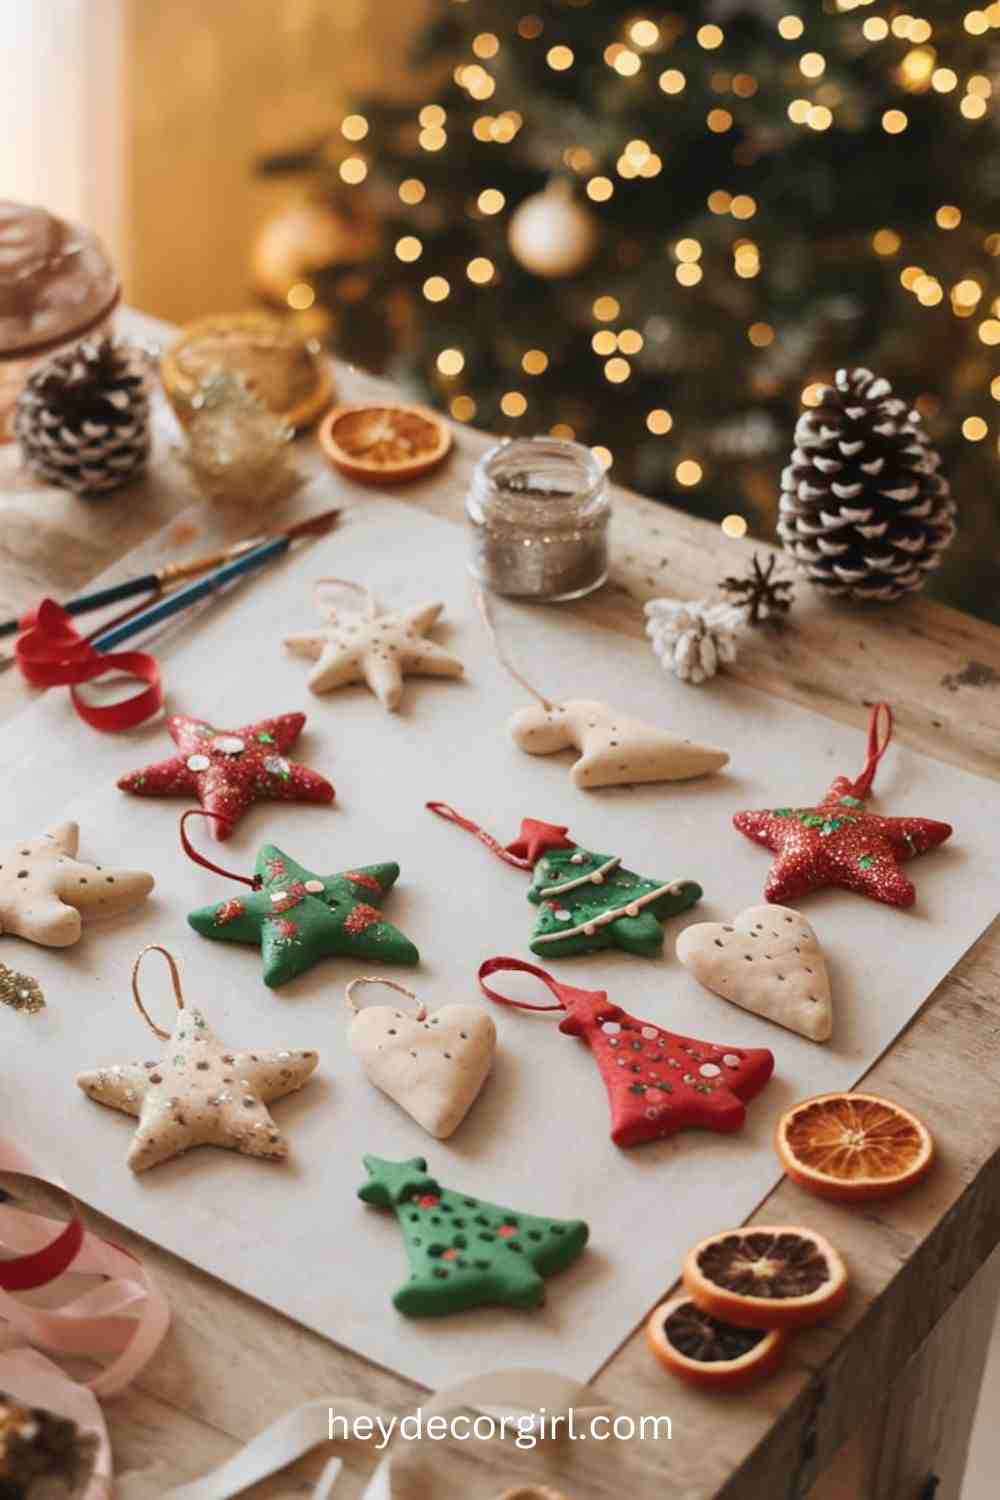
These salt-dough ornaments are a simple and entertaining DIY project that can help personalize and make your Christmas decorations look handmade. The best part? You can shape them into whatever shape or design you desire, whether it is the conventional stars and hearts or something unique, such as an animal, snowflakes, or even the initials of your family. These decorations are ideal for giving gifts or a family craft project. The following are instructions on how to make your own salt dough ornaments:
Materials Needed:
- 1 cup all-purpose flour
- 1/2 cup salt
- 1/2 cup water
- Rolling pin
- Cookie cutters (not necessary, to shape)
- Straw (to make holes in the hangings with).
- Paint (acrylic or watercolor)
- Brushes
- Ribbon or twine (for hanging)
- Rolling surface (such as parchment paper or a clean countertop)
Step-by-Step Instructions:
- Prepare Salt Dough: Add the salt and flour to a large mixing bowl. Add water gradually, stirring till you have formed a dough. When the dough is too sticky, then put more flour into it; when it is too dry, put a bit more water until you have a smooth, firm dough.
- Roll out the Dough: Pick the dough on a flat area sprinkled with flour. Roll it out to approximately 1/4 inch with your rolling pin;n, that is the right thickness of ornaments that will keep their shape, but not so thick that they are too hard to bake.
- Cut Out Shapes: Cookie cutters or a knife are used to cut out the shapes you want. As the Christmas options are popular, there are stars, trees, hearts, and angels, or even initials. It is also possible to make your own custom shapes.
- Create Holes to be Hanged: Use a drinking straw or skimming to make holes on the tops of the ornaments where one can put ribbon or twine in later to hang.
- Bake the Ornaments: turn your oven on 250degF (120degC). Roll your form of dough into a baking pan that has been lined with parchment paper and bake it at a duration of approximately 1-2 hours, depending on the thickness of your ornaments. Monitor them to ensure they do not overbake. The decorations must be thoroughly dry and hard to the touch.
Bake the Ornaments: Bake the ornaments, then cool them in the wire rack before decorating.
- Ornament Decorations: Now that your salt dough ornaments are cool, it is time to add color to them. Festive colors can be used to decorate your ornaments using acrylic paints. You can paint them in bright reds, greens, or metallic golds and silver, or make a much more natural design in natural tones or white to make it wintery.
Personalizing it, you may also paint names, dates, or short messages on the ornaments.
Decorate them further by adding glitter, tiny rhinestones, or even ribbons. - Hanging Ribbon: As soon as the paint had dried pa pass through the hole at the top of each ornament a piece of ribbon, twine, or string. Tie a knot or a bow and make a hanger to your ornament.
- Display and Enjoy: Your salt dough ornaments may be hung on the Christmas tree, in a wreath, or around the house. These adorable homemade decorations are ideal for creating a personal, warm ambiance during the holidays.
- Additional Ideas:
Stamped Impressions: You can make an impression or a design on your ornaments with the help of stamps before baking to add a decorative touch. - Make Different Based on Shapes with Cookie Cutters: Be creative with your cookie cutters and create different themed cookies like reindeer, snowflakes, or even customize your own family names.
- Gift Tags: It is also possible to use smaller salt dough ornaments as personalized gift tags for presents.
Add Scent: Add one drop of essential oil (such as cinnamon, clove, or pine) to the dough mixture to make the ornaments have a delicious smell that will last all through the season.
OrnamenSalt-dough ornaments are a simple, low-cost, and customizable craft that fits almost any holiday or occasion. By being a bit creative, you will be able to come up with beautiful, personal decorations that will be preserved throughout the years!
10. Upcycled Tinsel Garlands
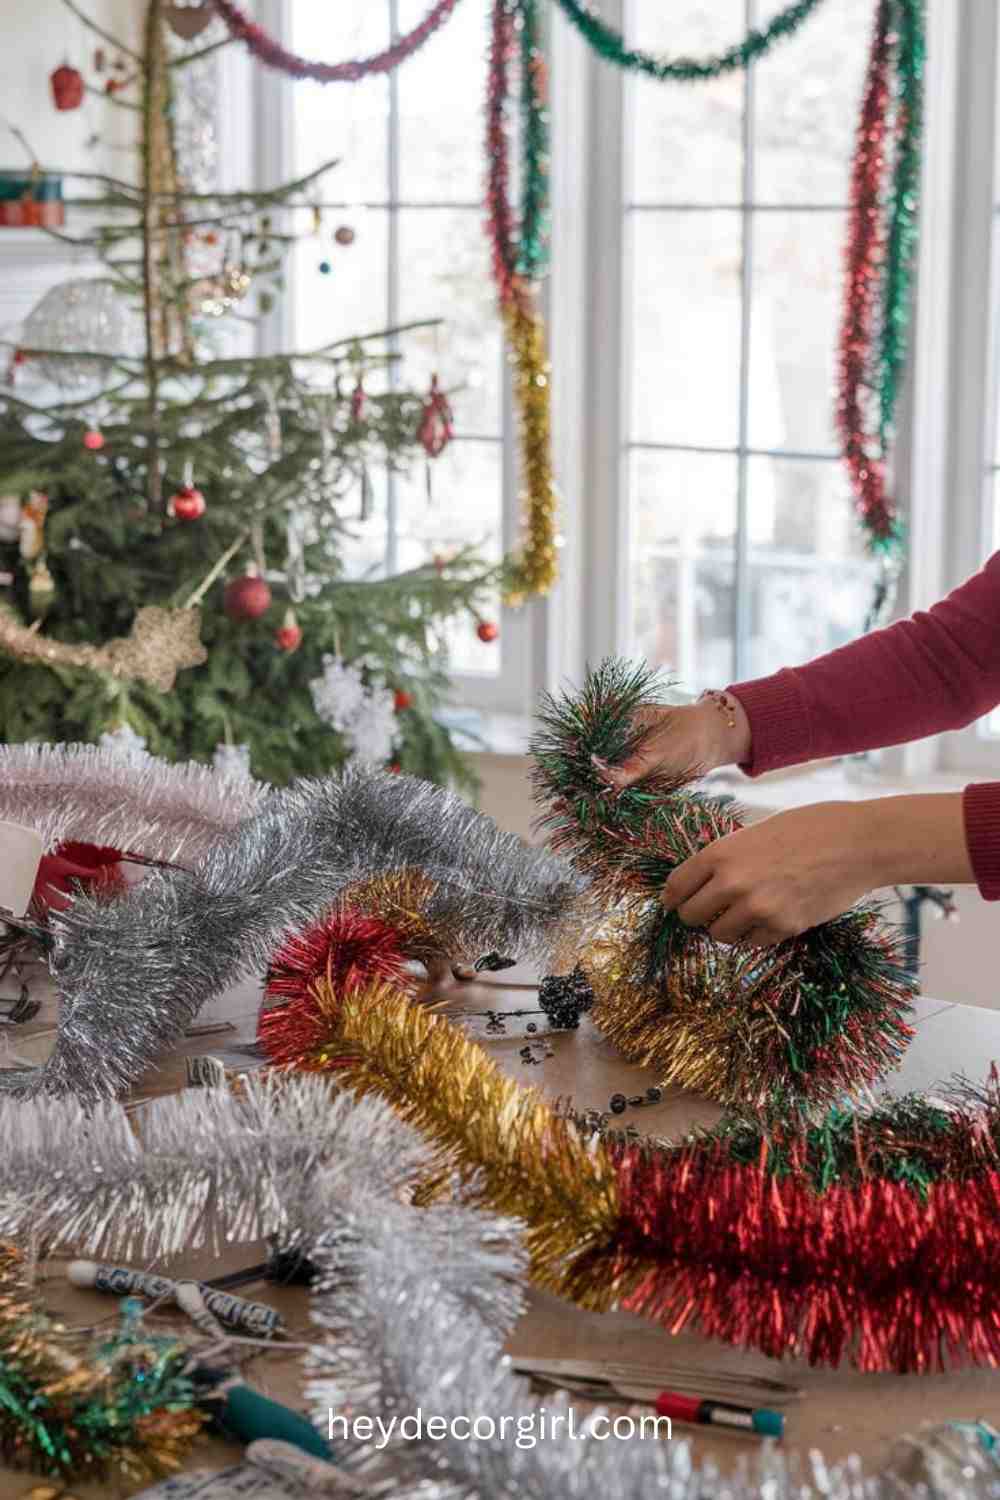
Old tinsel garlands are an easy way to make new, colorful holiday decorations without buying anything. So when you realize that you have extra tinsel from past years, grab those strands growing in the trash and give them new life as these beautiful garlands to add a bit of sparkle and shimmer to your home this holiday season. A bit of imagination and you can reform or combine different desired colors and textures of tinsel to personalize the fresh new appearance on your Christmas tree, mantel, stair railings. Here’s how to bring old tinsel garlands back to life:
Materials Needed:
- Old tinsel garlands
- Scissors
- Hot glue gun or tape (not required)
- Other decorations (optional, such as beads, sequins, ribbon, or little ornaments)
- Thread or wire (to make garlands)
Step-by-Step Instructions:
- Sort and Separate the Tinsel. If your tinsel garlands are multicolored or have a variety of textures (say, metallic vs. iridescent strands), separate them by color or style. This will allow you to make an artificial and deliberate string for your new garland. You can also choose whether you’d like to stack a few strands of tinsel together for a fuller effect or keep them more on the wispy side.
- Reshape the Tinsel: Occasionally, older tinsel garlands lose their form when they are stored. To freshen them up, carefully rake the strands apart and stretch them out. They can be easily bent into a new shape, such as a spiral or loop, to give them a fresher and more contemporary look. With your hands or a wire frame, make the tinsel take on the shape that you want.
- Mix & Match: If you want a more multi-dimensional garland, use both colored and frosted tinsel. Mix gold, silver, and red tinsel for a traditional Benoit theme (or toss in some iridescent or metallic tinsel if that’s more your style). If the tinsel feels too thin, you can double or triple strands together to make them fuller.
- Optional: Add Extra Decorations. To make your upcycled tinsel garland even more fabulous, you could decorate it. You can also attach small ornaments, beads, or sequins to them as you make the garland more personal. Tying a few ribbons or bows will provide some elegant decoration, and you could also cover the tinsel with fairy lights to add a bit of sparkle.
- Stick the Tinsel to a Base (Optional). If you’d like your garland to have more structure, think about sticking the tinsel onto string, wire, or ribbon. This is particularly handy if you want to hang the garland on a mantle or drape it over a doorway.
- How to Use Tinsel Garla.nd I hope you found the tutorial on how to make tinsel garland helpful, and now that it’s completed, how do you decorate with it? Hang it on your Christmas tree or drape it from a mantel, window, or door. You could even drape it over your staircase railing or use it as a background for Christmas photo booth pictures.
Additional Ideas:
- Make Tinsel Swirls: Make the tree more playful by bending tinsel into swirly patterns to use as ornaments or solitary accents.
- Mix with natural elements: Mix the shimmer of tinsel in with natural objects like pinecones, berries, or greenery for a more rustic or forest-like garland.
Tinsel Wreath Youupcyclecycle tinsel to make a wreath: just form the tinsel into a circle and tack it in place, then attach small ornaments, berries, or bells to the wreath base.
Updating tinsel garlands is a DIY trickier than brightening the holiday home and keeping those sparklers out of landfills. Whether you want to upcycle old tinsel from holidays past or reimagine garlands of yore, a little creativity and some do-it-yourself spirit can help these decorations look fresh (and just as twinkly) once again.
You May Also Like:
FAQ
1. What are the inexpensive ideas for Christmas decorations?
A. Certain ideas of low-cost Christmas decorations are DIY paper snowflakes, DIY mason jar lanterns, homemade pinecone ornaments, and repurposed tinsel garlands. It can also make you make festive decorations without spending a lot by repurposing old items such as sweaters, ornaments, and items found in thrift stores.
2. What is the best way to celebrate Christmas on a low budget?
A. Decoration on a limited budget can be based on DIY projects with the cheapest materials, such as paper, twine, and scraps of fabric. Dollar stores and thrift stores are excellent in terms of cheap decorations. It is also possible to reuse old ornaments, wreaths, or even clothing and make your own unique and personal decorations.
3. Would I be able to create my personal Christmas decorations?
A. Yes! Most of the simplest DIY ornament projects include salt dough ornaments, cinnamon stick ornaments, and homemade pinecone ornaments. These are easy to create and can be customized, so they will be ideal for an inexpensive Christmas.
4. What can I do to save money on the decorations of my Christmas tree?
A. To keep decorations of Christmas trees less expensive, try to make homemade ornaments, such as chains of paper, salt doork, or upcycling. You may also use those objects that surround you at home, like buttons, ribbon, and old jewelry, to make unusual tree decorations.
5. What can I do to keep DIY Christmas decorations longer?
To increase the life span of DIY decorations, make sure that they are well stored in a cool and dry area after the holidays. Use long-lasting materials such as tough cloth and put them into protective paints or apply a coating of varnish to enable them to retain their appearance in different seasons.
6. Do you have any eco-friendly ideas about Christmas decorations?
A. A lot of the best cheap ideas of Christmas decorating are eco-friendly, yes! Take some natural objects, such as a pinecone, dried oranges, and scraps of fabric. Waste can also be limited through the repurposing of old decorations, and disposable objects should not be used during the holidays.
7. What should I do to adorn my house without being overly expensive in terms of Christmas lights?
A. You can avoid spending a lot of money on buying light, or use the cheap lights of strings you already have, or purchase cheap battery-operated LED lights. It is also possible to create your own lighted decorations using mason jars, empty bottles, or upcycled containers.
8. Where can you find cheap Christmas decorations?
A. Thrift stores, dollar stores, and craft stores are useful in case of affordable Christmas decorations. Cheap ornaments and ribbons,bons, and other decorative elements can be found inexpensively and customized or refurbished. Seasonal sales and online marketplaces are also good places to find cheap stuff.
9. Is it possible to make my home festive without having to spend a lot of money?
A. Absolutely! Even basic activities such as making paper snowflakes, using recycled materials to make garlands, and using cinnamon sticks or pinecones to add a festive smell to your home do not cost much but will help make your home a warm and cozy place during the holidays. Be sparse and meaningful in your decorations and draw attention to things you make or reuse.
10. Is it possible to use blue decorations in my holiday gifts?
A. Yes! Wrap in blue wrapping paper, ribbons, and tags to achieve an integrated appearance. Another thing you can give as a present that is blue in nature, such as candles or ornaments, that fit in with your general color palette.