DIY closet ideas are an excellent means of changing your wardrobe area without making the wallets too thin. Not only are the projects cost-effective, but they also provide a creative and fun method of personalizing your closet to fit your needs and style. Here, the size of the space is irrelevant because the DIY closet projects will help you make the most of every inch and add a personal touch. Between the improved organization and decluttering for the development of an aesthetically pleasing storage space, there are many advantages to undertaking such projects. Moreover, numerous DIY closet projects are surprisingly easy to execute, which makes them the best choice for both beginners and advanced DIYers.
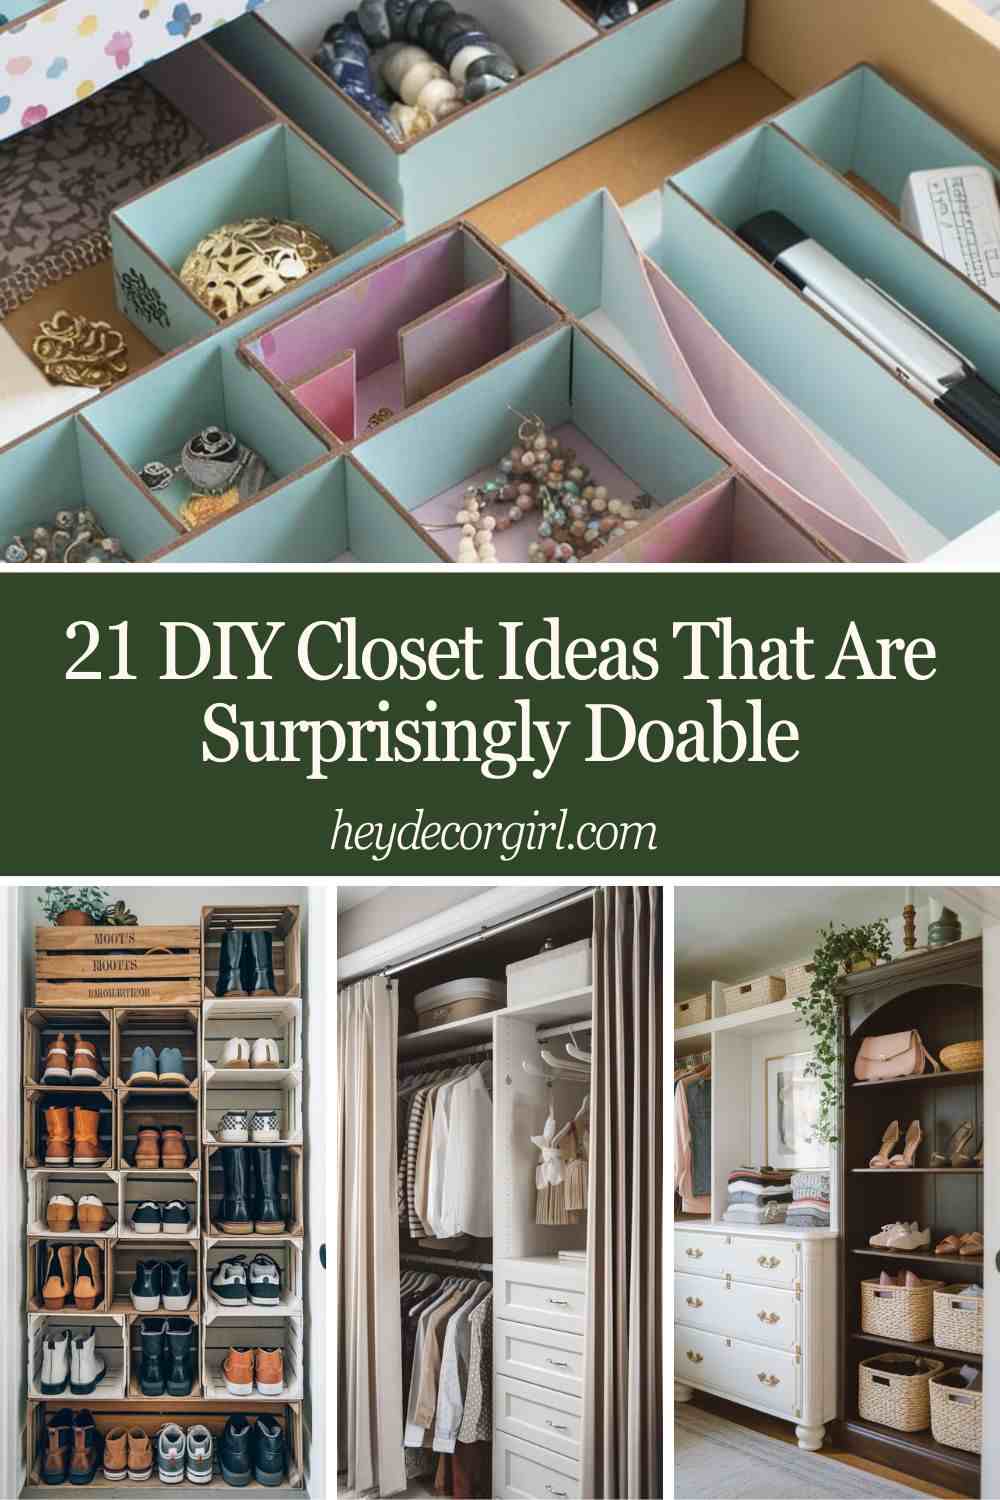
Best DIY Closet Ideas That Are Surprisingly Doable
1. Repurpose Old Furniture Into Closet Storage
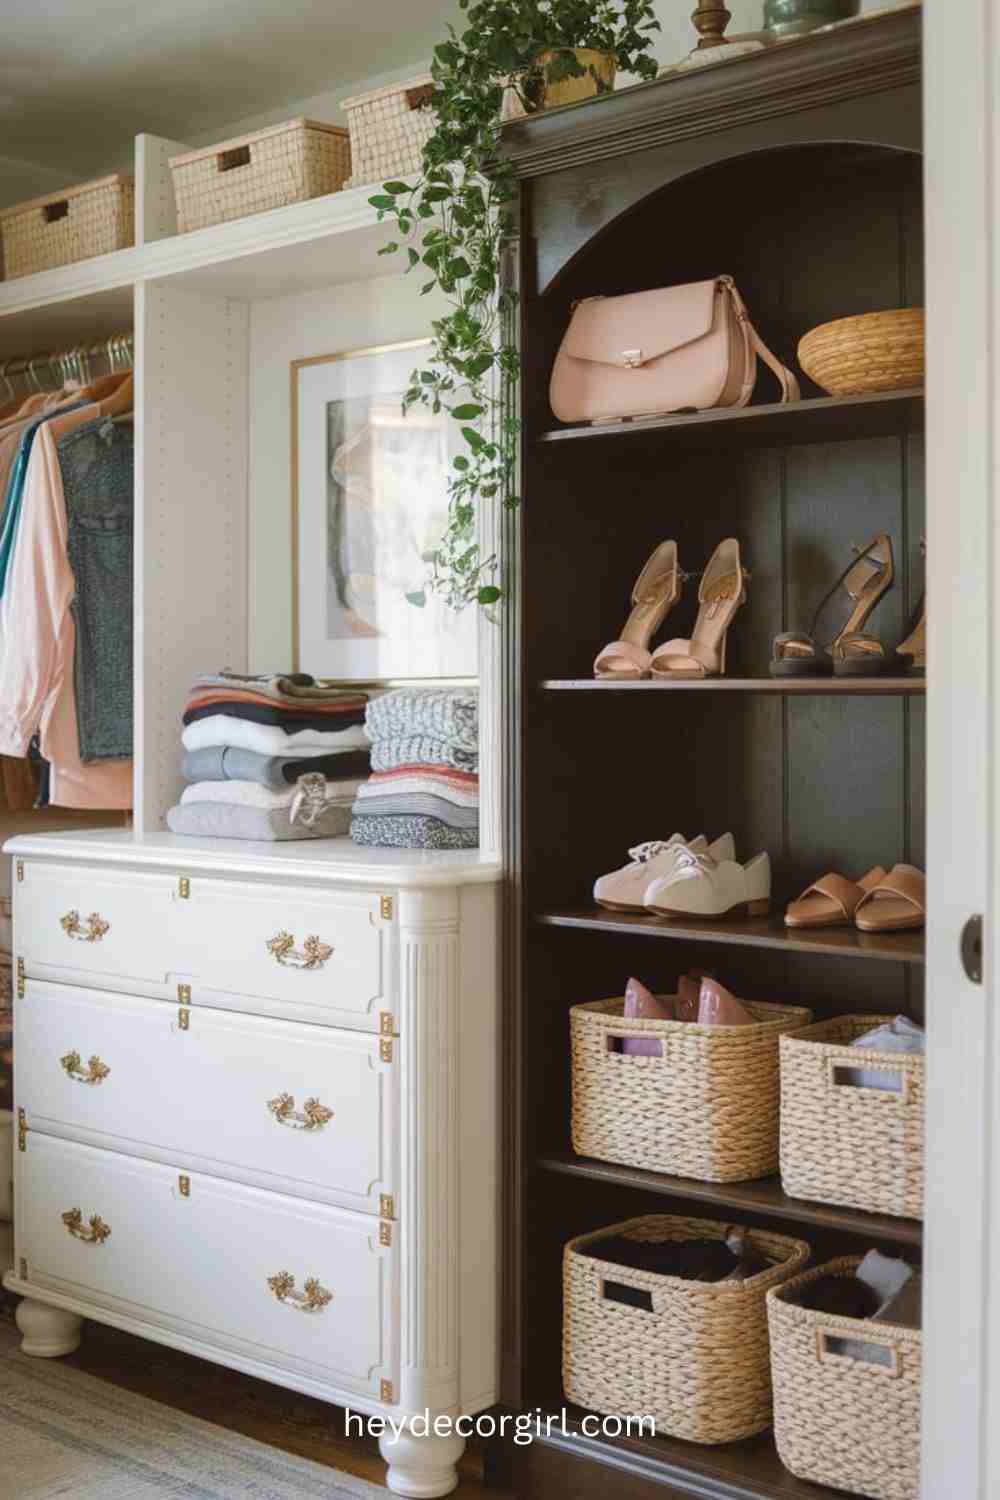
Among the most ingenious DIY closet solutions is converting the old furniture, dressers, or bookshelves, into useful closet storage. A dresser that has grown old can be refinished or even painted to suit your clothes closet style, and the drawers can be used to store folded clothes, shoes, or accessories. Another flexible solution is bookshelves; their open shelves would be ideal to put shoes, bags, or baskets in smaller sizes. This will save money as well as provide a personalized touch to your closet, and also help you save money through the upcycling of used furniture.
2. DIY Open Wardrobe With Pipe Shelving
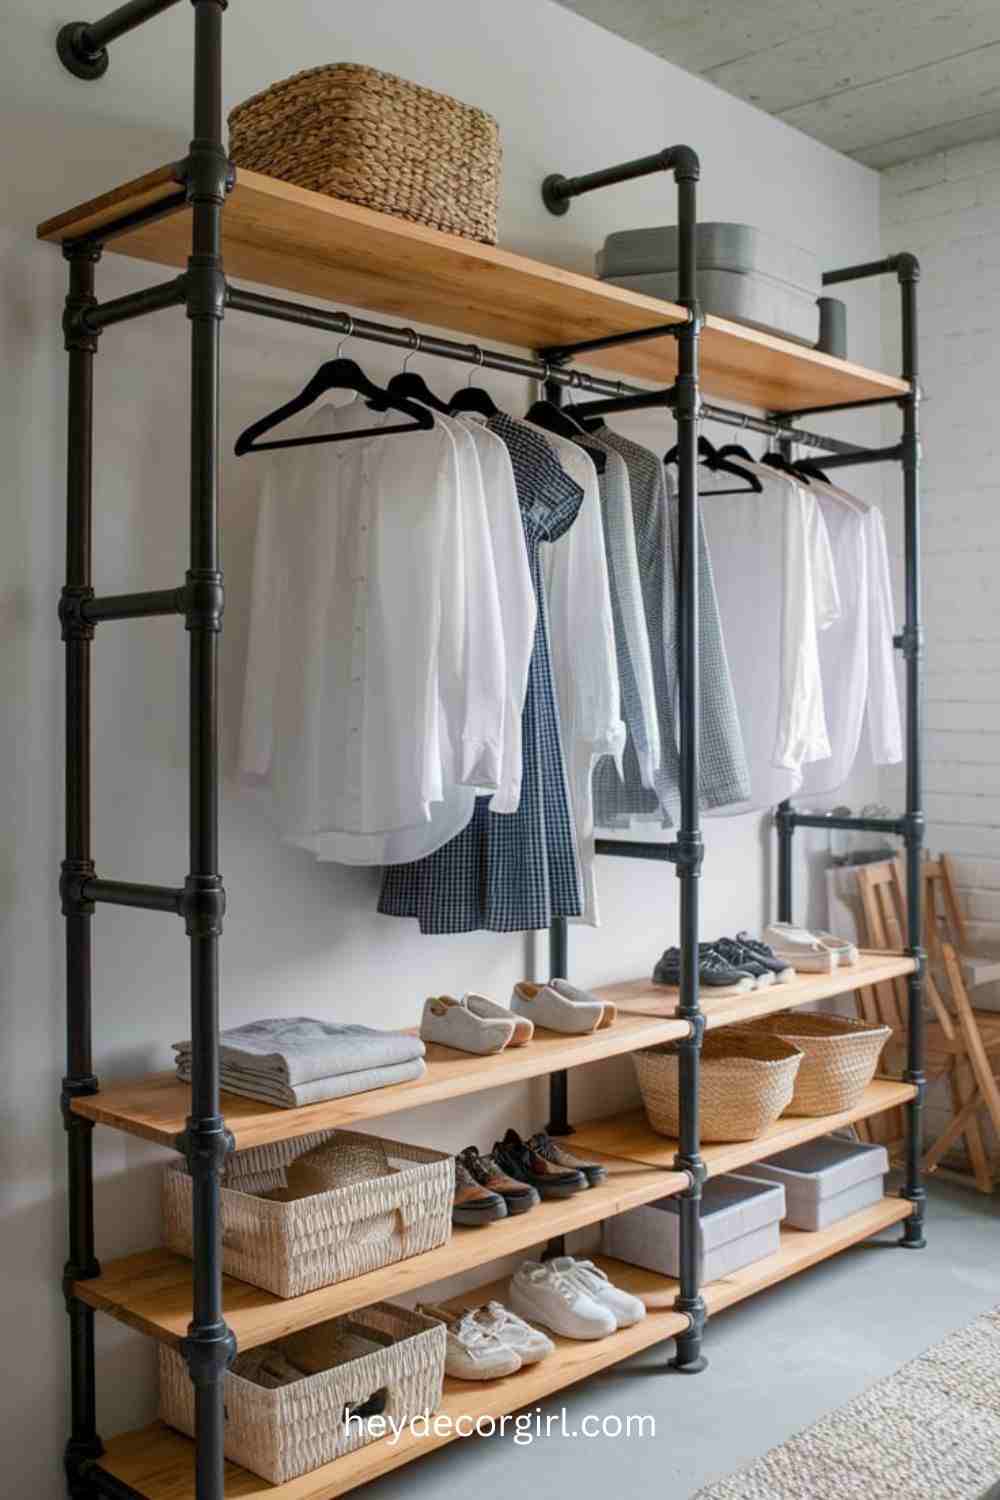
A simple but classy project to do is to construct your own open wardrobe using pipe shelving to bring some industrial flair to your own space and keep your clothes organized. Here’s how to do it:
- Prepare Materials: You will need metal pipes (galvanized or black to have a modern, industrial appearance), pipe flanges, wood planks (cut them to whatever size you need for shelves), screws, and wall anchors.
- Install the Pipe Structure: This begins by fixing the flanges to the wall on which you wish to place the wardrobe. Fix the pipes to the flanges vertically so as to form the framework of the wardrobe. You can just raise or lower the height, according to whether you are making shelves of folded clothing or garment hanging rods.
- Install Shelves and Rods: In the case of the shelves, lay wooden planks on the pipes lying horizontally, and attach them to the pipes so that they remain in position. The wood can be sanded and stained to gain a finished appearance. To use hanging space, all you need is to add horizontal pipes across the width of the wardrobe to get clothing rods.
- Final Decorations: When the pipes and shelves are installed, the unused area can be used to hang clothes, to pile shoes, or to place baskets to store accessories. The open system gives the appearance of a useful but appealing wardrobe that can be easily used in a limited space or in a sparse, isolated space.
Not only can this DIY open wardrobe be customized to your requirements, but it also brings a nice, industrial touch to your room.
3. Create a Closet With Floating Shelves
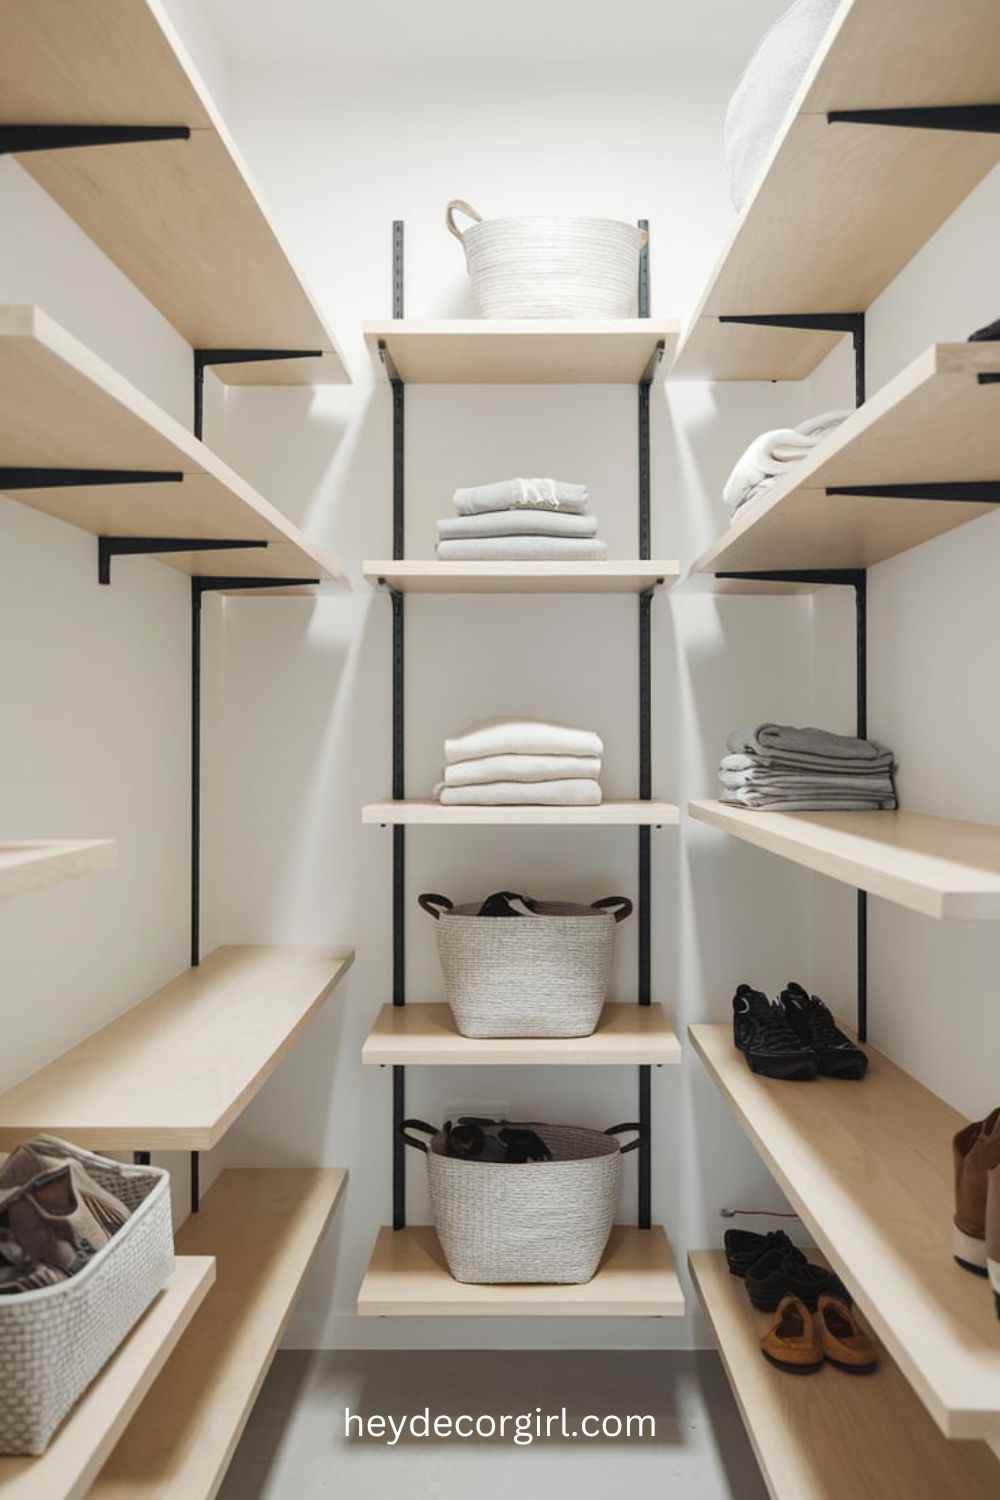
Floating shelves are a very effective but easy-to-install DIY closet project that provides a minimalistic, space-efficient storage option. Below is the way to make a closet with floating shelves:
- Select Your Shelves: Select heavy floating shelves that will be able to hold the weight of your clothes, shoes, and accessories. Shelves made of wood or laminate are good and can be made to your choice of color or finish.
- Measure and Plan: Measure the area in which you want to place the shelves. Create a spacing between one shelf to another, depending on what you want to place there. As an example, when you are storing folded clothes or bins, you should separate the shelves even more.
- Install the Shelves: Check the wall where you would like to install the shelves using a level. Fix them using wall anchors and wall brackets to enable them to support the weight. Put them in so that they look smooth and symmetrical.
- Arrange Your Closet: After placing the shelves, arrange your home furnishings by storing folded clothes, shoes, and decorative baskets on respective shelves. To make it look clean, store accessories such as scarves and jewels in smaller containers.
It is an example of a floating shelf that provides a simple and aesthetically pleasing method to build a functional closet that does not require a lot of space like traditional furniture, which is why this style is the best solution for a small space or those who want a more sleek and modern design.
4. Turn an Empty Nook Into a Built-In Closet
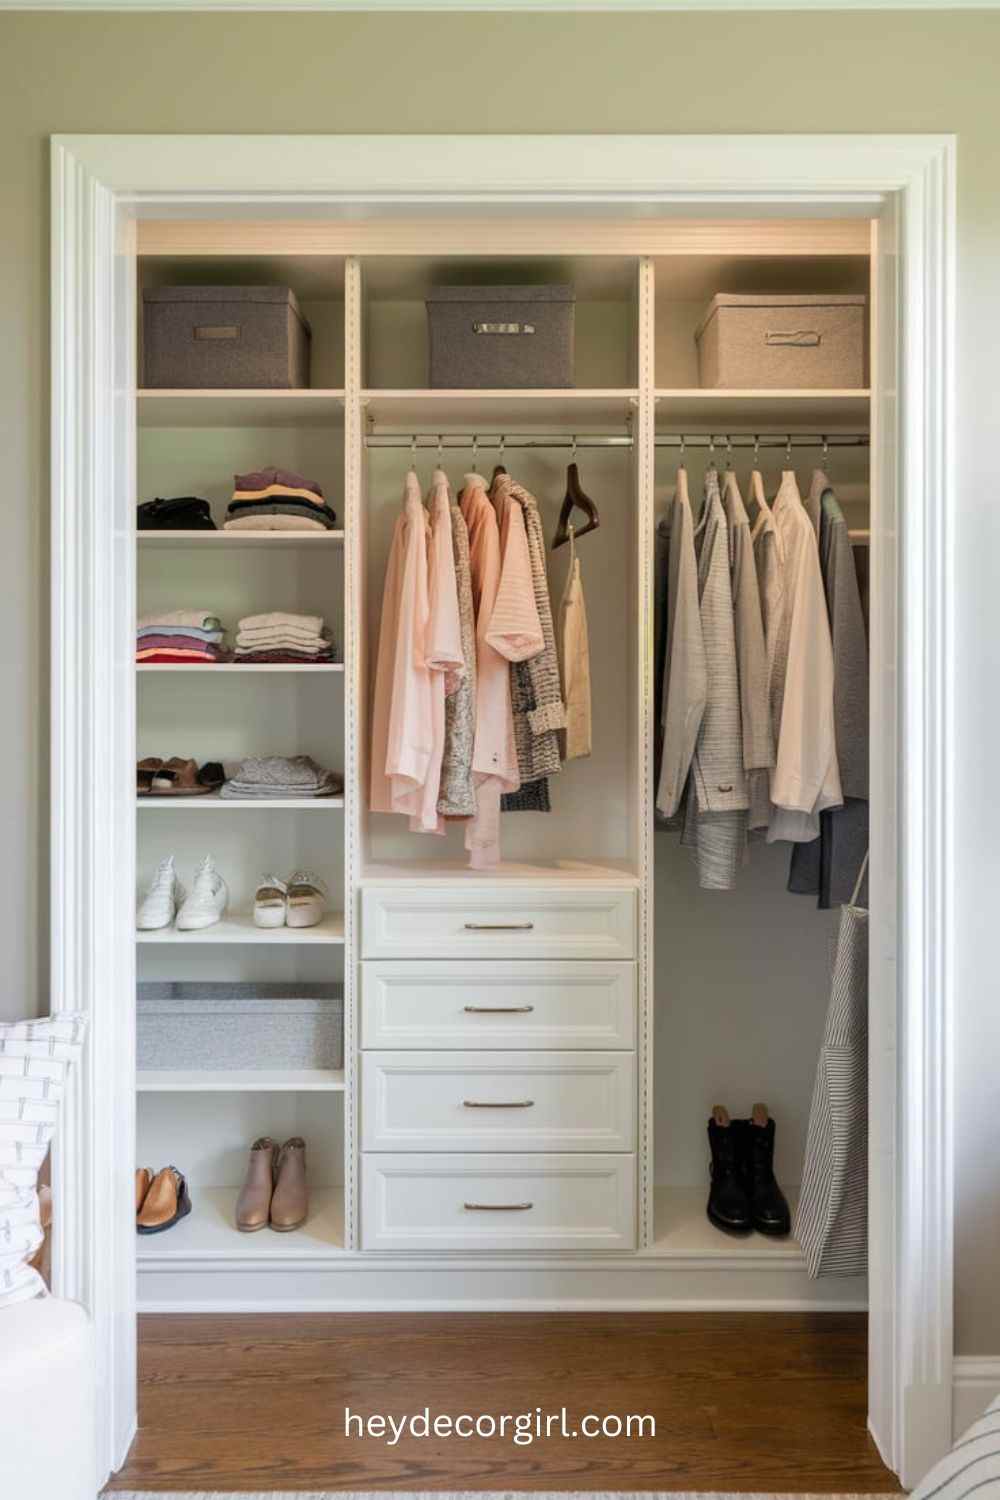
Converting a nook or an alcove that is not used to a built-in closet is an excellent method of maximising space and providing more storage. Here’s how to do it:
- Evaluate the Space: Measure the size of the nook or the alcove to find out the spare space. The depth and the width should be considered to make decisions about the size and the layout of your built-in closet.
- Design Your Closet: Design the layout of your built-in closet, including shelves, hanging rods, and any other details such as drawers or bins. Draw a plan that fits in the nook and provides the storage requirements.
- Read the Area: Clean up the crevice and make the wall smooth and flat. Patch up any holes or holes as required. You may also have to install drywall in case the nook is not enclosed.
- Install the Framework: Construct a frame for your closet with wood or metal studs. Fasten it to the wall to make it a stable structure. The shelves, rods, and other storage parts will be supported by this frame. Add Shelves and Rods: Add shelves and hanging rods depending on your design. Be sure the shelves are fastened with brackets or shelf support, and make sure that the hanging rods are level and anchored.
- Finalize and Decorate: Paint or decorate the built-in closet to suit your room decoration. To keep it all in order, add organizational items such as bins, baskets, and hangers.
It is a transformation and does not just put to waste a wasted space, but also gives your house a personal touch, both functional and beautiful.
5. Customizable Pegboard Closet Organizer
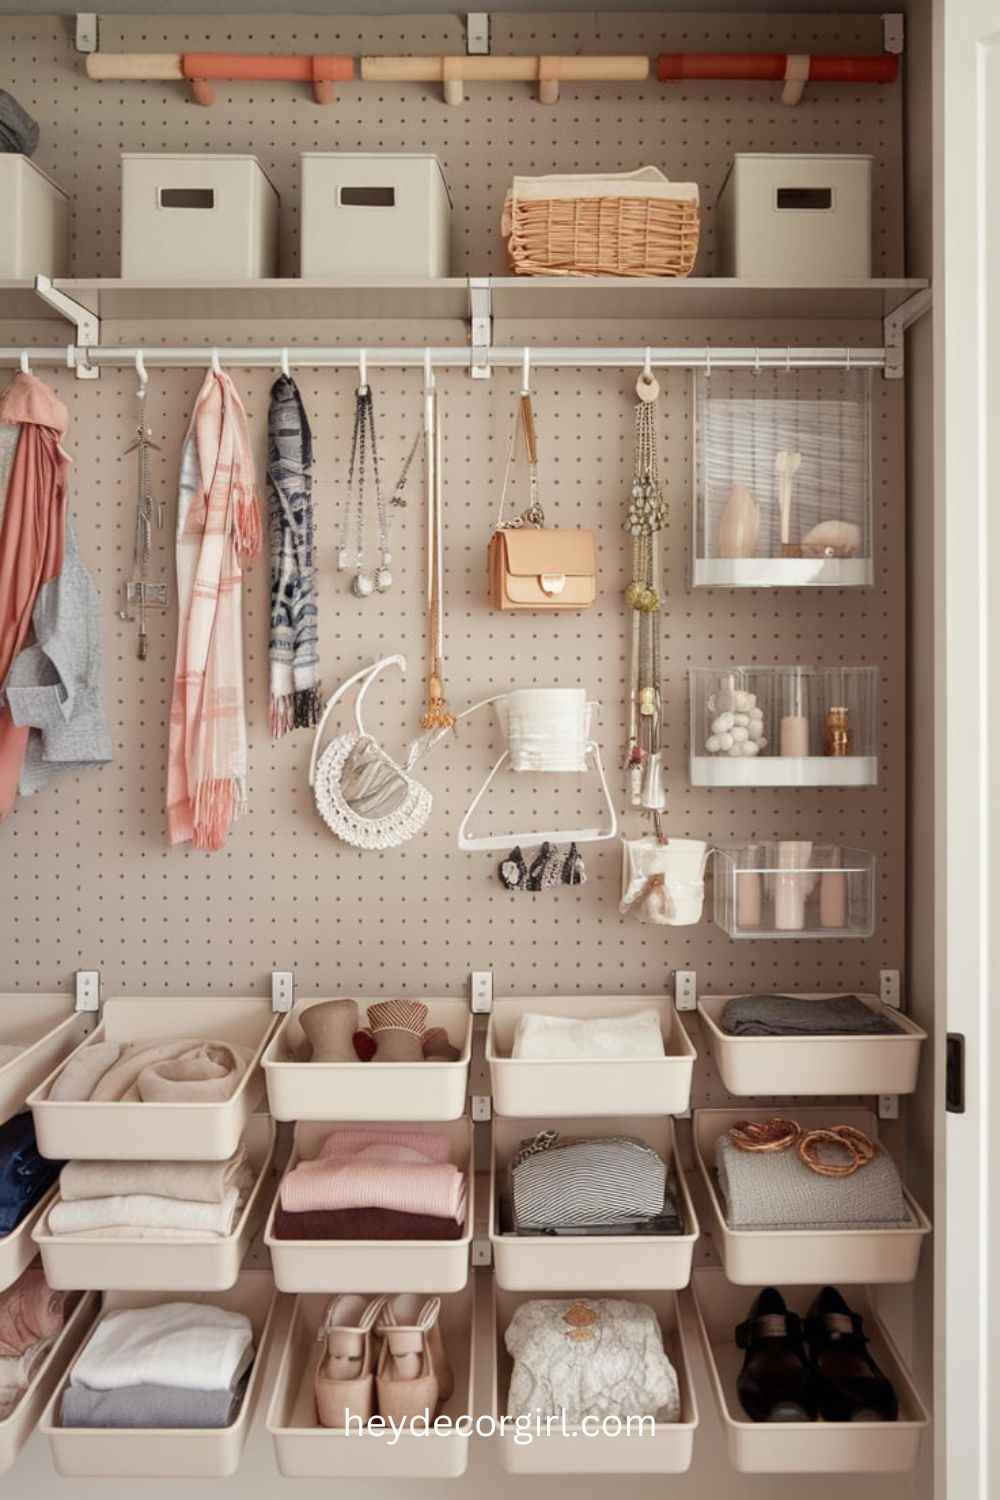
A pegboard closet organizer is a highly adaptable and versatile DIY product to use in storing accessories and small pieces of clothing. Here’s how to create one:
- Choose Your Pegboard: Choose a pegboard that can fit in your closet. Pegboards exist in many different sizes and materials, including metal or wood, and therefore, you should choose the pegboard that fits your style and purposes.
- Read the Space: Wipe down and measure the wall of the place you are going to install the pegboard. Make sure that the surface is spread out, without obstructions. Depending on the unevenness of the wall or when you want to mount the pegboard on drywall, you may need to add a backer board.
- Fit the Pegboard: Attach the pegboard to the wall with either the wall anchors or screws, depending on how heavy the objects you will be hanging are. Ensure that it is flat and firmly fastened.
- Add Pegboard Accessories: Add hooks, shelves, baskets, etc. to the pegboard. Everything can be stored in these accessories, such as jewelry and scarves, small bags, and folded clothes. Make sure you lay them in a manner that makes the most use of the space, and everything is in reach.
- Arrange Your Things: Hang and organize your accessories and small clothes on the pegboard. Smaller items are to be stored in bins or other containers to make everything orderly. The pegboard is personalizable, so you can customize the pegboard by moving the accessories around whenever you feel like it fits the changing storage requirements.
The pegboard closet organizer can make your closet neater and more organized, in addition to bringing some individuality to your wardrobe through its customizable design.
6. Fabric-Covered Storage Boxes for Small Closets
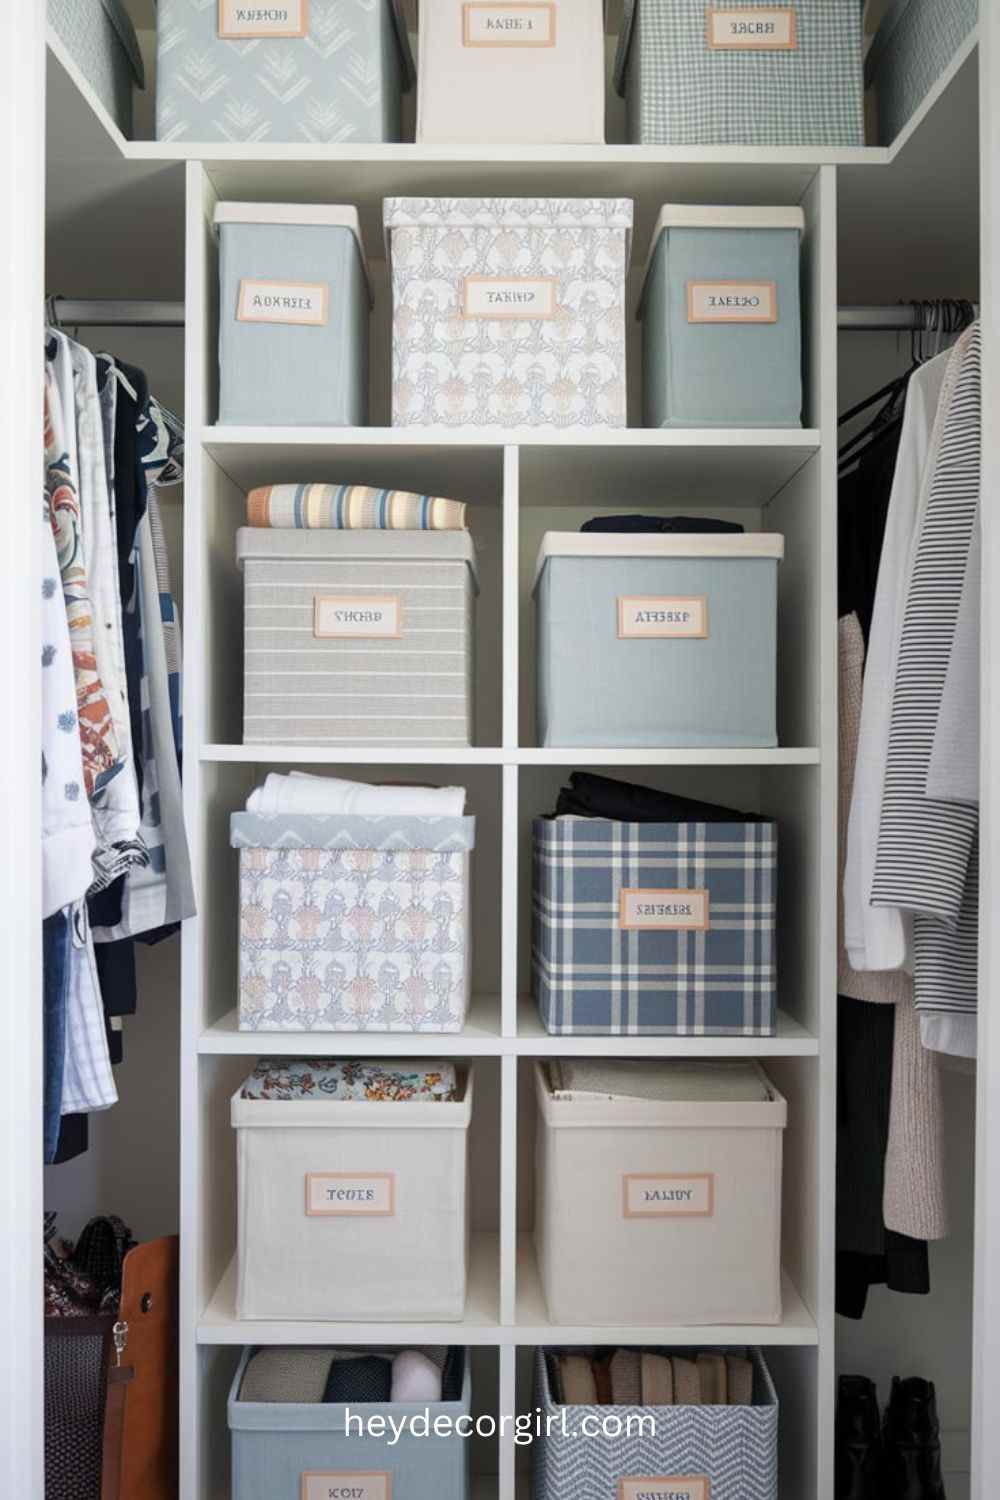
Storage boxes covered with fabric are e trendy and convenient means of utilizing the small closets. The following are instructions on how to make your own custom boxes:
- Prepare Materials: You will require cardboard boxes or storage bins, fabric (cotton or linen is good), adhesive spray/fabric glue, a ruler, scissors, and a utility knife.
- Measure and Cut: Measure the size of your boxes or bins. Trace out the fabric to the correct size with a little bit of excess material to cover the edges. To have a smooth appearance, be careful in measurements so that the fabric will fit the box completely.
- Read the Boxes: When using cardboard boxes, place some extra layers of cardboard or tape on the boxes to make them maintain their shape. In the case of plastic bins, they must be washed thoroughly and then covered.
- Apply the Fabric: Spray or stick adhesive or fabric glue on one side of the box or bin. Lay the fabric on the adhesive B, being careful not to leave any wrinkles or bubbles. Cover it with the fabric on the edges, and fix it with the help of more glue. Cut any unnecessary material using a utility knife or a pair of scissors to give it a clean cut.
- Finish and Organize: When the glue has completely dried, use the boxes. When dry, get your fabric-covered boxes into the closet, labeling them, as you wish. Keep them where you store clothing or accessories, or other small items, and get the most out of your closet area, and have some decorative flair.
Storage boxes covered with fabric will not only beautify your closet but will also give you a practical way of storing all the stuff and making it readily available when needed.
7. DIY Shoe Rack With Wooden Crates
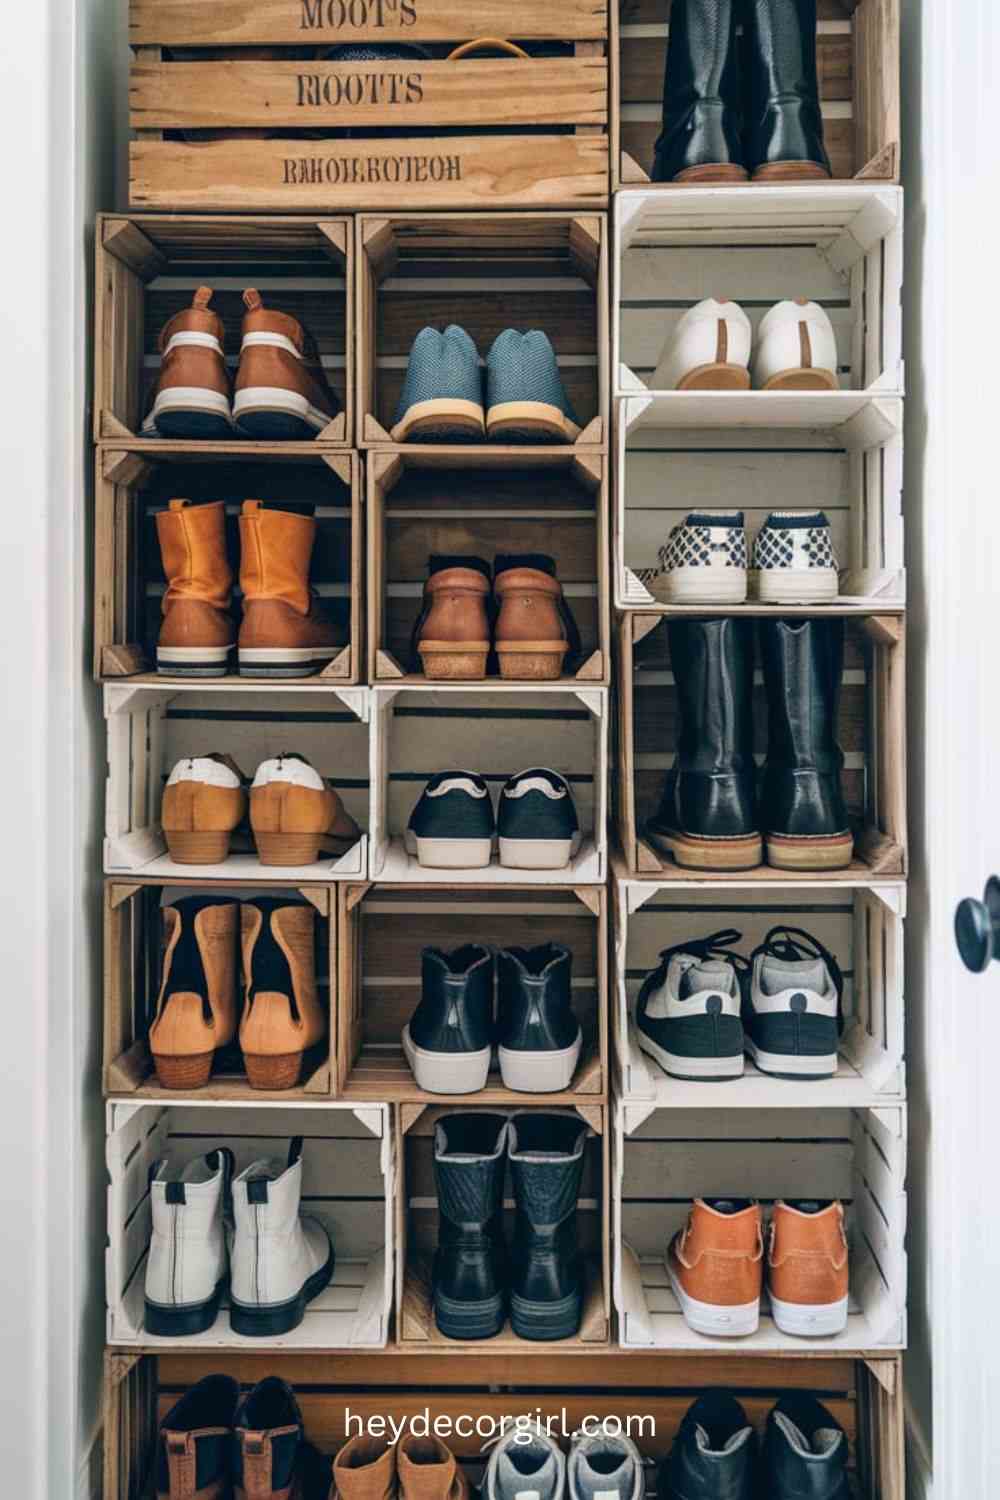
The wooden crates make up a shoe rack, which is a DIY project that is both rustic and functional. To put one together, follow these directions:
- Prepare Materials: You will also need wooden crates (you can obtain these at craft shops or online), screws, a screwdriver/drill, and some wood stain or paint to finish the crates (which is optional). Optional: ornamental hardware or labels.
- Prepare the Crates: The wooden crates should be sanded to put in a smooth finish, and all the splinters out of them. You can stain or paint the crates to fit your decor, in case you want. Then leave them to dry thoroughly and assemble.
- Lay out the Crates: Determine how your shoe rack should look. The crates can be stacked on top of each other or placed side by side, just like the space you have, as well as the number of crates you possess. Make sure the setup gives your shoes sufficient height and depth.
- Put the Rack: When stacking vertically, add screws that hold the crates in place. You put the drilling pilot holes to make sure the wood does not split, and screw the crates together at the corners. In horizontal arrangements, you might have to fix the crates to the wall or to each other to make them stable.
- Finally, Decorations: (Optional): Place or add ornamental fittings or labels on the crates to make them unique. You may also think of putting felt pads on the crate’s floor to cushion your floor.
- Put Your Shoes in the Boxes: Put your shoes in the boxes, categorizing them by type or season, so that they can be easily accessed. The crates are open-design, and it is easy to see and access your shoes as well as provide a rustic and handmade approach to your space.
This homemade shoe rack made of wooden crates is not only a convenient way of organising your shoes, but also a stylish and rustic look to your entryway, bedroom, or closet.
8. Closet Makeover With Curtain Rods
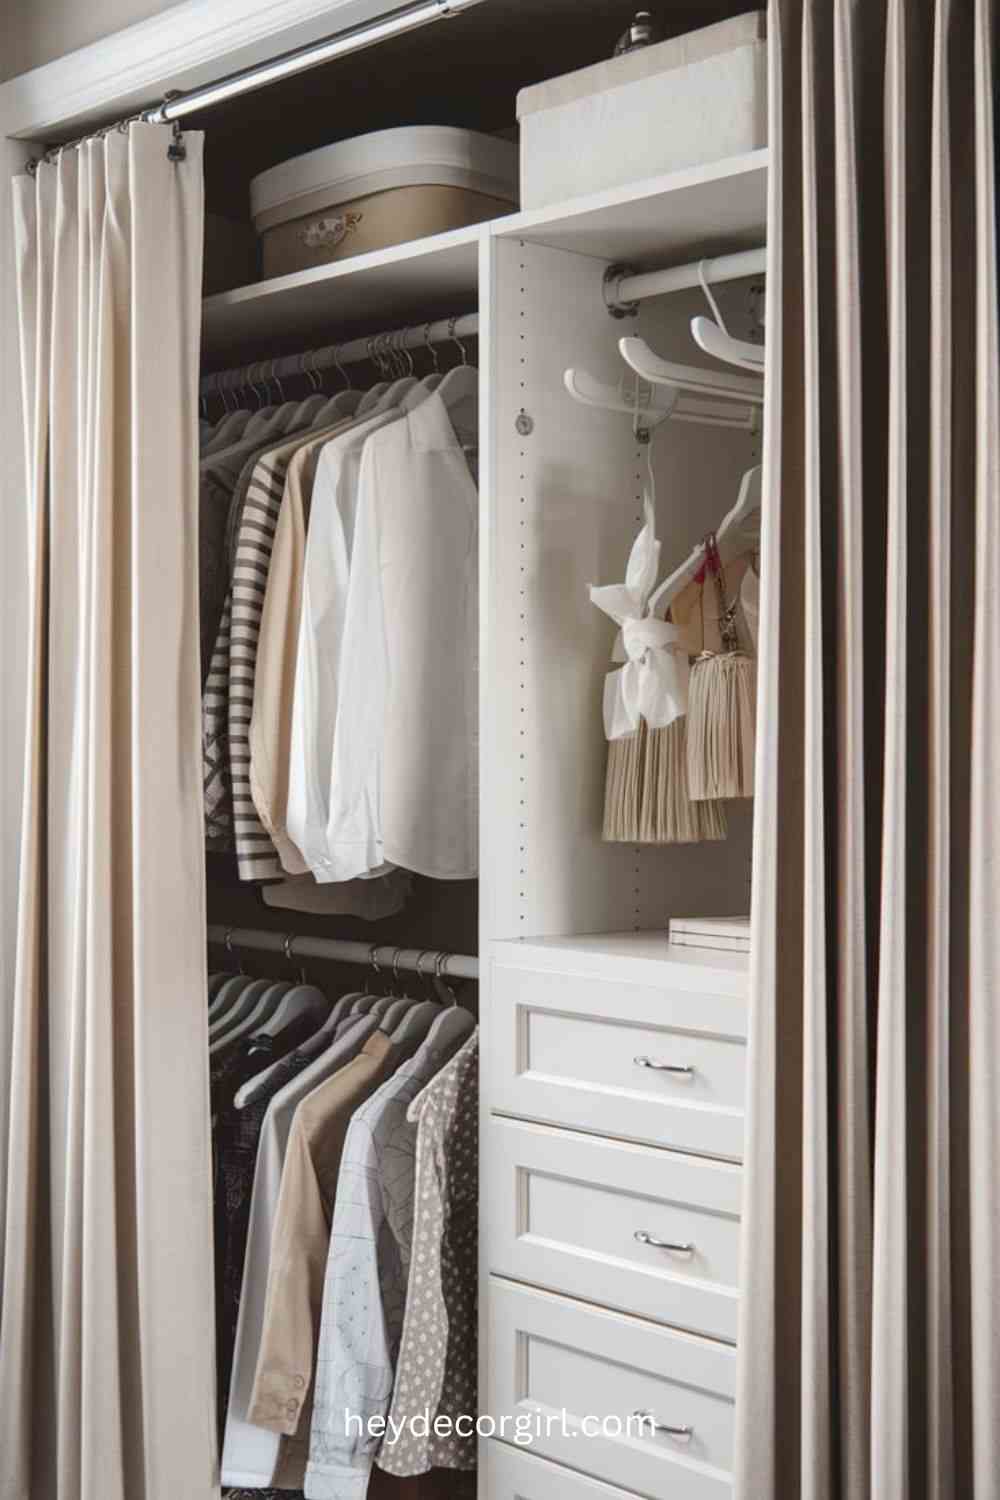
Curtain rod conversion of your closet is a simple and inexpensive means of improving your storage space. Here’s how to do it:
- Assemble Materials: You will need tension rods or curtain rods, curtain panels (select fabric that matches your room), and curtain rings in the event you are using standard rods. Optional: adhesive hooks or brackets to give the device more stability.
- Plan Your Layout: Determine the positions where you are going to install the curtain rods. You can use them to divide parts of the closet, like a hanging place to place clothes, or use them to cover open shelves. Measure the width and height so that the rods can fit.
- Install your Rods: In the case of tension rods, you need only adjust the length and then fit them between the walls or inside the closet to the desired height. In case of curtain rods, make sure that they have adhesive hooks or brackets and that they are not slanted or not well attached.
- Hang the Curtains: Fasten the pieces of the curtain to the rods. In case they are using tension rods, the curtains must move freely along the rod. In the case of normal rods, the panels can be hung with curtain rings. Select the style of curtains to match your room, including blackout curtains to keep your room private or lightweight fabric to create a light look.
- Arrange Your Closet: Once the curtain rods and panels have been installed, arrange your closet by dividing it into the new sections of various kinds of clothes, accessories, or storage bins. Clutter may be concealed by drawing the curtains, or it may be given a clean-cut appearance.
This is a curtain rod makeover of the closet that adds some functionality as well as a bit of style and offers a flexible and attractive, easy-to-install, and inexpensive storage option.
9. Create a Custom Closet Door With Mirrors

One of the best things you can do to improve the appearance and functionality of your closet is to add mirrors to the closet doors. There are mirrors in a custom closet door as follows:
- Prepare Materials: You will require mirrors (either mirror tiles or one large mirror cut to size), glue adhesive or mirror mounting fastening tape, utility knife or glass cutter (to trim mirrors), a measuring tape, and a clean cloth.
- Measure and Cut: Measure the size of your closet doors and mirrors to fit. When you are working with big mirrors, you may have to cut them. Much safer to get mirrors cut at a glass shop and have them cut with a lot of care.
- Ready the Doors: Clean the doors of the closet to get all the dust and debris out of it. Before any adhesive is applied, make sure that the doors are dry.
- Attach Adhesive: When using mirror tiles, glue to the back with adhesive glue or mirror tiling tape. When a big mirror is used, then a back adhesive can be applied, or mounting clips can be used, which have been made to fit in the back of the mirror.
- Install the MirrorsThehe mirrors mustbe installedd on the closet doors, but always on one end and then move to the other. Helping the bond firmly with the press. When there are mirror tiles, make sure that you align them with no interspersions.
- Final Touches: The adhesive should be left to dry as per the directions of the manufacturer. Wipe the mirrors with a glass cleaner to get off the fingerprints or smudges.
- Arrange Your Room: With the mirrors in place, the reflective surface will greatly increase the feeling of space in your room and offer you a practical full-length mirror to dress in.
Not only does this custom mirror and a closet door make your closet seem bigger and modern, but it also presents a practical aspect that you can use in your daily life.
10. DIY Drawer Organizers Using Cardboard
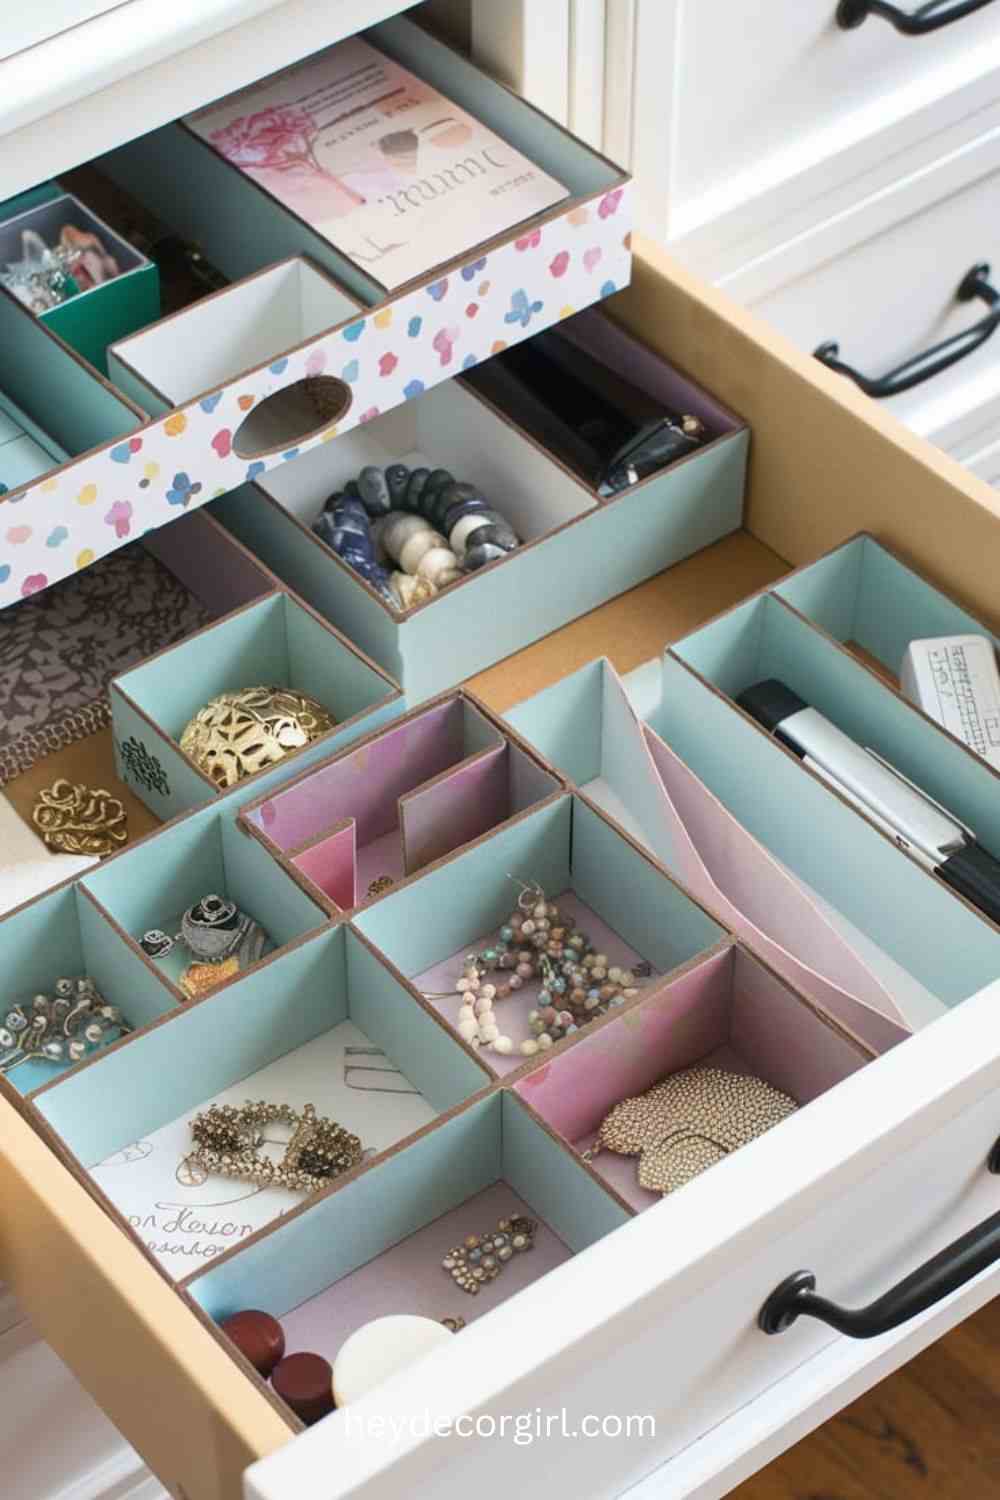
It is also a cheap and simple process to make your own, cardboard-based, drawer organizers and keep your accessories and small items well organized. The following is a quick recipe for making your own:
- Prepare Supplies: You will require a solid cardboard (old cereal boxes and recycled are great), ruler, pencil, scissors or utility knife, and glue or adhesive tape. Optional: paper or fabric to finish it decoratively.
- Measure and Cut: Measure the size of each of your drawers so that you can know the size of your organizers. Draw up the dimensions on the cardboard with the ruler and pencil. Cut cardboard into strips to form the sides and bottom of the dividers.
- Prepare the Dividers: Prepare an undercarriage for each divider by cutting a piece of cardboard to the shape of the bottom of the drawer. In the case of sides, cut strips of extra height for the drawer. Connect the divider by bonding the side strips to the base by the use of adhesive tape or glue. Using dividers, form a grid to form compartments for various items.
- Install the Organizers: Put the complete dividers in the drawer. Change the layout to suit your storage requirements. To make them look more presentable, you could wrap the cardboard in decorative paper or cloth first, and then put them in the drawer.
- Arrange Your Drawer: Fill in the new separators with accessories, office supplies, or little clothes. The compartments will aid in keeping everything where it belongs and ease the locating of what you require.
This is not only a DIY project since it assists in maintaining an organized drawer (not to mention that you are able to tailor the compartments to your needs and requirements), but it is also inexpensive and easy to execute.
FAQ
Q: What are some of the DIY closet ideas that are easy to follow?
A: DIY closet ideas that are friendly to beginners are putting tension rods in for an additional hanging rack, using adjustable shelving systems, or attaching stick-on hooks to accessories. The latter projects need very few tools and can be completed in a couple of hours.
Q: What can I do to make a small closet as large as possible?
A: To make the most out of a tiny closet, consider implementing vertical organization means, such as hanging items, adding shelf dividers to create independent spaces, and installing pull-out drawers/bins to keep the items organized.
Q: What will I need for most DIY closet projects?
A: Shelving, brackets, tension rods, closet rods, hooks, adhesive organizers ,and storage baskets are typical examples of such materials. Basic equipment (such as a drill, level, measuring ta, p, and screwdriver) may also be required.
Q: Is it possible to assemble a closet organizer myself, without the help of power tools?
A: Yes, there are a few closet organizer projects that do not need power tools. Modular shelving units, sstick-ohooksor adjustable hanging rthathich simply clip or stick into place can be used.
Q: What do I use to add lighting to my homemade closet?
A: You can easily light up your closet using battery-powered LED lights, strip lighting, which can be stuck inin placesor using motion-sensor lights. These solutions need not be wired and can be fitted in a matter of minutes.
Q: What DIY ideas can be used to organize shoes in my closet?
A: Think of using the over-the-door shoe racks, stackable shoe bins, or putting a low shelf or cubbies in the bottom of your closet to store shoes off the floor and in order.
Q: What can I do to make my self-made closet more fashionable?
A: To add aesthetics, you can use matching hangers, decorative storage boxes or baskets, peel-and-stick wallpaper on the back wall, or have a statement light.
Q: What is the approximate time of DIY closet projects?
A: The majority of DIY projects with a closet can be accomplished in a few hours or even a weekend. Other simpler pprojectsts such as adding hooks or shelves, may take an hour, whereas other projects, like a custom shelcreationreate may require more time.
Q: Do we have the possibility of the reuse of things in my DIY closet?
A: Absolutely! Use old bookshelves, baskets, or wooden crates to make them into special storage bins. These DIY Closet Ideas can be personalizedd and the project is budget-friendly.
Q: What can I do to increase the amount of space in my closet?
A: You can put a second hanging rod beneath the rod, tension rods where space is not used, or hang one or a few hooks for bags, scarves, or belts to create room on the rod to add clothes. These are fabulous DIY ideas for a closet that will assist in maximizing the functionality and organization of your closet.